Bugs found in Employee Timesheets Scheduling for iOS


Employee Timesheets Scheduling is a comprehensive app designed for small business owners to manage employee scheduling and time tracking effortlessly.
With this app, users can efficiently create and update shifts, simplify timesheet management, and ensure accurate payroll processing across various industries such as hospitality, retail, and construction.
Our QA team has completed thorough testing of the app to assist the Employee Timesheets Scheduling team in reaching their target audience. We’re excited to present our findings!
Login screen appears despite user already logged in
Severity:
Critical
Precondition:
Register two email addresses.
Steps to Reproduce:
- Open the app for the first time.
- Click on the “Sign up” button.
- Enter the first email and password.
- Click on the “Sign up” button.
- Enter the business name.
- Click on the “Next” button.
- Select the industry and number of employees from the drop-down lists.
- Click on the “Next” button.
- Go to the first mailbox.
- Open the email.
- Click on the “Yes, it’s me – let’s get started” button.
- Open the app.
- Click on the close (cross) button.
- Click on the “People” button.
- Click on the “Add employee” button.
- Fill in the fields: “First name,” “Last Name,” and “Email address” (second email).
- Click on the “Next” button.
- Click on the “Next” button.
- Fill in the field: “Pay rate.”
- Click on the “Complete” button.
- Go to the second mailbox.
- Open the email.
- Click on the “Set up your employee app” button.
- Fill in the fields: “Password” and “Confirm password.”
- Click on the “Confirm” button.
- Open the app.
- Click on the “Settings” button.
- Click on the profile button.
- Click on the “Sign out” button.
- Fill in the fields: “Email address” (second email) and “Password” (valid password).
- Click on the “Log in” button.
- Click on the close (cross) button.
- Click on the “Settings” button.
Environment:
iPhone 11, iOS Version 18.0
Actual Result:
The login screen is displayed for the logged-in user.
Expected Result:
The login screen should not be displayed for the logged-in user.
Employee menu displayed incorrectly for employer account
Severity:
Critical
Precondition:
Register two email addresses.
Steps to Reproduce:
- Open the app for the first time.
- Click on the “Sign up” button.
- Enter the first email and password.
- Click on the “Sign up” button.
- Enter the business name.
- Click on the “Next” button.
- Select the industry and number of employees from the drop-down lists.
- Click on the “Next” button.
- Go to the first mailbox.
- Open the email.
- Click on the “Yes, it’s me – let’s get started” button.
- Open the app.
- Click on the close (cross) button.
- Click on the “People” button.
- Click on the “Add employee” button.
- Fill in the fields: “First name,” “Last Name,” and “Email address” (second email).
- Click on the “Next” button.
- Click on the “Next” button.
- Fill in the field: “Pay rate.”
- Click on the “Complete” button.
- Go to the second mailbox.
- Open the email.
- Click on the “Set up your employee app” button.
- Fill in the fields: “Password” and “Confirm password.”
- Click on the “Confirm” button.
- Open the app.
- Click on the “Settings” button.
- Click on the profile button.
- Click on the “Sign out” button.
- Fill in the fields: “Email address” (second email) and “Password” (valid password).
- Click on the “Log in” button.
- Click on the close (cross) button.
- Click on the “Settings” button.
- Click on the profile button.
- Click on the “Sign out” button.
- Click on the “Sign in” button.
- Fill in the fields: “Email address” (first email) and “Password” (valid password).
- Click on the “Log in” button.
- Click on the “Clock” button.
- Click on the “Roster” button.
Environment:
iPhone 11, iOS Version 18.0
Actual Result:
The employee menu is displayed for the employer account.
Expected Result:
The employer menu should be displayed for the employer account.
Unable to initiate time tracking
Severity:
Critical
Precondition:
- Register an employer account.
- Create an employee account from the employer account.
- Log in to the employee account.
Steps to Reproduce:
Click on the “Clock” button.
Environment:
iPhone 11, iOS Version 18.0
Actual Result:
The user is unable to start time tracking.
Expected Result:
It should be possible to start time tracking.
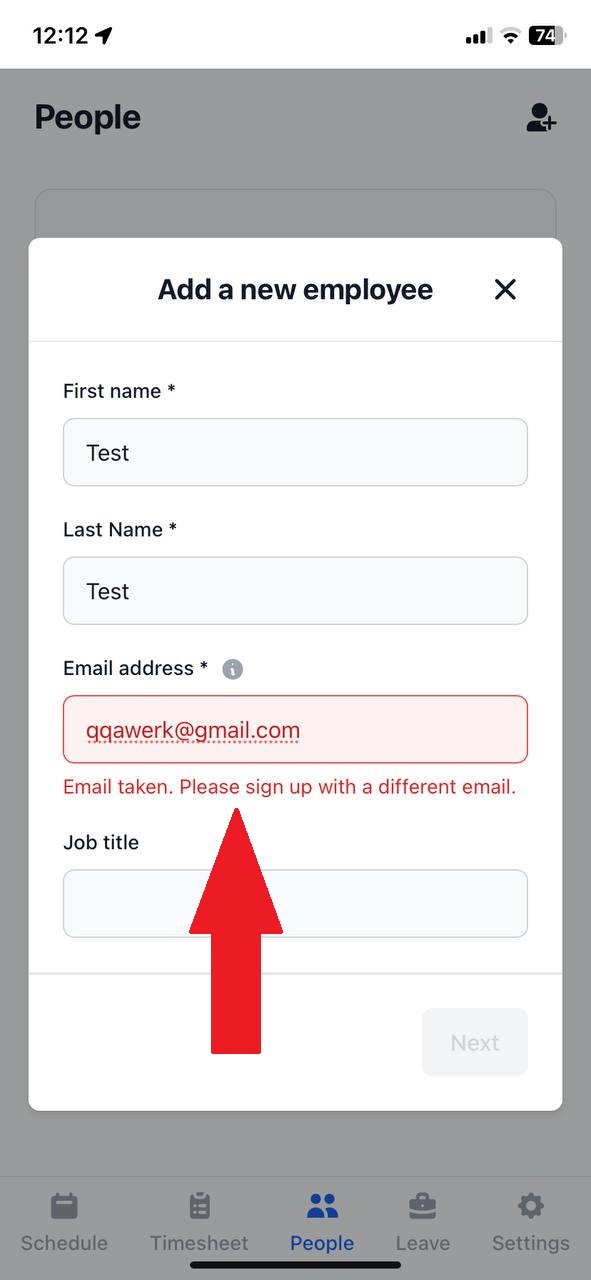
Duplicate employee addition restriction
Severity:
Critical
Precondition:
Register three email mailboxes.
Steps to Reproduce:
- Open the app for the first time.
- Click on the “Sign up” button.
- Enter the first email and password.
- Click on the “Sign up” button.
- Enter the business name.
- Click on the “Next” button.
- Select the industry and the number of employees from the drop-down lists.
- Click on the “Next” button.
- Go to the first mailbox.
- Open the email.
- Click on the “Yes, it’s me – let’s get started” button.
- Open the app.
- Click on the cross (assuming to close a window or modal).
- Click on the “People” button.
- Click on the “Add employee” button.
- Fill in the fields: “First name”, “Last name”, “Email address” (second email).
- Click on the “Next” button.
- Click on the “Next” button again.
- Fill in the field: “Pay rate”.
- Click on the “Complete” button.
- Go to the second mailbox.
- Open the email.
- Click on the “Set up your employee app” button.
- Fill in the fields: “Password” and “Confirm password”.
- Click on the “Confirm” button.
- Open the app.
- Click on the “Settings” button.
- Click on the profile button.
- Click on the “Sign out” button.
- Click on the “Sign up” button.
- Enter the third email and password.
- Click on the “Sign up” button.
- Enter the business name.
- Click on the “Next” button.
- Select the industry and the number of employees from the drop-down lists.
- Click on the “Next” button.
- Go to the first mailbox.
- Open the email.
- Click on the “Yes, it’s me – let’s get started” button.
- Open the app.
- Click on the cross.
- Click on the “People” button.
- Click on the “Add employee” button.
- Fill in the fields: “First name”, “Last name”, and “Email address” (second email).
- Click on the “Next” button.
Environment:
iPhone 11, iOS Version 18.0
Actual Result:
Two employers cannot add the same employee.
Expected Result:
Since part-time employment is allowed, it should be possible for the same employee to work for several employers.
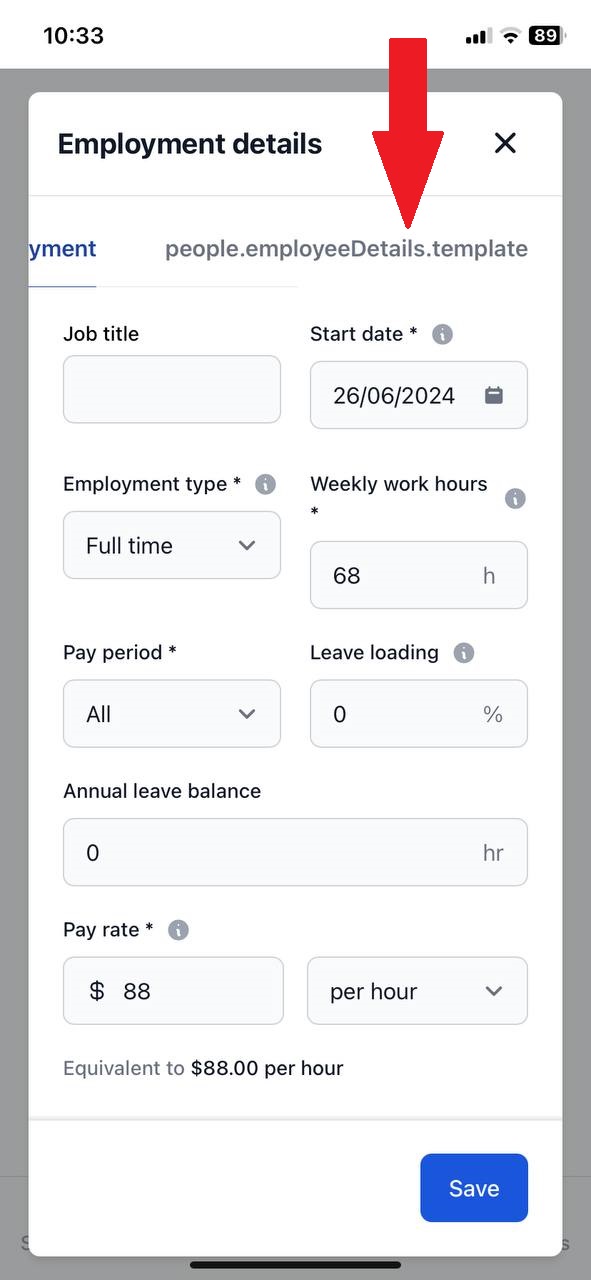
Header in popup tab shows code
Severity:
Major
Precondition:
Login to the employer account.
Steps to Reproduce:
- Click on the “People” button.
- Click on the “Add employee” button.
- Fill in the following fields: “First name”, “Last name”, and “Email address” (second email).
- Click on the “Next” button.
- Click on the “Next” button.
- Fill in the field: “Pay rate”.
- Click on the “Complete” button.
- Click on the created employee.
- Click on the edit button.
- Swipe the top popup menu to the left.
Environment:
iPhone 11, iOS Version 18.0
Actual Result:
The header in one of the popup tabs displays code.
Expected Result:
The header should not contain any code.
Changes not saving despite all mandatory fields filled
Severity:
Major
Precondition:
Login to the employer account.
Steps to Reproduce:
- Click on the “People” button.
- Click on the “Add employee” button.
- Fill in the fields: “First name”, “Last Name”, and “Email address” (second email).
- Click on the “Next” button.
- Click on the “Next” button.
- Fill in the field: “Pay rate”.
- Click on the “Complete” button.
- Click on the created employee.
- Click on the edit button.
- Scroll down the popup.
- Select any country from the Country drop-down list.
- Click on the “Save” button.
Environment:
iPhone 11, iOS Version 18.0
Actual Result:
All mandatory fields are filled in, but changes cannot be saved.
Expected Result:
If all mandatory fields are filled in, it should be possible to save the changes.
Slow page transition when clicking lower menu buttons
Severity:
Minor
Precondition:
Login to the employer account.
Steps to Reproduce:
- Click on the “Schedule” button.
- Click on the “Timesheet” button.
- Click on the “People” button.
- Click on the “Leave” button.
Environment:
iPhone 11, iOS Version 18.0
Actual Result:
When clicking on the buttons in the lower menu, the transition to another page is very slow.
Expected Result:
There should be a transition to another page; afterward, a loader should be added to the opened page until its content is fully loaded, instead of staying on the previous page.
Unable to scroll through industries list
Severity:
Minor
Steps to Reproduce:
- Open the app for the first time.
- Click on the “Sign up” button.
- Enter the first email.
- Enter the password.
- Click on the “Sign up” button.
- Enter the business name.
- Click on the “Next” button.
- Click on the Industry field.
- Scroll through the drop-down list.
Environment:
iPhone 11, iOS Version 18.0
Actual Result:
It is not possible to scroll through the list of industries.
Expected Result:
It should be possible to scroll through the list of industries.
Video opens automatically in full-screen mode
Severity:
Minor
Precondition:
Login to the employer account.
Steps to Reproduce:
- Click on the “Settings” button.
- Click on the chat button.
- Click on the “Help” button.
- Click on the “Quick Overview” button.
- Click on the “Getting started with Payroller as an employer” button.
- Click on the “Adding Employees” button.
- Click on the start video button.
Environment:
iPhone 11, iOS Version 18.0
Actual Result:
The video opens in full screen.
Expected Result:
Clicking on the play button should start playing the video on the page.
Unable to change day
Severity:
Minor
Precondition:
Login to the employer account.
Steps to Reproduce:
- Click on the “People” button.
- Click on the “Add employee” button.
- Fill in the fields: “First name”, “Last Name”, and “Email address” (second email).
- Click on the “Next” button.
- Click on the “Start date” field.
- Place the cursor at the end of the day.
- Click on the delete button.
Environment:
iPhone 11, iOS Version 18.0
Actual Result:
Only the day cannot be changed.
Expected Result:
The editing cursor should remain in the same place after clicking the delete button.
Error from first employee creation page persists on final page
Severity:
Minor
Precondition:
Login to the employer account.
Steps to Reproduce:
- Click on the “People” button.
- Click on the “Add employee” button.
- Fill in the fields: “First name” (21 characters), “Last Name” (21 characters), and “Email address” (second email).
- Click on the “Next” button.
- Click on the “Next” button.
- Fill in the field: “Pay rate”.
- Click on the “Complete” button.
Environment:
iPhone 11, iOS Version 18.0
Actual Result:
The error associated with the first page of creating an employee occurs on the last page.
Expected Result:
Validation of fields should be performed at each step.
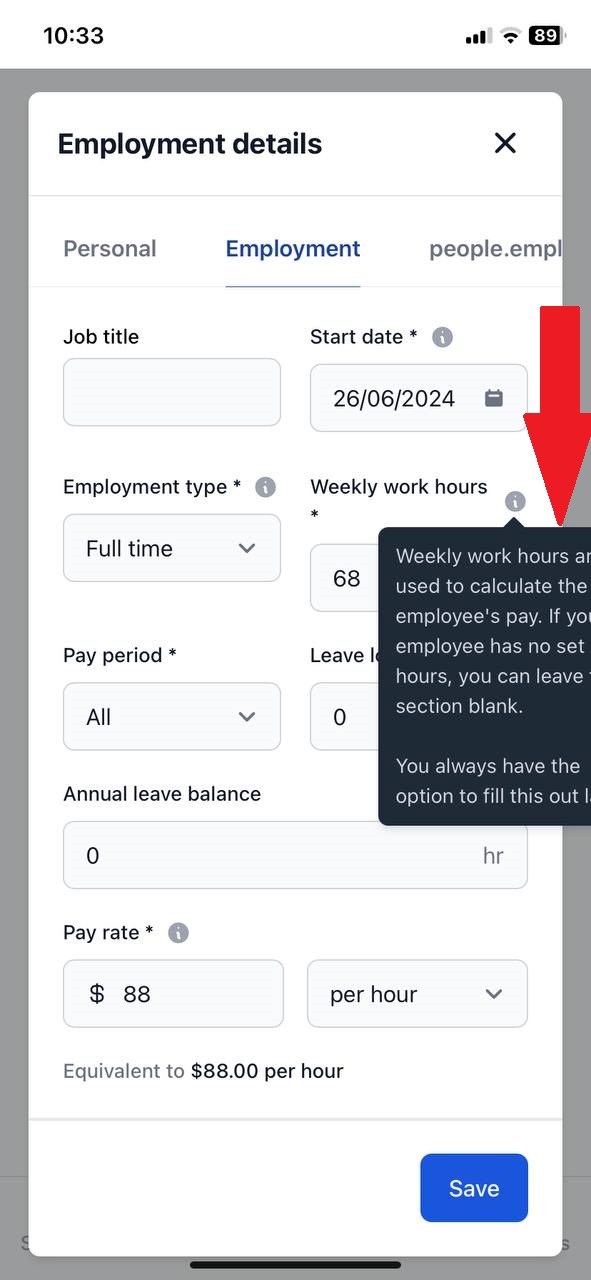
Information pop-up exceeds screen dimensions
Severity:
Minor
Precondition:
Login to the employer account.
Steps to Reproduce:
- Click on the “People” button.
- Click on the “Add employee” button.
- Fill in the fields: “First name”, “Last Name”, and “Email address” (second email).
- Click on the “Next” button.
- Click on the “Next” button.
- Fill in the field: “Pay rate”.
- Click on the “Complete” button.
- Click on the created employee.
- Click on the edit button.
- Click on the “Employment” button.
- Click on the “i” button next to the “Weekly work hours” field.
Environment:
iPhone 11, iOS Version 18.0
Actual Result:
The information pop-up does not fit on the screen.
Expected Result:
The informational pop-up should fit on the screen.
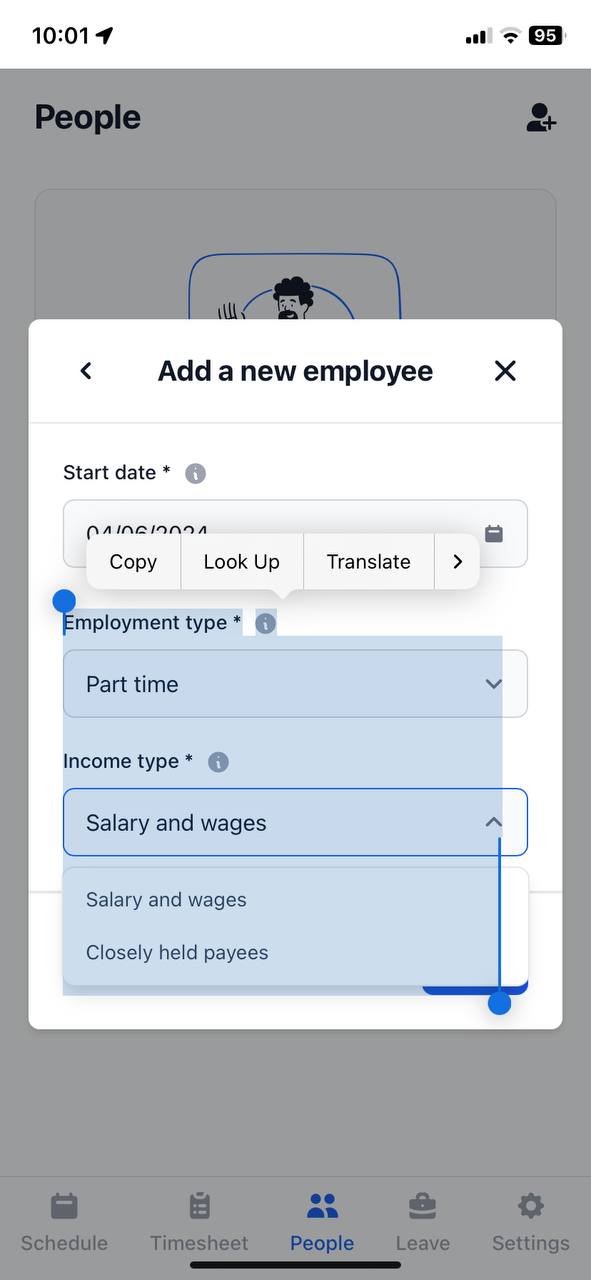
Copying allows selection of all pages
Severity:
Trivial
Steps to Reproduce:
- Open the app for the first time.
- Click on the “Sign up” button.
- Enter the first email.
- Enter the password.
- Click on the “Sign up” button.
- Enter the business name.
- Click on the “Next” button.
- Click on the Industry field.
- Pinch the list and drag the cursor down.
Environment:
iPhone 11, iOS Version 18.0
Actual Result:
All pages can be selected for copying.
Expected Result:
When pressing on the pages, the selection of the page should not start automatically.
Email input field triggers text keyboard instead of email keyboard
Severity:
Trivial
Steps to Reproduce:
- Open the app for the first time.
- Click on the “Sign up” button.
- Click on the email input field.
Environment:
iPhone 11, iOS Version 18.0
Actual Result:
When clicking on the email input field, a text keyboard opens.
Expected Result:
When clicking on the email input field, the email input keyboard should open.

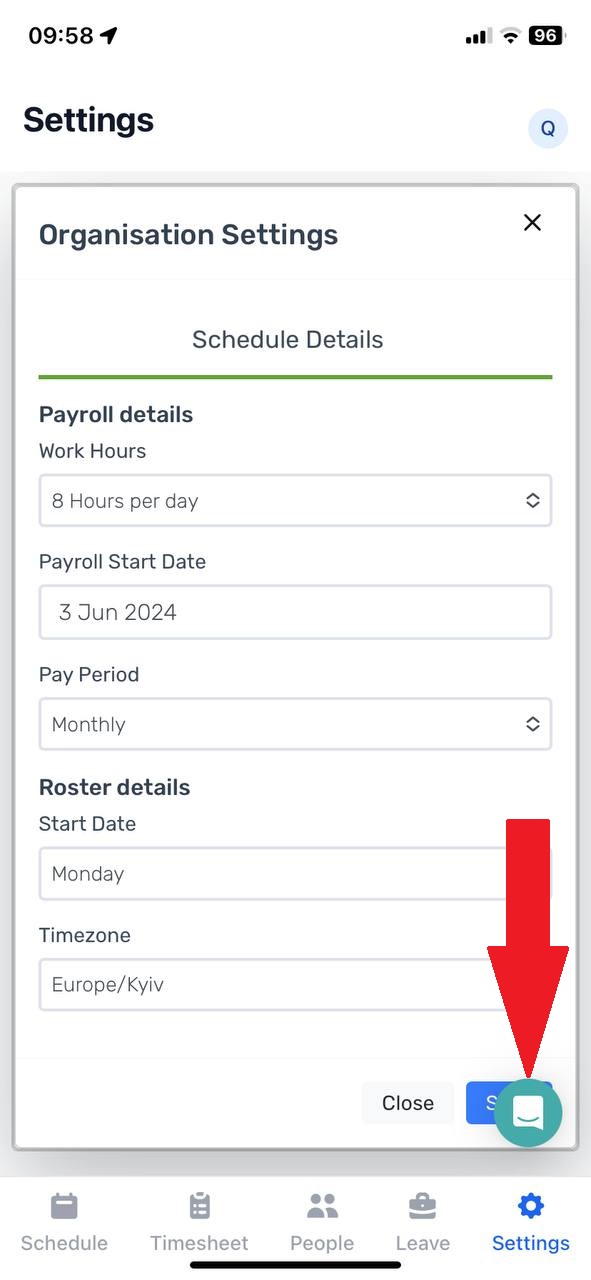
Chat button overlays save button in UI
Severity:
Trivial
Precondition:
Login to the employer account.
Steps to Reproduce:
- Click on the “Settings” button.
- Click on the “Organization Settings” button.
Environment:
iPhone 11, iOS Version 18.0
Actual Result:
The “Chat” button overlays the “Save” button.
Expected Result:
The settings popup should appear above the “Chat” button.
I've spotted 15 bugs while testing, from small design quirks to serious issues that affect shift schedules and timesheets. I recommend testing on a variety of iOS devices and versions to ensure everything runs smoothly. Using tools like Appium for automated testing and conducting thorough checks after updates will definitely help pinpoint and fix these issues.