Bugs found in Journi Print: Photobooks for iOS


Journi Print is your personal photo book designer. In just seconds, its smart algorithm crafts stunning layouts for your memories, effortlessly arranging up to 1200 photos in 34 seconds.
You can select photos from various sources, customize as you please, and voilà – your photo book is ready for print. With easy editing options, non-cropped photos, and environmentally friendly materials, cherish your moments in the highest quality. Plus, the app offers perks like earning rewards and maintaining 100% privacy.
Our QA engineers gave the Journi Print app one round of manual testing to help the app creators improve it and make it a true value-add for users. Here’s our bug report!
Error displayed upon clicking on picture
Severity:
Major
Precondition:
- Download an archive of low-quality images to your phone.
- Open the Journi Print app.
- Log in to your account.
Steps to Reproduce:
- Click on the “Print Shop” button in the bottom menu.
- Click on the “Calendar” button.
- Click on the “New Calendar” button.
- Add any photos.
- Click on the “Continue” button.
- Click on the “Create Calendar” button.
- Click on any blank page.
- Click on the “Add” button.
- Click on the “Add Photos” button.
- Add images from the downloaded archive.
- Click on any picture.
Environment:
iPhone 11, iOS Version 17.4
Actual Result:
When clicking on the picture, an error is displayed.
Expected Result:
Clicking on the picture should not trigger an error.
Failure to open next page when clicking buttons on “Retro Print Box” page
Severity:
Major
Precondition:
- Log in to your account.
Steps to Reproduce:
- Click on the “Print Shop” button in the bottom menu.
- Scroll down the pages.
- Click on the “Retro Print Box” button.
- Scroll a little down.
- Click on the “22+ Retro Prints” button.
- Click on the “44+ Retro Prints” button.
Environment:
iPhone 11, iOS Version 17.4
Actual Result:
When clicking on the buttons on the “Retro Print Box” page, the next page does not open.
Expected Result:
When you click on the buttons on the “Retro Print Box” page, the corresponding pages should open.
Impossible to make changes after clicking added page element
Severity:
Major
Precondition:
- Log in to your account.
Steps to Reproduce:
- Click on the “Print Shop” button in the bottom menu.
- Click on the “Calendar” button.
- Click on the “New Calendar” button.
- Add any photos.
- Click on the “Continue” button.
- Click on the “Create Calendar” button.
- Click on any blank page.
- Click on the “Add” button.
- Click on the “Add Sticker” button.
- Choose any sticker.
- Click on the “Add” button.
- Click on the sticker.
- Swipe multiple times to go to any other page.
Environment:
iPhone 11, iOS Version 17.4
Actual Result:
If the user clicks on the added element of the page, then they cannot make changes to these pages by switching.
Expected Result:
When switching to another page, the focus should be removed from the previously selected element on the other page.
Inconsistent album page layout
Severity:
Major
Precondition:
- Log in to your account.
Steps to Reproduce:
- Click on the “Print Shop” button in the bottom menu.
- Click on the “Photo Book” button.
- Click on the “New Photo Book” button.
- Add any 51 photos.
- Click on the “Continue” button.
- Scroll down the page.
Environment:
iPhone 11, iOS Version 17.4
Actual Result:
When adding enough photos to the album, some pages contain 4 pictures, and some pages are empty.
Expected Result:
If you add enough photos, they should be evenly spread throughout the album.
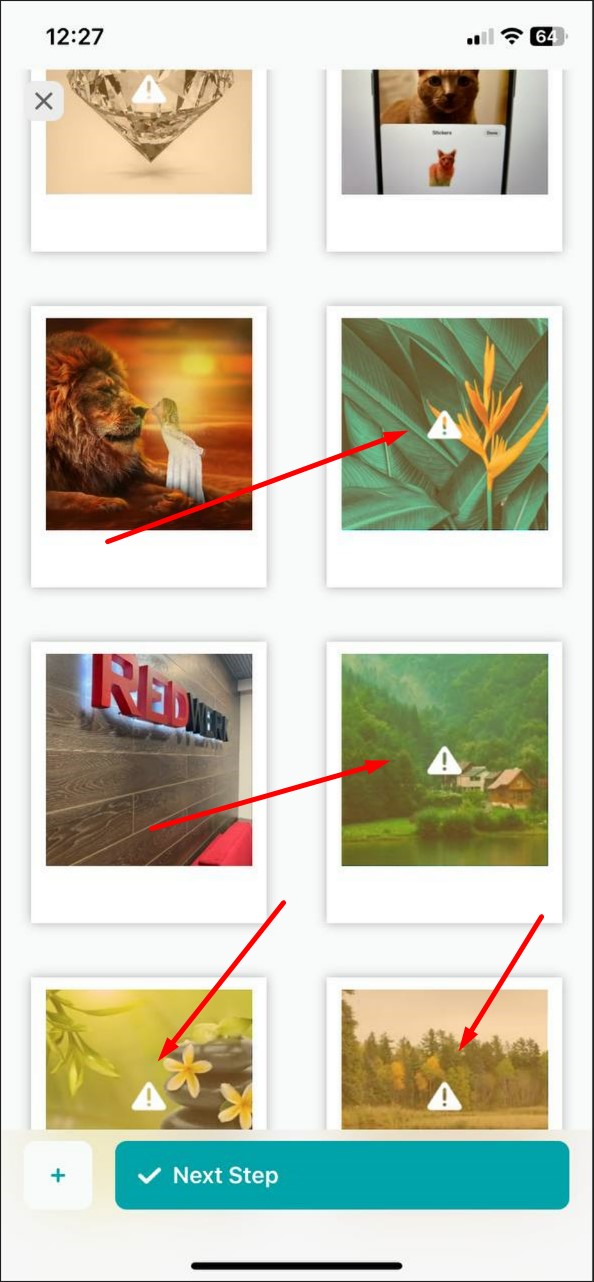
Missing error details for image
Severity:
Minor
Precondition:
- Download an archive of low-quality images to your phone.
- Open the Journi Print app.
- Log in to your account.
Steps to Reproduce:
- Click on the “Print Shop” button in the bottom menu.
- Scroll down the pages.
- Click on the “Retro Print Box” button.
- Click on the “New Retro Print Box” button.
- Add any 22 photos, including one photo from the archive.
- Click on the “Continue” button.
- Click on the picture with the error.
Environment:
iPhone 11, iOS Version 17.4
Actual Result:
Error details for the image with the error are missing.
Expected Result:
When viewing a picture with an error, information about the error should be displayed.
Same “Pick Layout” options across page with 4 photos
Severity:
Minor
Precondition:
- Log in to your account.
Steps to Reproduce:
- Click on the “Print Shop” button in the bottom menu.
- Click on the “Photo Book” button.
- Click on the “New Photo Book” button.
- Add any photos.
- Click on the “Continue” button.
- Scroll down the page.
- Click on the page with 4 photos.
- Click on the “Pick Layout” button.
Environment:
iPhone 11, iOS Version 17.4
Actual Result:
For a page with 4 photos, all “Pick Layout” options are the same.
Expected Result:
For pages with 4 photos, there should be different versions of “Pick Layout”.
False notification mark on app icon
Severity:
Minor
Precondition:
- Log in to your account.
Steps to Reproduce:
- Click on the “Print Shop” button in the bottom menu.
- Click on the “Calendar” button.
- Click on the “New Calendar” button.
- Add any photos.
- Click on the “Continue” button.
- Click on the “Create Calendar” button.
- Minimize the app.
- Find the application icon on the desktop.
Environment:
iPhone 11, iOS Version 17.4
Actual Result:
The app icon shows a notification mark, although there are no notifications.
Expected Result:
The notification label should be displayed only when the app actually has notifications available.
Maps removed from calendar page cannot be recovered
Severity:
Minor
Precondition:
- Take some photos with your phone, ensuring access to geolocation.
- Open the Journi Print app.
- Login to your account.
Steps to Reproduce:
- Click on the “Print Shop” button in the bottom menu.
- Click on the “Calendar” button.
- Click on the “New Calendar” button.
- Add any photos.
- Click on the “Continue” button.
- Click on the “Create Calendar” button.
- Click on any blank page.
- Click on the “Add” button.
- Click on the “Add Photos” button.
- Add a geotagged photo.
- Click on the “Continue” button.
- Click on the map.
- Click on the “Remove” button.
- Click on the “Add” button.
Environment:
iPhone 11, iOS Version 17.4
Actual Result:
If you delete a map on the calendar page, it cannot be restored.
Expected Result:
It should be possible to add the map again; an “Undo” button should be available for restoring deleted maps.
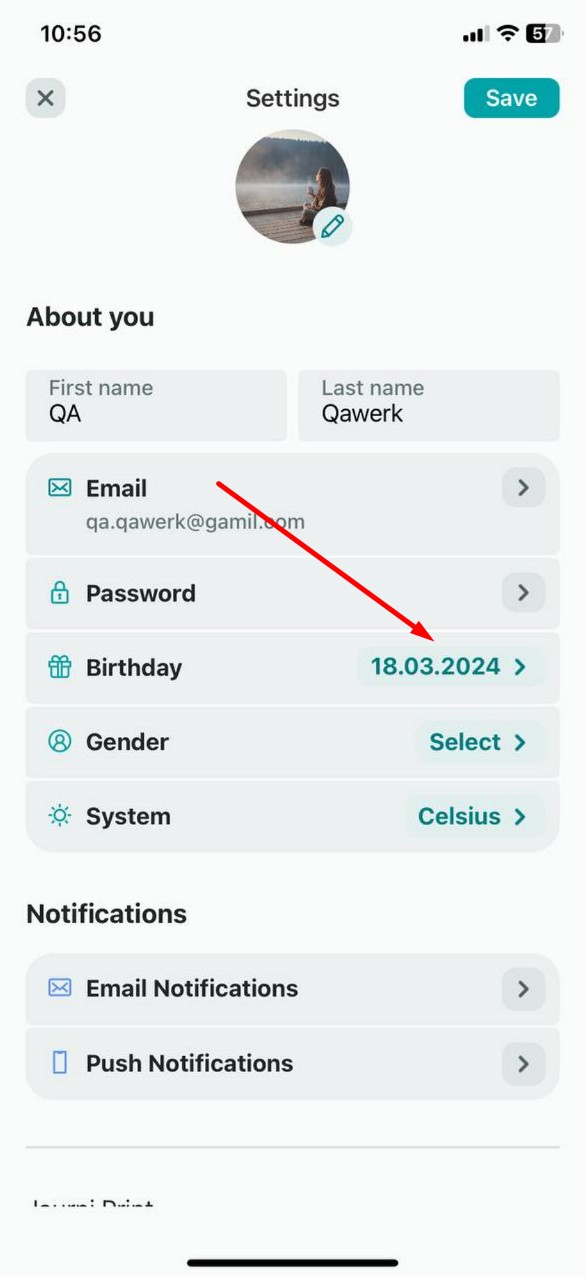
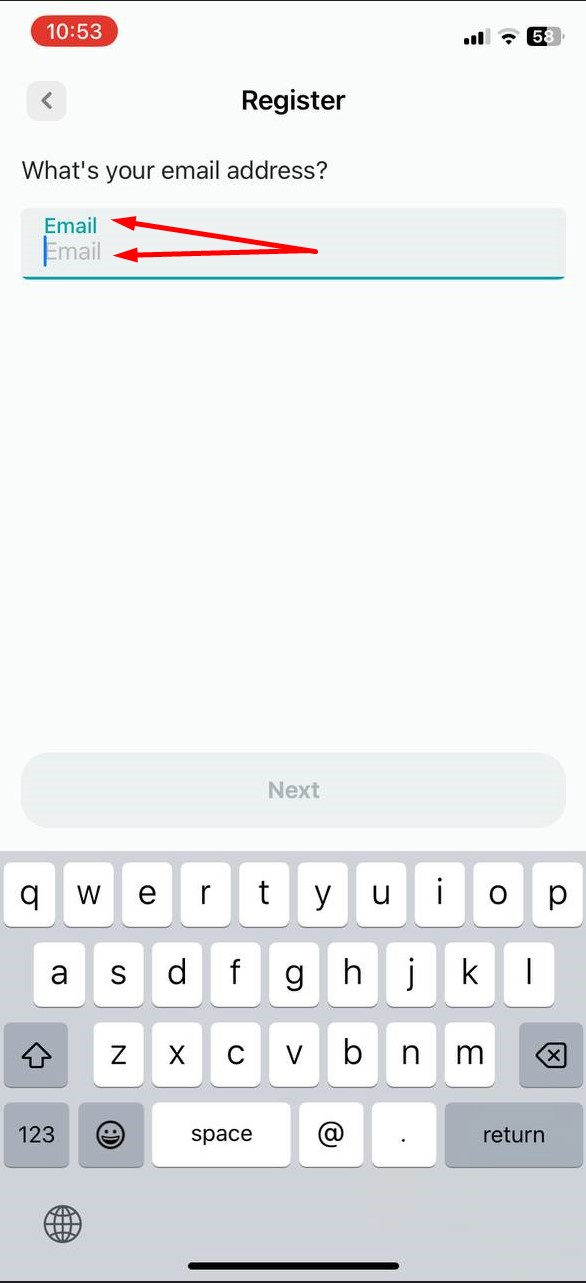
Automatic date of birth entry upon account creation
Severity:
Trivial
Steps to Reproduce:
- Open the Journi Print app.
- Click on the “Continue with Email” button.
- Enter your email.
- Click on the “Next” button.
- Fill in the fields:
- First name.
- Last name.
- Password.
- Click on the “Register” button.
- Click on the “Account” button in the bottom menu.
- Click on the “Settings” button.
Environment:
iPhone 11, iOS Version 17.4
Actual Result:
After creating a new account, the date of birth is automatically filled in with the current date.
Expected Result:
The date of birth should remain blank until the user enters the data.
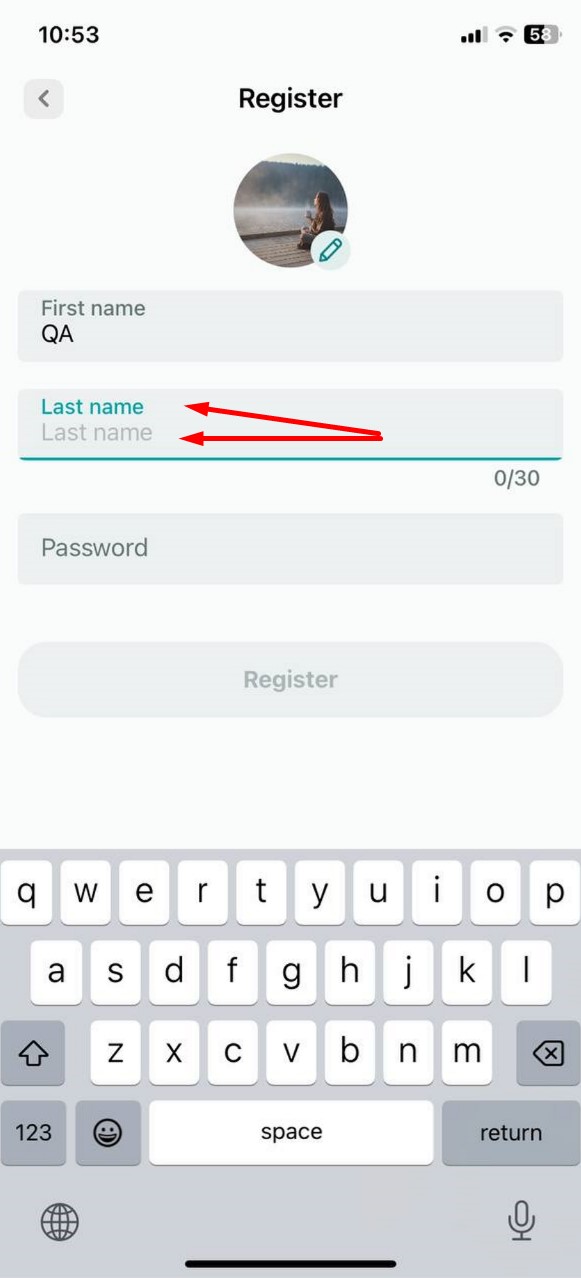
Placeholder doesn’t disappear upon input field click
Severity:
Trivial
Steps to Reproduce:
- Open the Journi Print app.
- Click on the “Continue with Email” button.
- Enter your email.
- Click on the “Next” button.
- Click on the fields: First name, Last name.
Environment:
iPhone 11, iOS Version 17.4
Actual Result:
The placeholder does not disappear when you click on the input field and is completely identical to the label above the field.
Expected Result:
If the placeholder does not contain additional information, it should disappear when you click on the field.
Deformed picture error icon
Severity:
Trivial
Precondition:
- Download an archive of low-quality images to your phone.
- Open the Journi Print app.
- Log in to your account.
Steps to Reproduce:
- Click on the “Print Shop” button in the bottom menu.
- Click on the “Calendar” button.
- Click on the “New Calendar” button.
- Add any photos.
- Click on the “Continue” button.
- Click on the “Create Calendar” button.
- Click on any blank page.
- Click on the “Add” button.
- Click on the “Add Photos” button.
- Add 10 images from the downloaded archive.
- Click on the check mark.
Environment:
iPhone 11, iOS Version 17.4
Actual Result:
The picture error icon appears deformed.
Expected Result:
The error icon should not appear deformed.
Impossible to modify size or position of added element
Severity:
Trivial
Precondition:
- Log in to your account.
Steps to Reproduce:
- Click on the “Print Shop” button in the bottom menu.
- Click on the “Calendar” button.
- Click on the “New Calendar” button.
- Add any photos.
- Click on the “Continue” button.
- Click on the “Create Calendar” button.
- Click on any blank page.
- Click on the “Add” button.
- Click on the “Add Sticker” button.
- Choose any sticker.
- Click on the “Add” button.
- Click on the sticker.
- Click on the “Edit” button.
Environment:
iPhone 11, iOS Version 17.4
Actual Result:
Unable to change the size or position of the added elements: Title, Paragraph, Weather, Sticker, and Travel.
Expected Result:
It should be possible to edit the size and position of an element on a page where only this element is present.
Unsaved name characters
Severity:
Trivial
Precondition:
- Log in to your account.
Steps to Reproduce:
- Open the Journi Print app.
- Click on the “Continue with Email” button.
- Enter your email.
- Click on the “Next” button.
- Fill in the fields:
- First name.
- Last name.
- Password.
- Click on the “Register” button.
- Click on the “Account” button in the bottom menu.
- Click on the “Settings” button.
- Click on the “First name” field.
- Enter 25 characters.
- Click on the “Save” button.
Environment:
iPhone 11, iOS Version 17.4
Actual Result:
Name characters are entered but not saved; after saving, only the first 20 characters are displayed.
Expected Result:
If the field has a limit of 20 characters, then the user should not be able to enter more than 20 characters.
To ensure the quality and reliability of the app, I recommend conducting thorough testing across various iOS devices and versions, utilizing tools such as Xcode and TestFlight. Functional testing should encompass core features such as photo uploading, book design, and the checkout process, while non-functional testing should prioritize usability, performance, and compatibility.