Bugs found in Taiga SaaS
Taiga is an open-source project management platform designed for cross-functional agile teams. Its wide-ranging language support, with translations available in over 20 languages, ensures accessibility for a diverse user base.
Key features of Taiga encompass backlog management, sprint planning, burn-down charts, Kanban boards, Epics, issue tracking, custom real-time reporting, personalized dashboards, and notifications. Taiga places a strong emphasis on security and control, ensuring that your data remains safe. The platform seamlessly integrates with popular tools like GitHub and Slack. Renowned global companies such as Mozilla, Red Hat, HP, and Decathlon trust Taiga for their project management needs.
Our dedicated team of QA engineers has manually tested the Taiga platform, and here’s what we found.
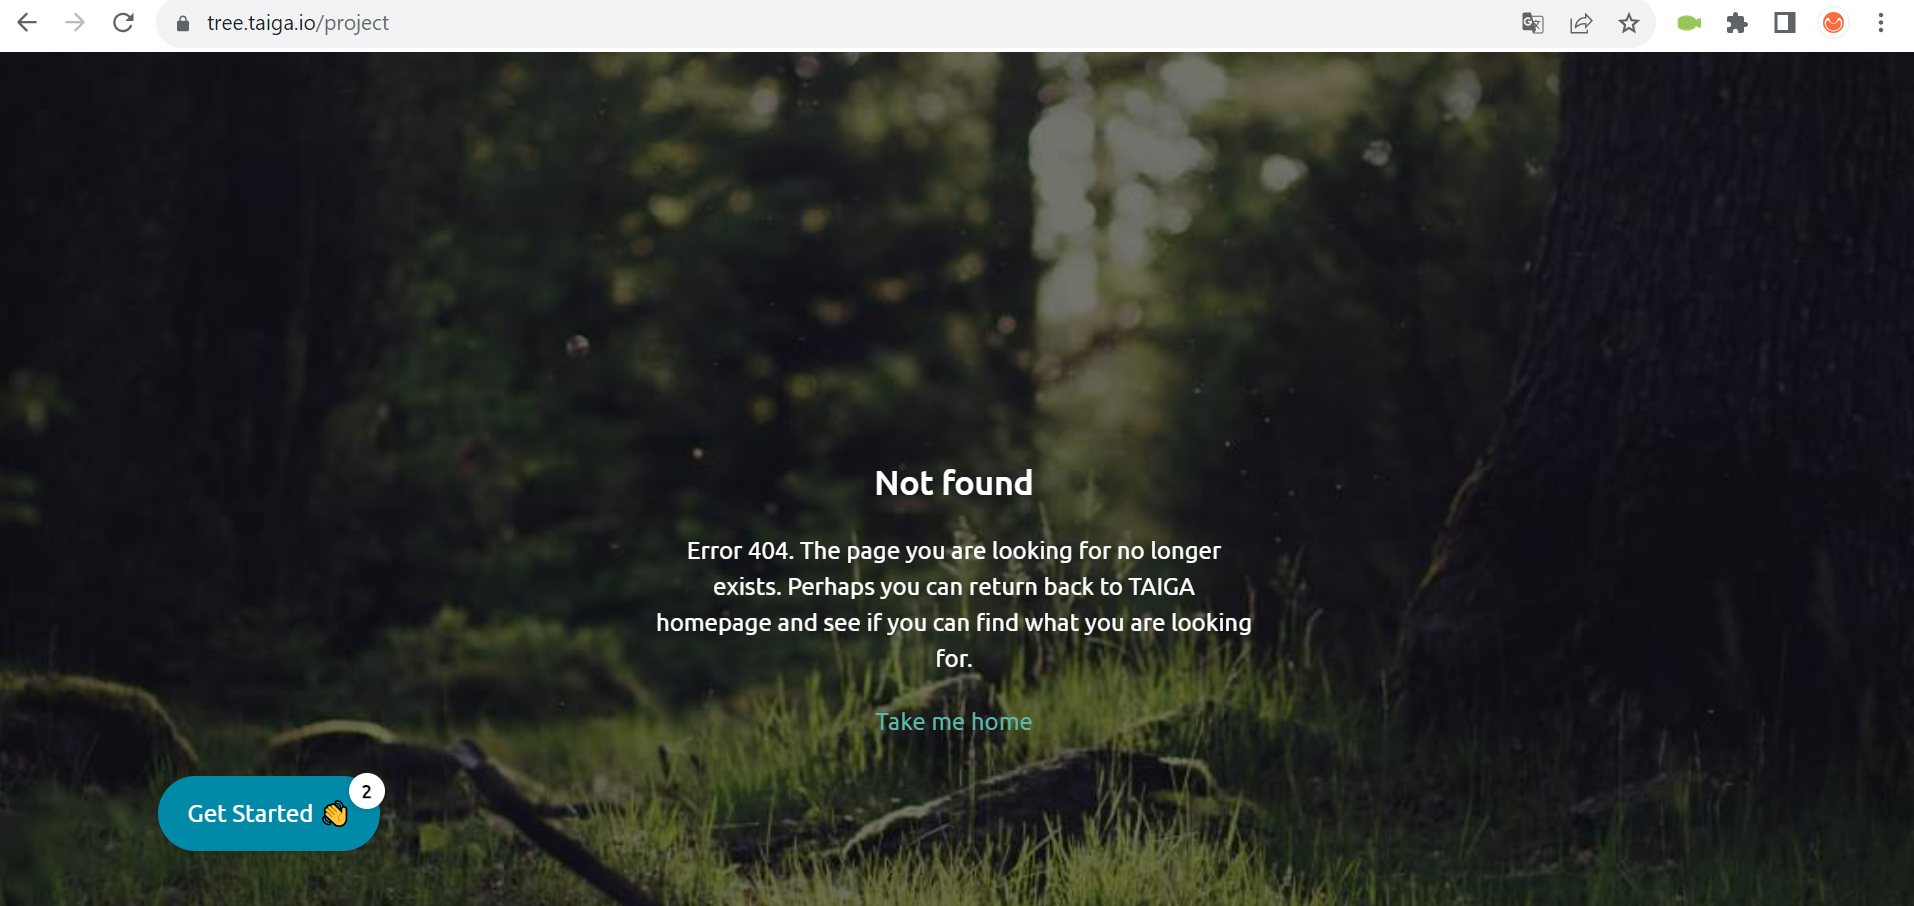
Error 404 is displayed when trying to access current project page
Severity:
Critical
Precondition:
Log in to your account for the first time.
Steps to Reproduce:
- Click on the “Get Started” button.
- Click on the “Create 1st Project” button.
- Close the pop-up window.
- Click on the “Scrum” button.
- Fill in the “Project Name” and “Project Description” fields.
- Click on the “Create project” button.
- Click on the “Add User Stories” button.
- Pinch any project and drag it down.
- Click on the “Kanban” button.
Environment:
Windows 10 Pro
Chrome v.117.0.5938.62, Firefox v.117.0.1, Microsoft Edge v. 116.0.1938.76
Actual Result:
Error 404 is displayed when trying to access the current project page.
Expected Result:
The transition to the page of the type of project you are working on should occur.
Repositories are retrieved from GitHub, not projects
Severity:
Major
Precondition:
- Register a GitHub account.
- Register an account with Taiga using a GitHub account.
Steps to Reproduce:
- Open a GitHub account.
- Click the “New” button to create a new repository.
- Fill in the “Repository name” field.
- Click the “Create repository” button.
- Go to your Taiga account.
- Navigate to the projects page.
- Click the “NEW PROJECT” button.
- Select “IMPORT PROJECT.”
- Click the “Github” button.
- Choose the previously created repository from the list.
Environment:
Windows 10 Pro
Chrome v.117.0.5938.62, Firefox v.117.0.1, Microsoft Edge v. 116.0.1938.76
Actual Result:
Repositories are retrieved from GitHub, not projects.
Expected Result:
GitHub projects should be retrieved, not repositories.
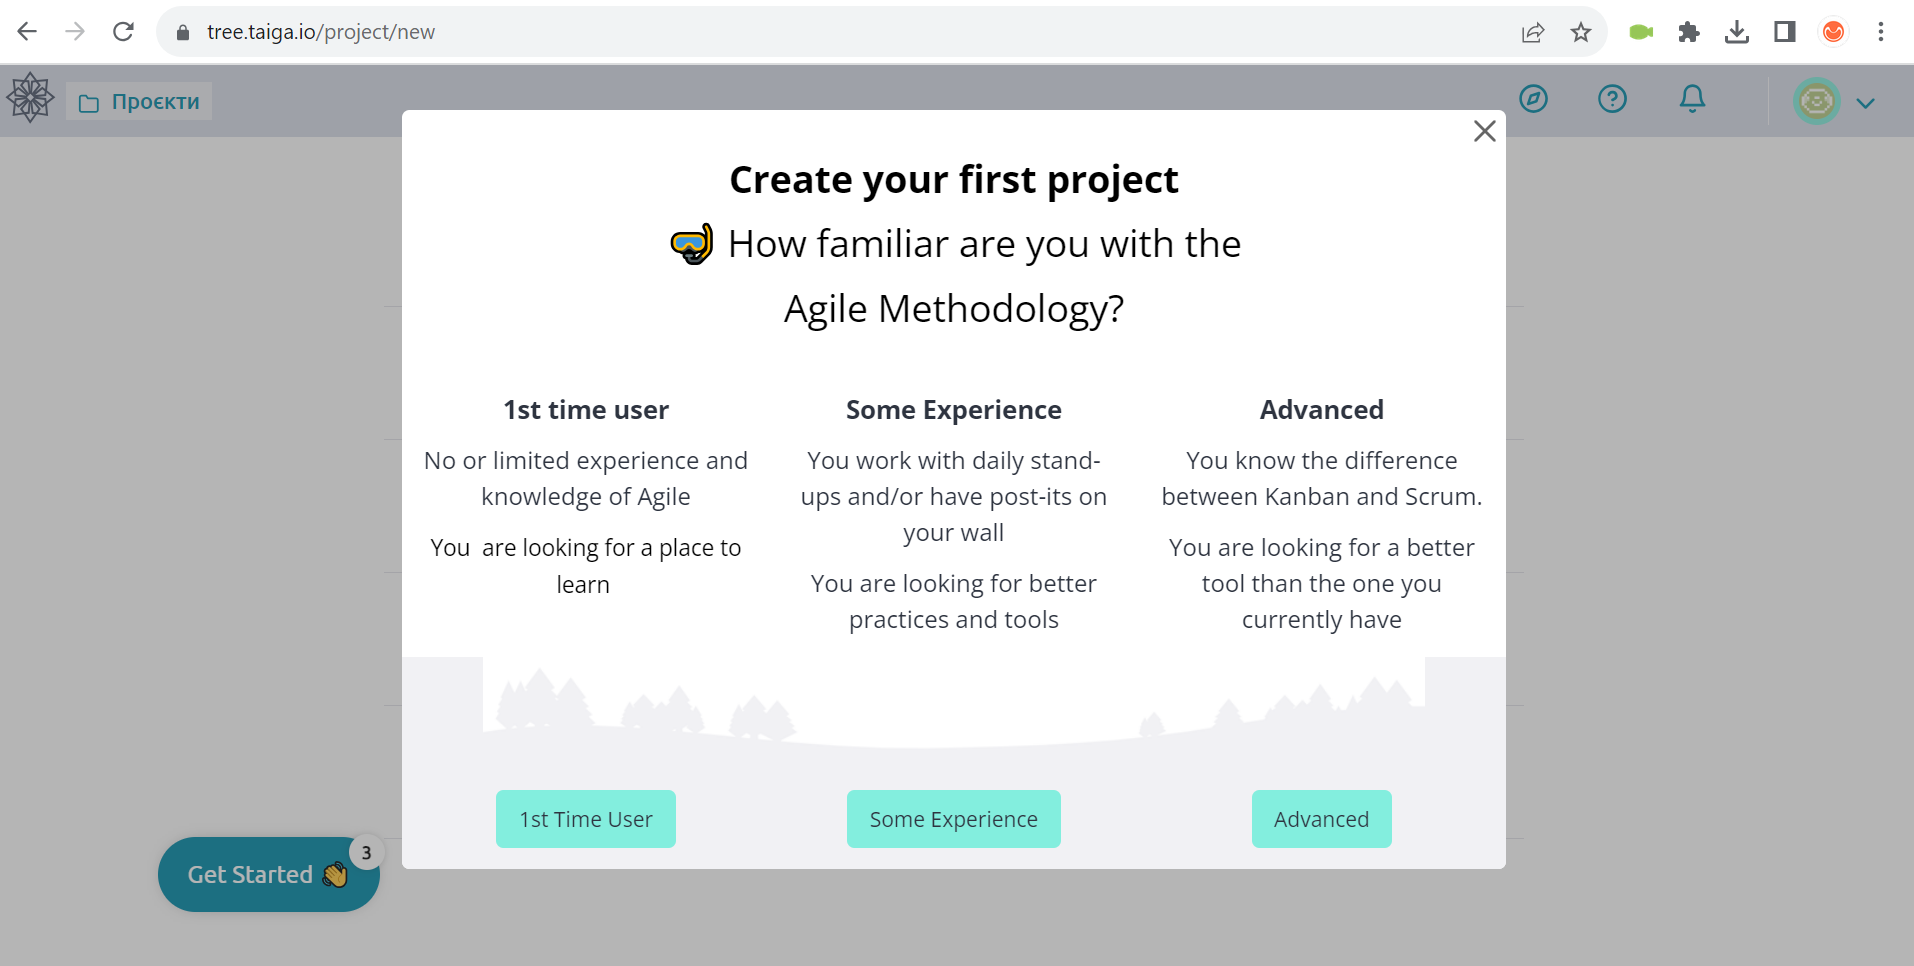
“What type of project are you working on?” pop-up appears one step too early
Severity:
Major
Precondition:
Log in to your account for the first time.
Steps to Reproduce:
- Click on the “Get Started” button.
- Click on the “Create 1st Project” button.
- Close the pop-up window.
- Click on the “Scrum” button.
- Fill in the “Project Name” and “Project Description” fields.
- Click on the “Create project” button.
- Click on the “Add User Stories” button.
- Pinch any project and drag it downward.
- Click on the “Kanban” button.
Environment:
Windows 10 Pro
Chrome v.117.0.5938.62, Firefox v.117.0.1, Microsoft Edge v. 116.0.1938.76
Actual Result:
The pop-up “What type of project are you working on?” appears 1 step earlier than it should have.
Expected Result:
The pop-up “What type of project are you working on?” should appear after navigating to the project page.
Project board is not imported when importing from GitHub
Severity:
Major
Precondition:
- Register a GitHub account.
- Register an account with Taiga using a GitHub account.
Steps to Reproduce:
- Open a GitHub account.
- Click the “New” button to create a new repository.
- Fill in the “Repository name” field.
- Click the “Create repository” button.
- Click on the “Projects” button in the top menu.
- Click “Link a project.”
- Click “Create a new project.”
- Dismiss the pop-up.
- Click the down arrow next to the “View” tab.
- Select “Board.”
- Click “Add item” in the “Todo” column.
- Enter a task name and press enter.
- Repeat steps 11 and 12 for another task.
- Click “Save.”
- Go to your Taiga account.
- Navigate to the projects page.
- Click “NEW PROJECT.”
- Select “IMPORT PROJECT.”
- Click the “GitHub” button.
- Choose the created project from the list.
- Fill in the “Project description” field.
- Toggle the “Links with GitHub” switch to the active position.
- Click “Create project.”
- Click “IMPORT” (twice).
- Click “Accept.”
- Go to the projects page.
- Refresh the page.
- Click on the name of the created project.
- Click the “Board” button.
Environment:
Windows 10 Pro
Chrome v.117.0.5938.62, Firefox v.117.0.1, Microsoft Edge v. 116.0.1938.76
Actual Result:
The project board is not imported when importing from GitHub.
Expected Result:
The project board should be imported when importing from GitHub.
When invited to register account, email confirmation is required separately
Severity:
Major
Precondition:
- Register an account on Taiga.
- Create a different email address from the one already associated with your account.
Steps to Reproduce:
- Go to the projects page.
- Click the “NEW PROJECT” button.
- Choose the “Scrum” option.
- Complete the “Project Name” and “Project Description” fields.
- Click the “Create project” button.
- Open the side menu and click on “Settings.”
- Select “MEMBERS.”
- Click the “NEW MEMBER” button.
- Enter the email you provided.
- Click the “+” button.
- Assign a role to the user.
- Click the “REQUEST” button.
- Click the profile button in the upper right corner.
- Choose “Logout.”
- Open the email inbox where the request was sent.
- Locate the email with the subject “[Taiga] Invitation to join the project.”
- Click the “Accept your invitation” button.
- Fill in the following fields: “User name”, “Full name”, “Your email”, and “Set a password”.
- Check the box to accept the terms and conditions.
- Click the “SIGN UP” button.
Environment:
Windows 10 Pro
Chrome v.117.0.5938.62, Firefox v.117.0.1, Microsoft Edge v. 116.0.1938.76
Actual Result:
When registering an account by invitation, it is still necessary to confirm the email separately.
Expected Result:
When registering an account by invitation, the email address should be automatically confirmed.
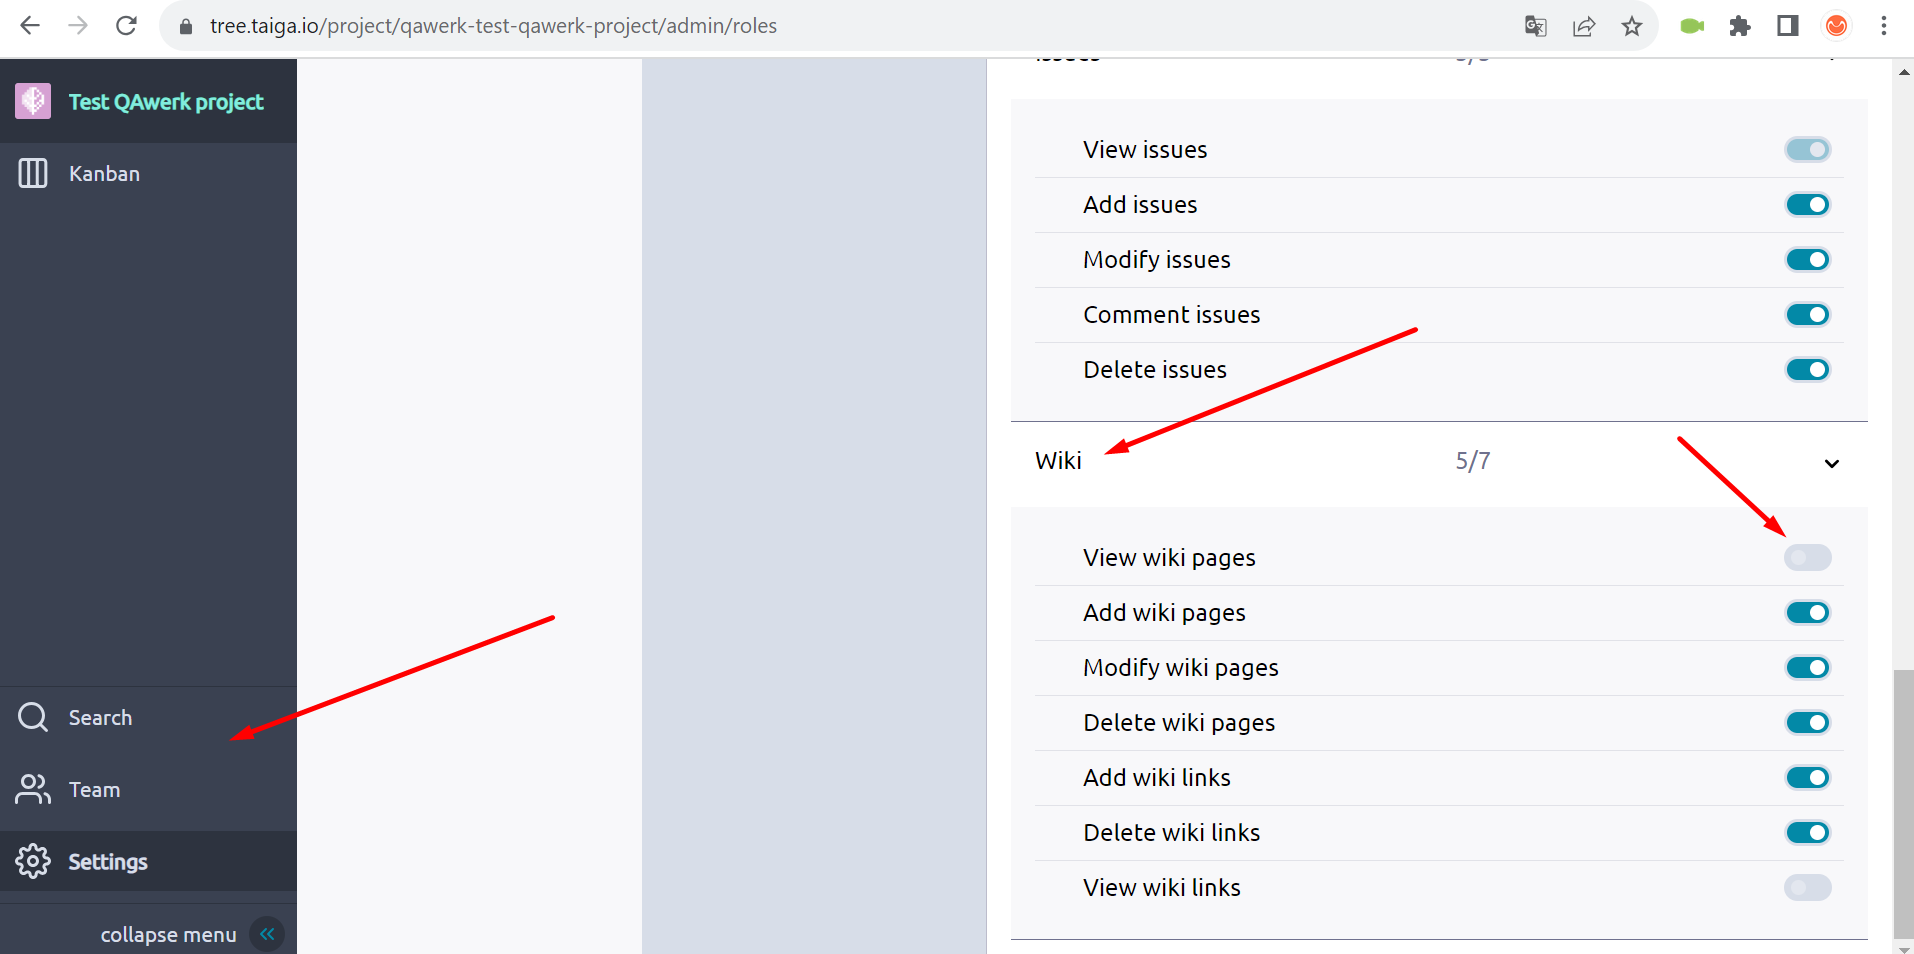
Wiki block is not added, but it’s possible to add edit permissions to it
Severity:
Minor
Precondition:
- Register an account on Taiga.
- Create a different email address from the one already associated with your account.
Steps to Reproduce:
- Go to the projects page.
- Click on the “NEW PROJECT” button.
- Select the Scrum option.
- Fill out the “Project Name” and “Project Description” fields.
- Click on the “Create project” button.
- Click on the settings button in the side menu.
- Select the “MEMBERS” option.
- Click on the “NEW MEMBER” button.
- Enter the email address you created.
- Click on the “+” button.
- Choose a role for the user.
- Click on the “REQUEST” button.
- Click on the “Permissions” button.
- Expand the “Wiki” section.
Environment:
Windows 10 Pro
Chrome v.117.0.5938.62, Firefox v.117.0.1, Microsoft Edge v. 116.0.1938.76
Actual Result:
The wiki block is not added, but the user can add edit permissions to it.
Expected Result:
If the wiki block is not added, granting permissions to edit it should not be possible.
Imported project is not immediately added to list
Severity:
Minor
Precondition:
- Register a GitHub account.
- Register an account with Taiga using a GitHub account.
Steps to Reproduce:
- Open a GitHub account.
- Click the “New” button to create a new repository.
- Fill in the “Repository name” field.
- Click the “Create repository” button.
- Go to your Taiga account.
- Navigate to the projects page.
- Click on the “NEW PROJECT” button.
- Choose “IMPORT PROJECT.”
- Select “GitHub” as the source.
- Pick the created repository from the list.
- Fill in the “Project description” field.
- Toggle the “Links with GitHub” switch to the active position.
- Click on the “Create project” button.
- Click on the “IMPORT” button.
- Confirm by clicking the “IMPORT” button.
- Click on the “Accept” button.
- Return to the projects page.
Environment:
Windows 10 Pro
Chrome v.117.0.5938.62, Firefox v.117.0.1, Microsoft Edge v. 116.0.1938.76
Actual Result:
An imported project is not immediately added to the list.
Expected Result:
The imported project should be added to the list of projects immediately.
"Archived" column moves to "Ready for test”
Severity:
Minor
Precondition:
Log in to your account.
Steps to Reproduce:
- Go to the projects page.
- Click on the “New project” button.
- Choose the “Kanban” option.
- Fill in the “Project Name” and “Project Description” fields.
- Click on the “Create project” button.
- In the “New” column, click the “+” button.
- Enter a subject.
- Click the “Create” button.
- Repeat steps 6-8 for as many times as necessary.
- Drag the created tasks to the “READY FOR TEST” column.
- Collapse the “ARCHIVED” column.
- Drag tasks from the “READY FOR TEST” column to the collapsed “ARCHIVED” column.
Environment:
Windows 10 Pro
Chrome v.117.0.5938.62, Firefox v.117.0.1, Microsoft Edge v. 116.0.1938.76
Actual Result:
The “Archived” column has been moved to the “Ready for test” column.
Expected Result:
A column should not be moved into another column.
Impossible to scroll through calendar when selecting story point deadline date
Severity:
Minor
Precondition:
Log in to your account.
Steps to Reproduce:
- Go to the Projects page.
- Click “New project.”
- Choose “Scrum.”
- Fill in “Project Name” and “Project Description.”
- Click “Create project.”
- Select “Add a user story.”
- Click the clock icon to set the user story end date.
- Try to scroll down the page.
Environment:
Windows 10 Pro
Chrome v.117.0.5938.62, Firefox v.117.0.1, Microsoft Edge v. 116.0.1938.76
Actual Result:
It’s not possible to scroll through the calendar when selecting a story point deadline date.
Expected Result:
It should be possible to scroll down the calendar to display the entire month on the page.
Notification remains on screen, restricting access to account functions
Severity:
Minor
Precondition:
- Register an account on Taiga.
- Create a different email address from the one already associated with your account.
Steps to Reproduce:
- Go to the Projects page.
- Click “NEW PROJECT.”
- Select “Scrum.”
- Fill in “Project Name” and “Project Description.”
- Click “Create project.”
- Open the side menu and click “Settings.”
- Choose “MEMBERS.”
- Click “NEW MEMBER.”
- Enter the created email.
- Click the “+” button.
- Select a user role.
- Click “REQUEST.”
- Open the email sent to the mailbox.
- Open the email titled “[Taiga] Invitation to join the project.”
- Click “Accept your invitation.”
- Fill in the following fields: “User name”, “Full name”, “Email”, and “Set a password”.
- Check the terms and conditions box.
- Click “SIGN UP.”
Environment:
Windows 10 Pro
Chrome v.117.0.5938.62, Firefox v.117.0.1, Microsoft Edge v. 116.0.1938.76
Actual Result:
The notification remains on the screen, restricting access to account functions.
Expected Result:
The notification should disappear a few seconds after appearing.
When archived, tasks remain in their respective columns
Severity:
Minor
Precondition:
Log in to your account.
Steps to Reproduce:
- Go to the projects page.
- Click on the “New project” button.
- Click on the “Kanban” button.
- Fill in the “Project Name” and “Project Description” fields.
- Click on the “Create project” button.
- In the “New” column, click the + button.
- Enter a Subject.
- Click the “Create” button.
- In the “NEW” column, click the + button.
- Enter a Subject.
- Click the “Create” button.
- In the “New” column, click the + button.
- Enter a Subject.
- Click the “Create” button.
- In the “New” column, click the + button.
- Enter a Subject.
- Click the “Create” button.
- In the “New” column, click the + button.
- Enter a Subject.
- Click the “Create” button.
- Drag the created task to the “READY FOR TEST” column.
- Collapse the “ARCHIVED” column.
- Drag 3 tasks from the “READY FOR TEST” column to the collapsed “ARCHIVED” column.
- Click on the button to expand the “ARCHIVED” block.
- Drag 2 tasks from the “READY FOR TEST” column to the collapsed “ARCHIVED” column.
Environment:
Windows 10 Pro
Chrome v.117.0.5938.62, Firefox v.117.0.1, Microsoft Edge v. 116.0.1938.76
Actual Result:
When tasks are archived, they do not disappear from the column they were in.
Expected Result:
When tasks are moved, they should disappear from the column they were in.
Invite button is deactivated
Severity:
Minor
Precondition:
Log in to your account.
Steps to Reproduce:
- Go to the projects page.
- Click “NEW PROJECT.”
- Select “Scrum.”
- Fill in the “Project Name” and “Project Description” fields.
- Click “Create project.”
- Open the side menu and click “Settings.”
- Choose “MEMBERS.”
- Click “NEW MEMBER.”
- Enter the created email.
- Click the “+” button.
- Choose a user role.
- Click the “+” button.
- Click the “+” button.
Environment:
Windows 10 Pro
Chrome v.117.0.5938.62, Firefox v.117.0.1, Microsoft Edge v. 116.0.1938.76
Actual Result:
The invite button is deactivated.
Expected Result:
If all required fields are filled, the “REQUEST” button should be active.
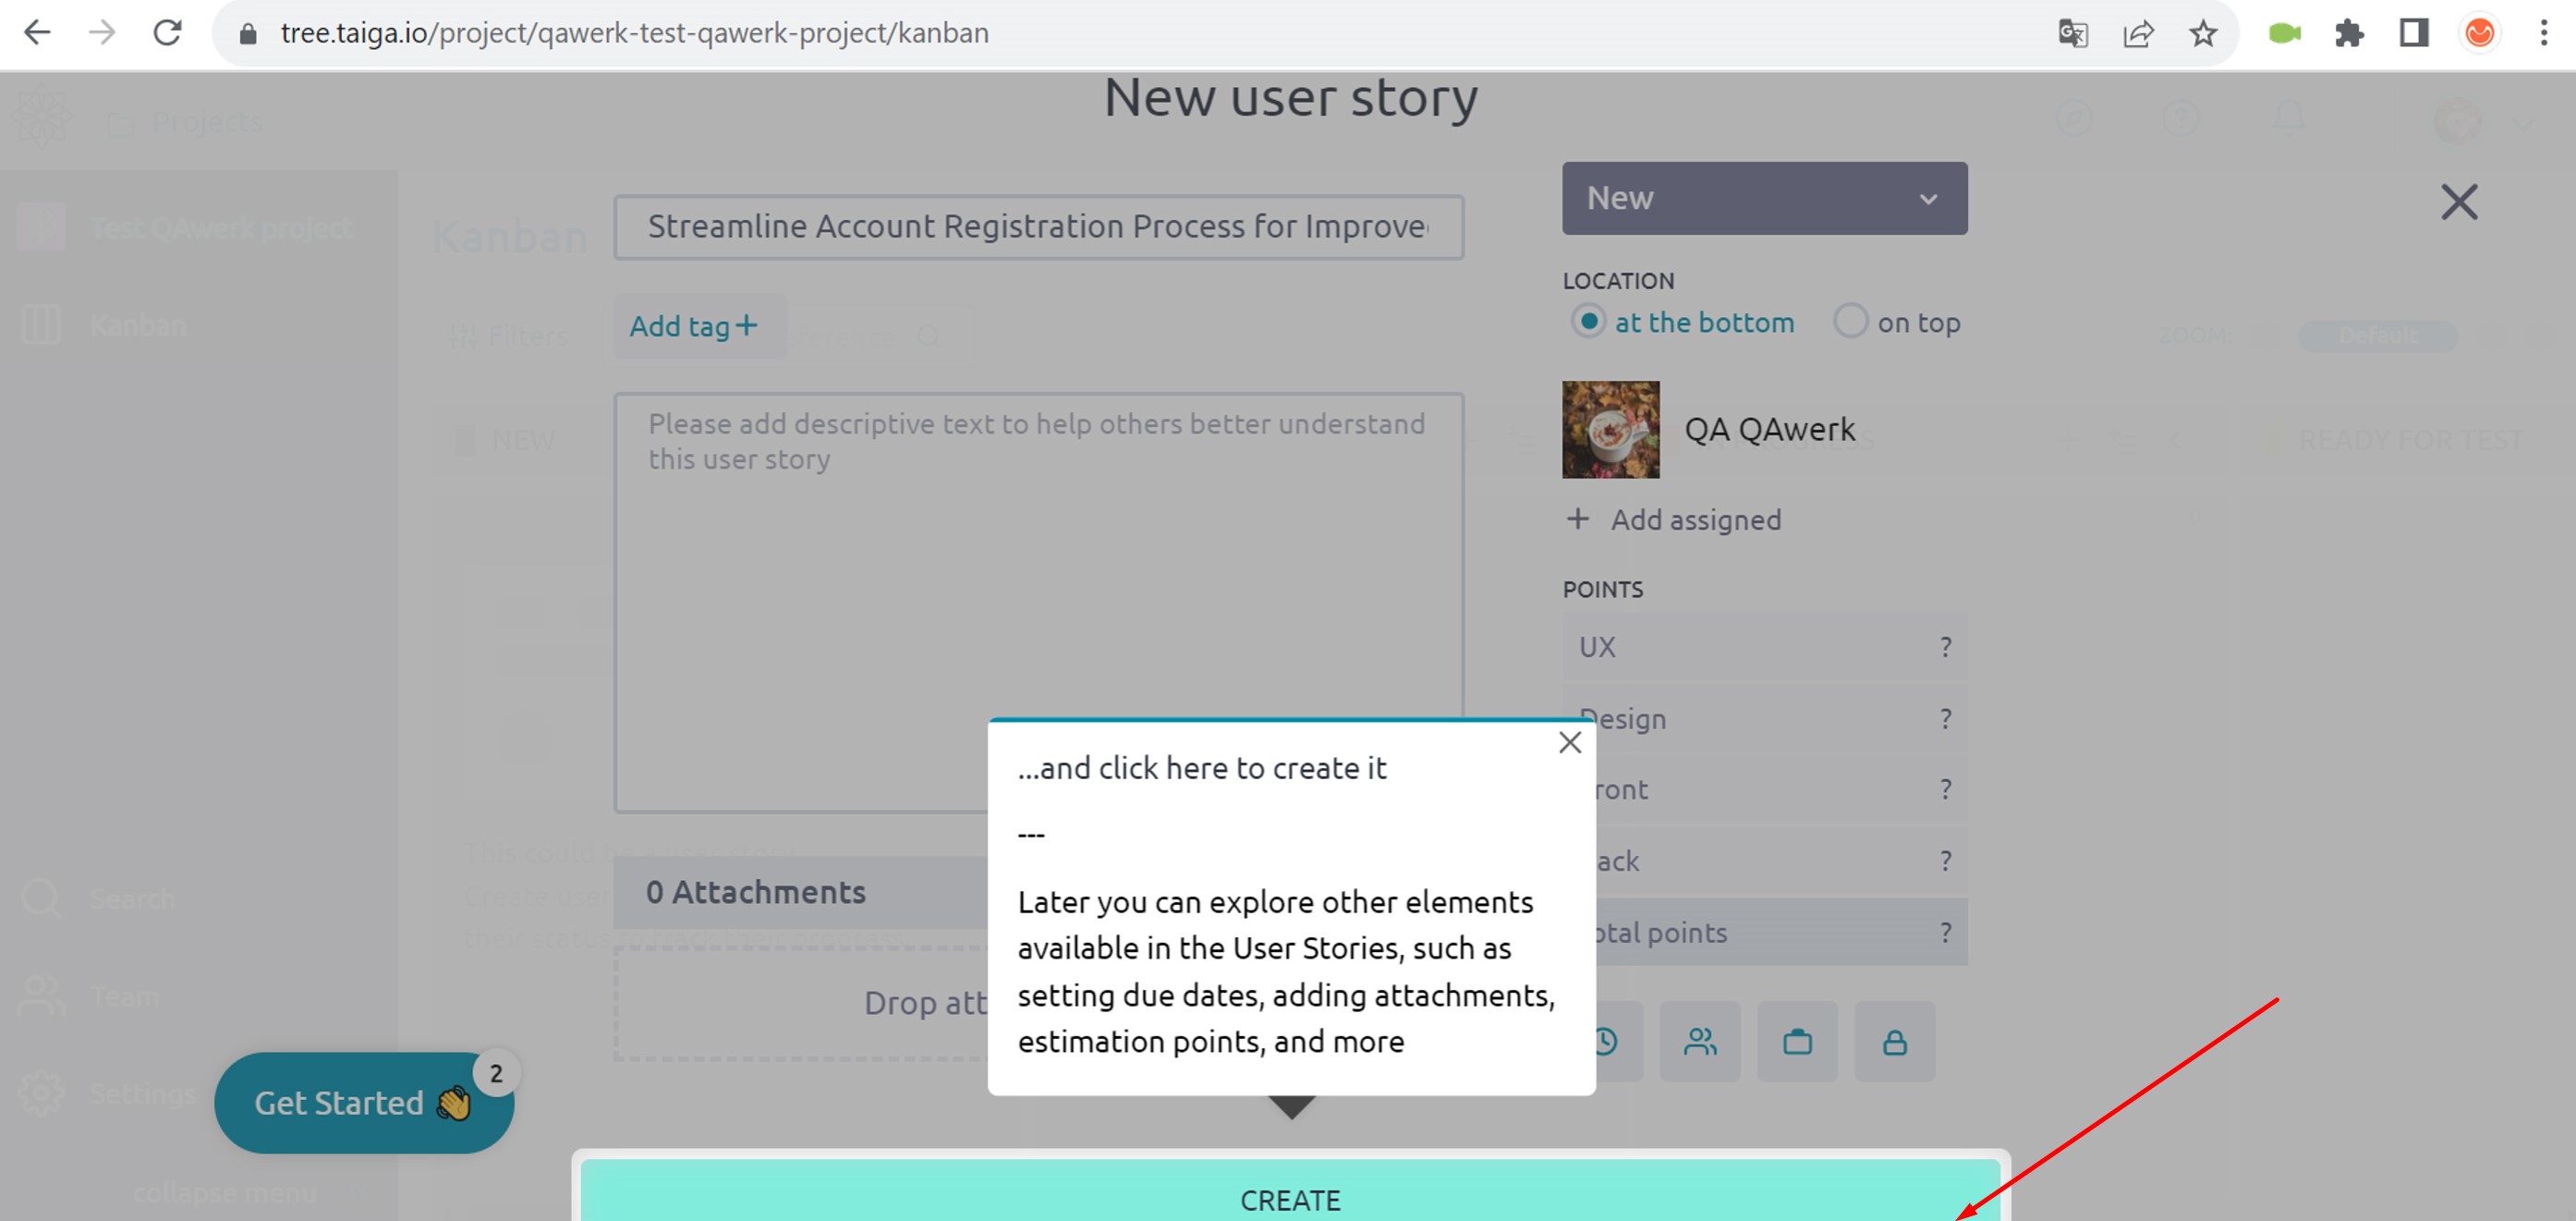
"Create" button does not fit on screen
Severity:
Trivial
Precondition:
Log in to your account.
Steps to Reproduce:
- Go to the projects page.
- Click on the “New project” button.
- Click on the “Scrum” button.
- Fill in the “Project Name” and “Project Description” fields.
- Click on the “Create project” button.
- Click on the “Add a user story” button.
Environment:
Windows 10 Pro
Chrome v.117.0.5938.62, Firefox v.117.0.1, Microsoft Edge v. 116.0.1938.76
Actual Result:
The “Create” button does not fit on the screen.
Expected Result:
The “Create” button should fit on the screen.
Poor image quality of icons for project types
Severity:
Trivial
Precondition:
Log in to your account for the first time.
Steps to Reproduce:
- Click the “Get Started” button.
- Click the “Create 1st Project” button.
- Close the pop-up window.
- Click the “Scrum” button.
- Fill out the “Project Name” and “Project Description” fields.
- Click the “Create Project” button.
- Click the “Add User Stories” button.
- Click the project name.
Environment:
Windows 10 Pro
Chrome v.117.0.5938.62, Firefox v.117.0.1, Microsoft Edge v. 116.0.1938.76
Actual Result:
Poor image quality of icons for project types.
Expected Result:
The quality of the icons should be high.
Search field is moved beneath task block
Severity:
Trivial
Precondition:
Log in to your account.
Steps to Reproduce:
- Go to the Projects page.
- Click on the “New project” button.
- Click on the “Scrum” option.
- Fill in the “Project Name” and “Project Description” fields.
- Click on the “Create project” button.
- Click on the “Add a user story” button.
- Fill in the “Subject” field.
- Fill in the “Description” field.
- Click the “Create” button.
- Click on the “Filters” button.
- Expand the Status drop-down list.
- Click on “New.”
- Scroll down the page.
Environment:
Windows 10 Pro
Chrome v.117.0.5938.62, Firefox v.117.0.1, Microsoft Edge v. 116.0.1938.76
Actual Result:
The search field has been moved beneath the task block.
Expected Result:
The search field should be pinned at the top of the page.
Arrow tip points to incorrect position on guide
Severity:
Trivial
Precondition:
Log in to your account for the first time.
Steps to Reproduce:
- Click on the “Get Started” button.
- Click on the “Create 1st Project” button.
- Close the pop-up window.
- Click on the Scrum button.
- Fill in the “Project Name” and “Project Description” fields.
- Click on the “Create Project” button.
- Click on the “Add User Stories” button.
- Click on the name of the project.
- Click on the “Scrum” button.
- Click on the “Invite Members” button.
Environment:
Windows 10 Pro
Chrome v.117.0.5938.62, Firefox v.117.0.1, Microsoft Edge v. 116.0.1938.76
Actual Result:
The arrow tip points to the incorrect position on the guide.
Expected Result:
The arrow should point to the “Settings” button.
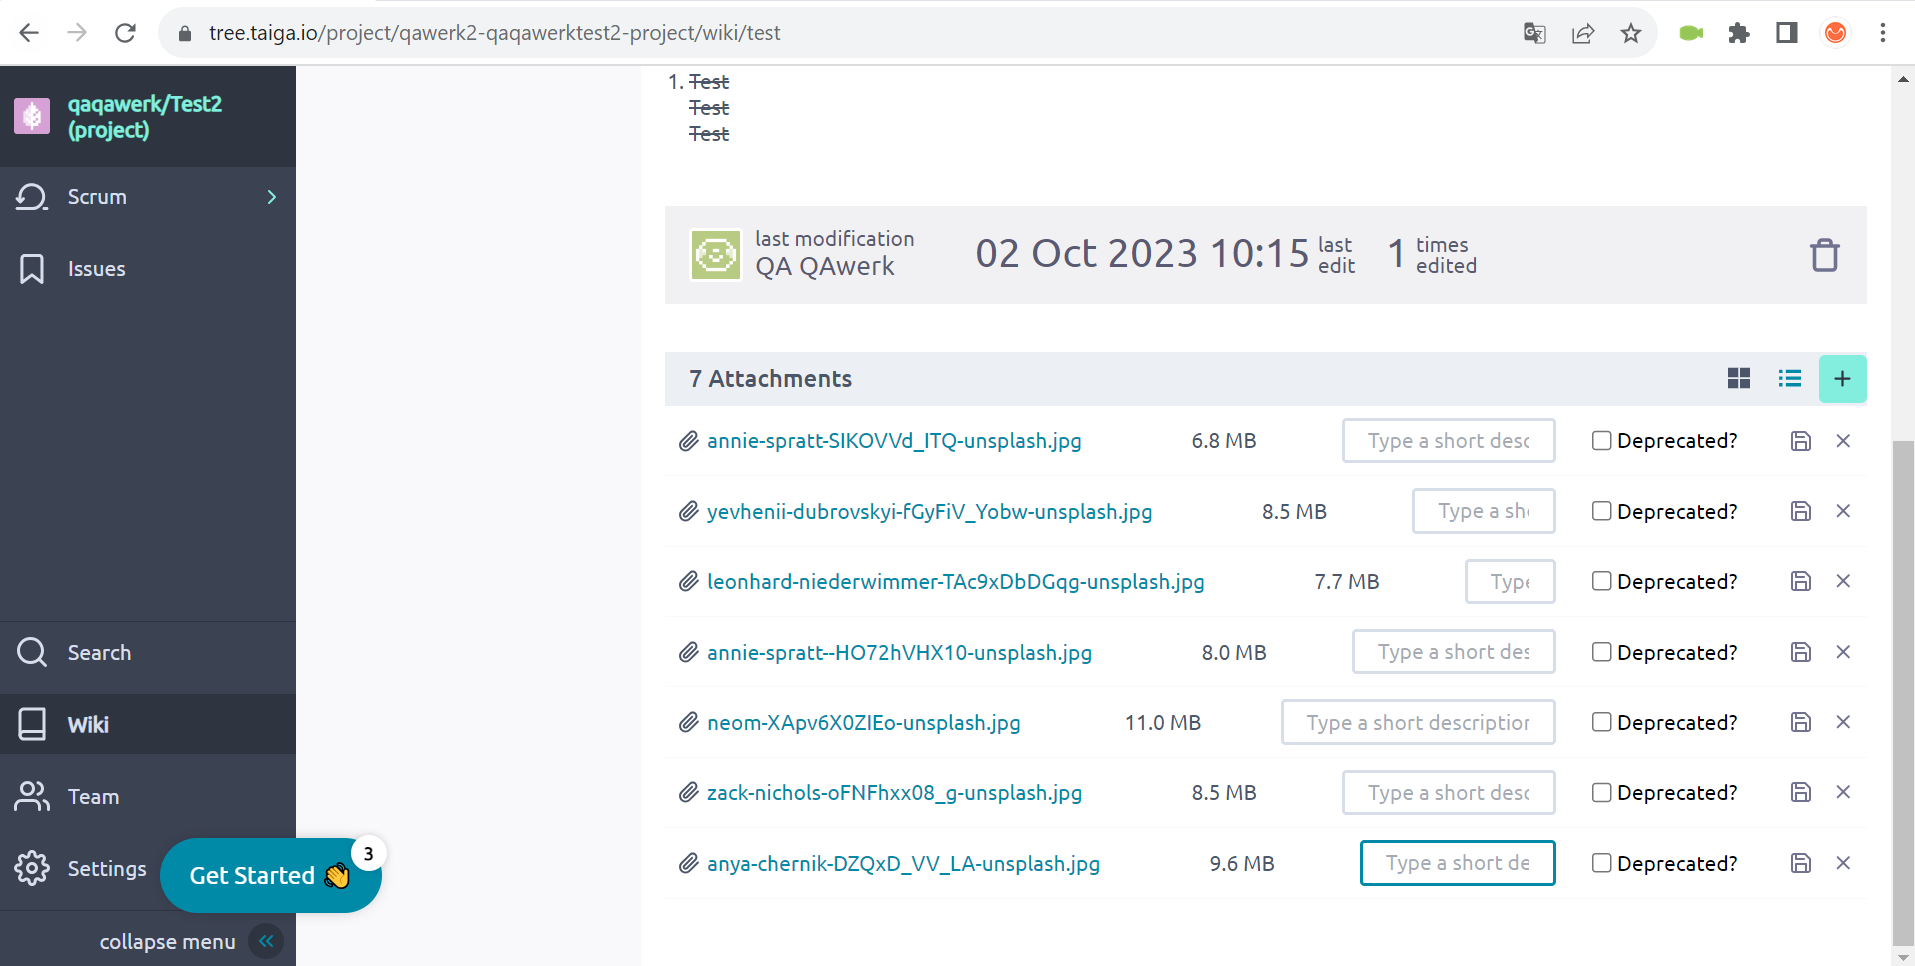
Attached files table has uneven columns
Severity:
Trivial
Precondition:
- Log in to your account.
- Download some pictures to your computer.
- Rename one picture to have a name with 10 characters and the other to have a name with 20 characters.
Steps to Reproduce:
- Go to the projects page.
- Click on the “New project” button.
- Click on the “Scrum” button.
- Fill in the “Project Name” and “Project Description” fields.
- Click on the “Create project” button.
- Click on the “Wiki” button.
- Click on the “Add bookmark” button.
- Enter a name.
- Press Enter.
- Click on the created bookmark.
- Click on the + button.
- Add two pictures.
Environment:
Windows 10 Pro
Chrome v.117.0.5938.62, Firefox v.117.0.1, Microsoft Edge v. 116.0.1938.76
Actual Result:
The attached files table has uneven columns.
Expected Result:
All columns for attached files should be the same for each file.
Missing "Add role" button
Severity:
Trivial
Precondition:
Log in to your account.
Steps to Reproduce:
- Go to the projects page.
- Click on the “NEW PROJECT” button.
- Click on the Scrum button.
- Fill in the “Project Name” and “Project Description” fields.
- Click on the “Create project” button.
- Click on the settings button in the side menu.
- Click on the “Permissions” button.
- Click on the “+ New role” button.
- Enter a name for the new role.
Environment:
Windows 10 Pro
Chrome v.117.0.5938.62, Firefox v.117.0.1, Microsoft Edge v. 116.0.1938.76
Actual Result:
When creating a new role, the “Add role” button is missing.
Expected Result:
When creating a new role, the “Add role” button should appear next to the entered name of the new role.
Not all site content is translated into selected language
Severity:
Trivial
Precondition:
Log in to your account.
Steps to Reproduce:
- Click on the account button in the upper right corner.
- Click on the “Account settings” button.
- Click on the “User Settings” button.
- Click on the “Language” drop-down list.
- Select “Українська.”
- Click on the “SAVE” button.
- Click on the “Get Started” button.
- Click on the “Create 1st Project” button.
- Close the pop-up.
- Click on the account button in the upper right corner.
Environment:
Windows 10 Pro
Chrome v.117.0.5938.62, Firefox v.117.0.1, Microsoft Edge v. 116.0.1938.76
Actual Result:
Not all site content is translated into the selected language.
Expected Result:
All site content should be translated into the selected language.
I recommend using a combination of automated and manual testing tools to thoroughly assess both functional and non-functional requirements. Prioritize specific testing types such as regression testing, usability testing, and localization testing.