Bugs found in SALESmanago SaaS
SALESmanago is a valuable tool for eCommerce businesses looking to boost their sales.
The platform gathers up-to-date information on customer transactions, preferences, and how they behave on your website. It offers innovative tools like zero-party data collection, AI-powered email design, and flexible workflows to tackle common eCommerce challenges. SALESmanago has earned the trust of renowned global brands such as Adidas, Converse, and Crocs.
Our QA engineers tested SALESmanago to assess software quality and assist in product improvement. Here is a summary of the bugs we discovered during testing.
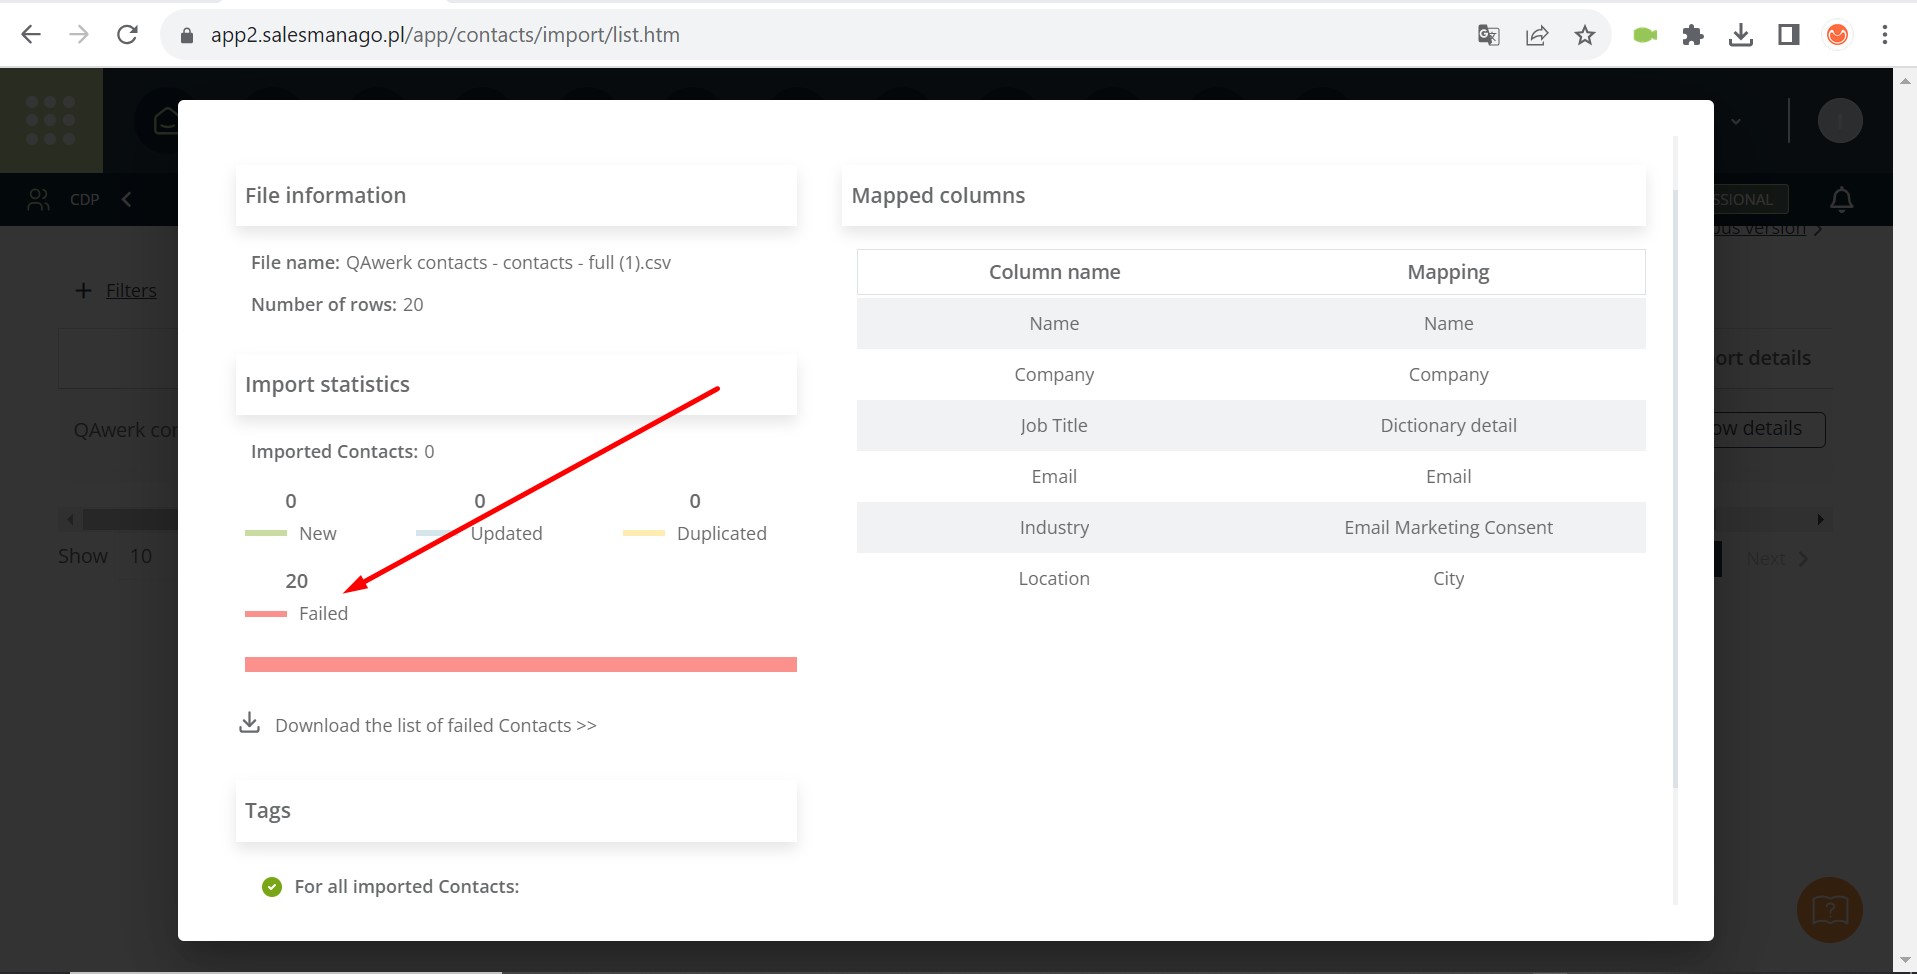
Impossible to export contacts
Severity:
Critical
Precondition:
- Log in to your account.
- Download the sample export data file to your computer.
Steps to Reproduce:
- Click on the “CDP / Contacts Import” button in the top menu.
- Click on the “New import” button.
- Click on the “Select file” button.
- Choose the previously downloaded file.
- Click on the “Next” button.
- For speakers:
- Select “Name” from the drop-down list under “Basic Contact Information” -> “Name.”
- Select “Company” under “Basic Contact Information” -> “Company.”
- For “Job Title,” choose “Standard Detail” in the pop-up, enter “Job Title,” and click the “Add” button.
- Choose “Email” under “Consents” -> “Email.”
- Select “Industry” from “Basic Contact Information” -> “Email Marketing.”
- Pick “Location” under “Basic Contact Information” -> “Country.”
- Click “Next.”
- Click “Next” again.
- Click “Save.”
- Click the “X” (cross).
- Find and select “Add list” from the list.
- Click “Show details.”
Environment:
Windows 10 Pro
Chrome v.117.0.5938.92, Firefox v.117.0.1, Microsoft Edge v. 117.0.2045.41
Actual Result:
It is impossible to export contacts.
Expected Result:
When exporting contacts, an error should occur during the category selection stage to prevent post-export failures.
Cannot recognize .csv file if it’s separated by commas
Severity:
Major
Precondition:
- Log in to your account.
- Download the sample export data file to your computer.
Steps to Reproduce:
- Click on the “CDP / Contacts Import” button in the top menu.
- Click on the “New Import” button.
- Click on the “Select File” button.
- Select the previously downloaded file.
- Click on the “Next” button.
Environment:
Windows 10 Pro
Chrome v.117.0.5938.92, Firefox v.117.0.1, Microsoft Edge v. 117.0.2045.41
Actual Result:
The platform cannot recognize a .csv file if it is separated by commas.
Expected Result:
When uploading a .csv file, the platform should allow users to choose a delimiter.
When swiftly adding widget to template, it can't be reused
Severity:
Major
Precondition:
Log in to your account.
Steps to Reproduce:
- Click the “Email Marketing / Dashboard” button in the top menu.
- Click the “New email” button.
- Select a theme from the “Email Design Studio templates” block.
- Click the “Use this template” button.
- Click the “Widgets” button.
- Drag the “Button” widget onto the template.
Environment:
Windows 10 Pro
Chrome v.117.0.5938.92, Firefox v.117.0.1, Microsoft Edge v. 117.0.2045.41
Actual Result:
When quickly moving a widget to a template, it loses its ability to be used again.
Expected Result:
Regardless of how quickly a widget is added to a template, the ability to add it again should always be retained.
When clicking button in pop-up, user does not follow link
Severity:
Major
Precondition:
Log in to your account.
Steps to Reproduce:
- Click “Lead Generation / Forms” in the top menu.
- Click “Create New.”
- Select “Image.”
- Choose “Desktop and smartphone.”
- Click “Next.”
- In the “Button” drop-down list, check “Add button” and “Add redirection.”
- In the “Button redirect URL” field, insert the link “https://qawerk.com/“.
- Click “Next.”
- Click “Next” three more times.
- Click “Finish.”
- Click “Save.”
- Hover the mouse over the created popup.
- Click “Preview.”
- Click the center button on the screen.
Environment:
Windows 10 Pro
Chrome v.117.0.5938.92, Firefox v.117.0.1, Microsoft Edge v. 117.0.2045.41
Actual Result:
When clicking the button in the pop-up, the user does not follow the link.
Expected Result:
After clicking the button in the pop-up, the user should follow the link.
Code is displayed in popup when page loads
Severity:
Minor
Precondition:
Log in to your account.
Steps to Reproduce:
- Click on the “Start / Dashboard” button in the top menu.
- Click on level 12 in the “10 minutes to set up” block.
- Click on the “Personalize Dashboard” button.
Environment:
Windows 10 Pro
Chrome v.117.0.5938.92
Actual Result:
The code is displayed in a popup when the page loads.
Expected Result:
The code should not be displayed in the popup.
Platform doesn't show integration completion info
Severity:
Minor
Precondition:
- Create an account in Shopify.
- Log in to your SALESmanago account.
Steps to Reproduce:
- Click on the “Start / Dashboard” button in the top menu.
- Click on level 1 in the “10 minutes to set up” block.
- Click on the “Integrate” button.
- Click on the “Integrate” button for the Shopify block.
- Click on the “Install” button.
- Log in to the Shopify account.
- Select a store from the list.
- Return to SALESmanago.
- Repeat steps 1-3.
Environment:
Windows 10 Pro
Chrome v.117.0.5938.92, Firefox v.117.0.1, Microsoft Edge v. 117.0.2045.41
Actual Result:
The platform does not show integration completion information.
Expected Result:
If the platform is integrated with SALESmanago, this information should be displayed on the integration page.
Web version doesn't show popup icon
Severity:
Minor
Precondition:
- Log in to your account.
- Download a picture to your computer that is under 2 MB in size.
Steps to Reproduce:
- Click “Lead Generation / Forms” in the top menu.
- Click “Create New.”
- Click “Image.”
- Choose “Desktop and smartphone.”
- Click “Next.”
- Click “Select from gallery.”
- Click “Add file” and upload the picture.
- Select the picture.
- Click “Select.”
- Click “Next.”
- Click “Next” again.
- Choose a Shape for the icon and select “Large Size.”
- Click the phone preview button.
- Return to the web version.
Environment:
Windows 10 Pro
Chrome v.117.0.5938.92, Firefox v.117.0.1, Microsoft Edge v. 117.0.2045.41
Actual Result:
The web version doesn’t show the popup icon.
Expected Result:
The attached image should be positioned as the background behind the icon on the web version.
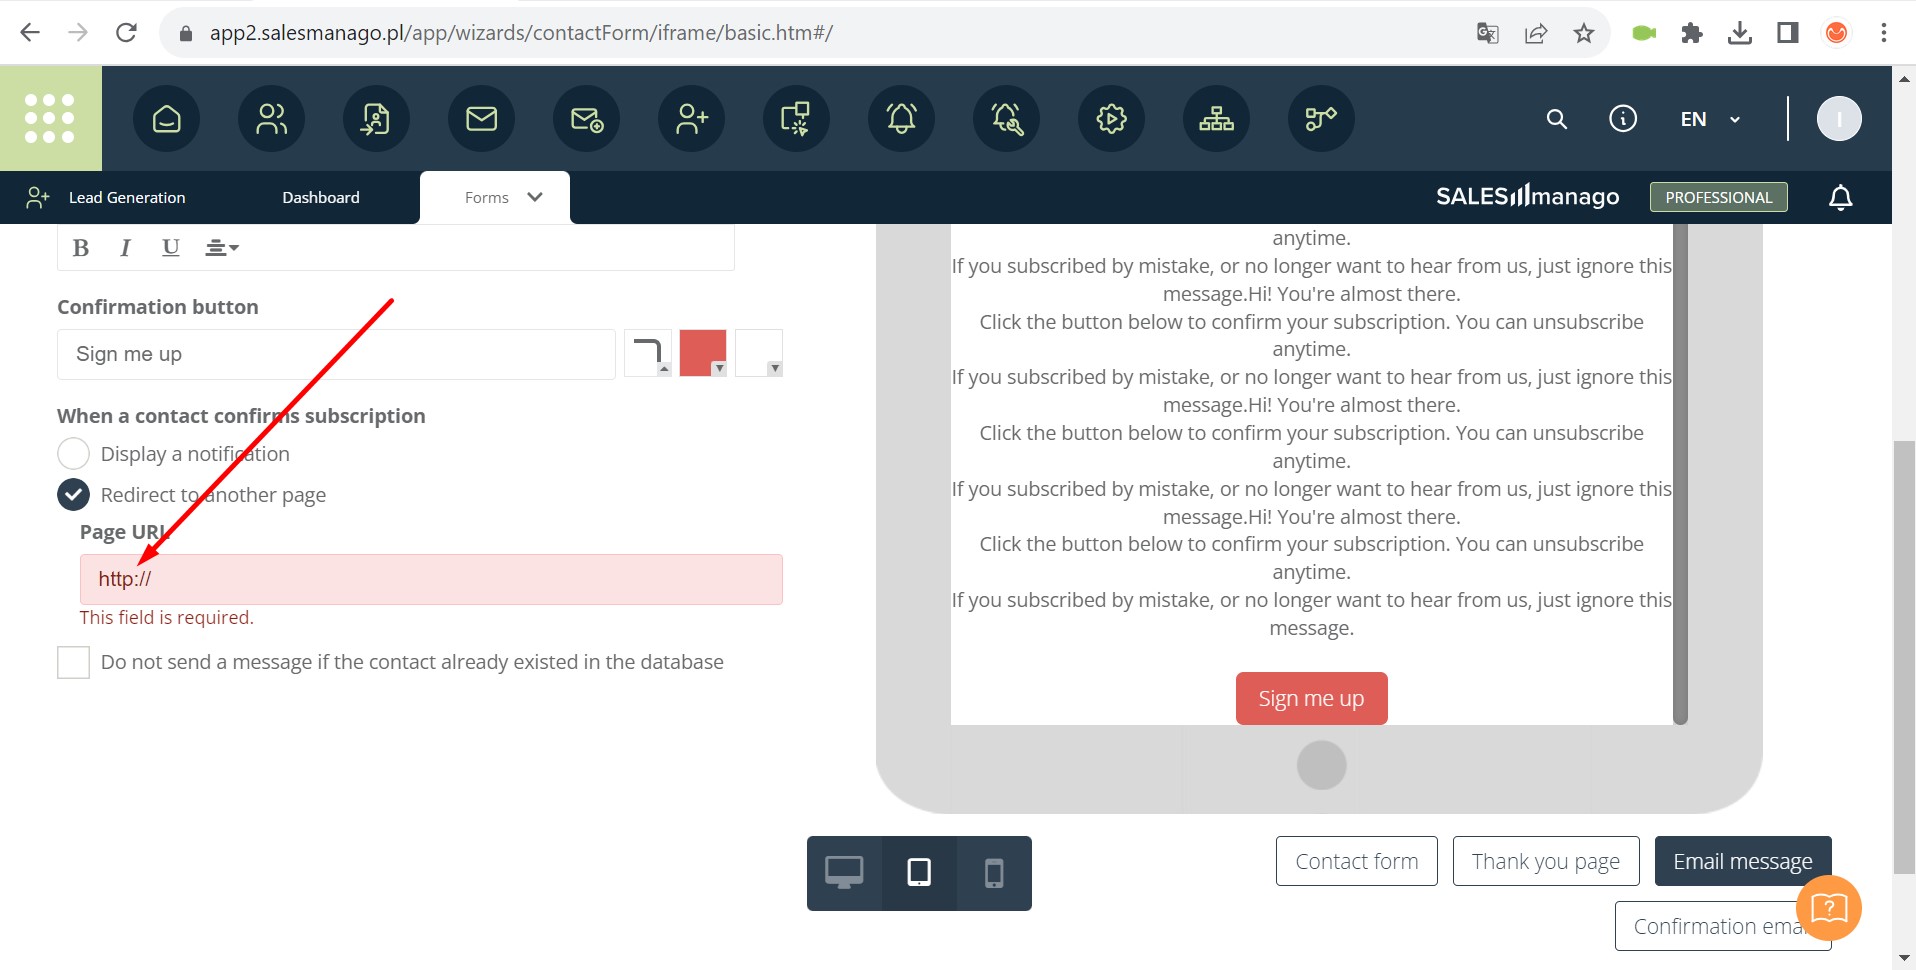
Default protocol is "http://"
Severity:
Minor
Precondition:
Log in to your account.
Steps to Reproduce:
- Click “Lead Generation / Forms” in the top menu.
- Hover over “Forms” in the top sub-menu.
- Click “Forms.”
- Click “Create new.”
- Choose “Express.”
- Click “Next” three times.
- In the “Page URL” field, enter “qawerk.com.”
Environment:
Windows 10 Pro
Chrome v.117.0.5938.92, Firefox v.117.0.1, Microsoft Edge v. 117.0.2045.41
Actual Result:
The default protocol is “http://”.
Expected Result:
By default, the “https://” protocol should be added.
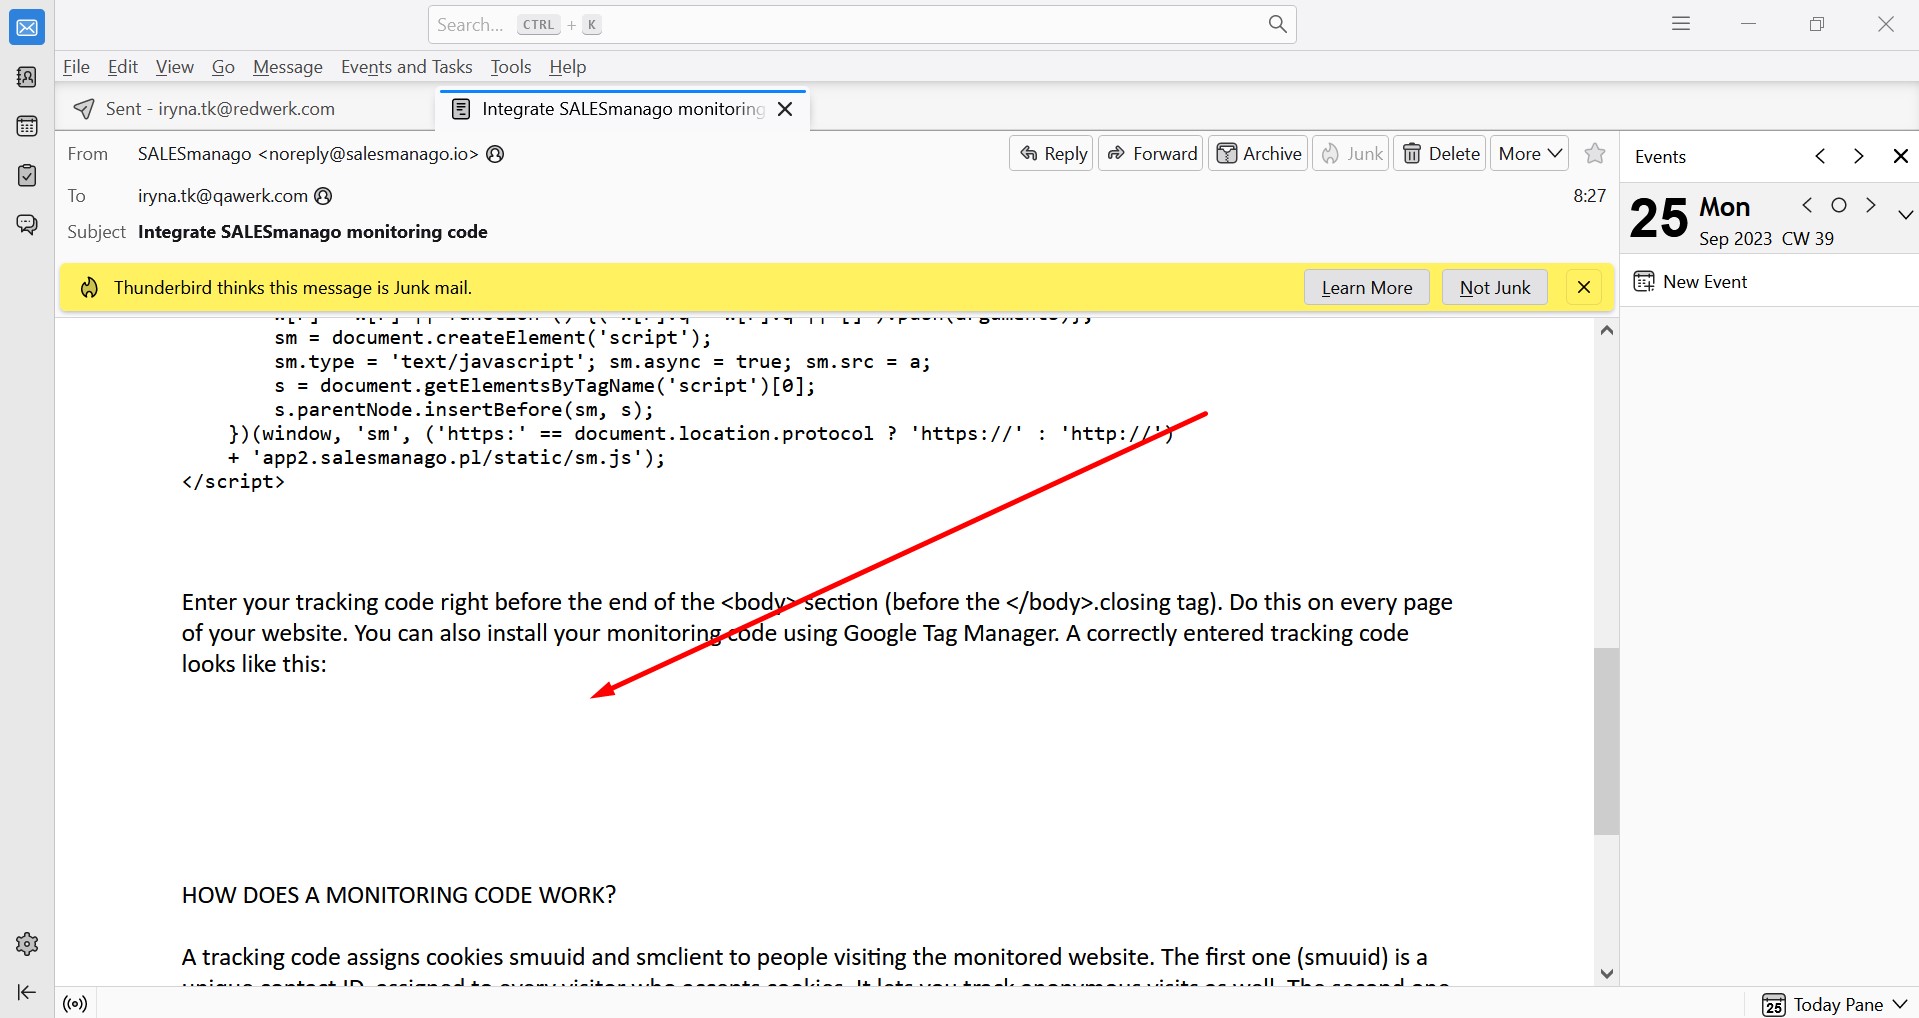
Thunderbird doesn’t display images in emails from SALESmanago
Severity:
Minor
Precondition:
- Sign up and sign in to your Thunderbird account.
- Log in to your SALESmanago account.
Steps to Reproduce:
- Click the main menu button in the top left corner.
- Enter “Monitoring Code” in the search field.
- Select “Monitoring Code” from the drop-down list.
- Enter your Thunderbird-associated email in the input field.
- Click “Send.”
- Open Thunderbird.
- Locate the new email from “SALESmanago noreply@salesmanago.io.”
- Open the email.
Environment:
Windows 10 Pro
Thunderbird 115.2.3
Actual Result:
Thunderbird mail agent does not display images in emails from SALESmanago.
Expected Result:
SALESmanago emails should display attached images.
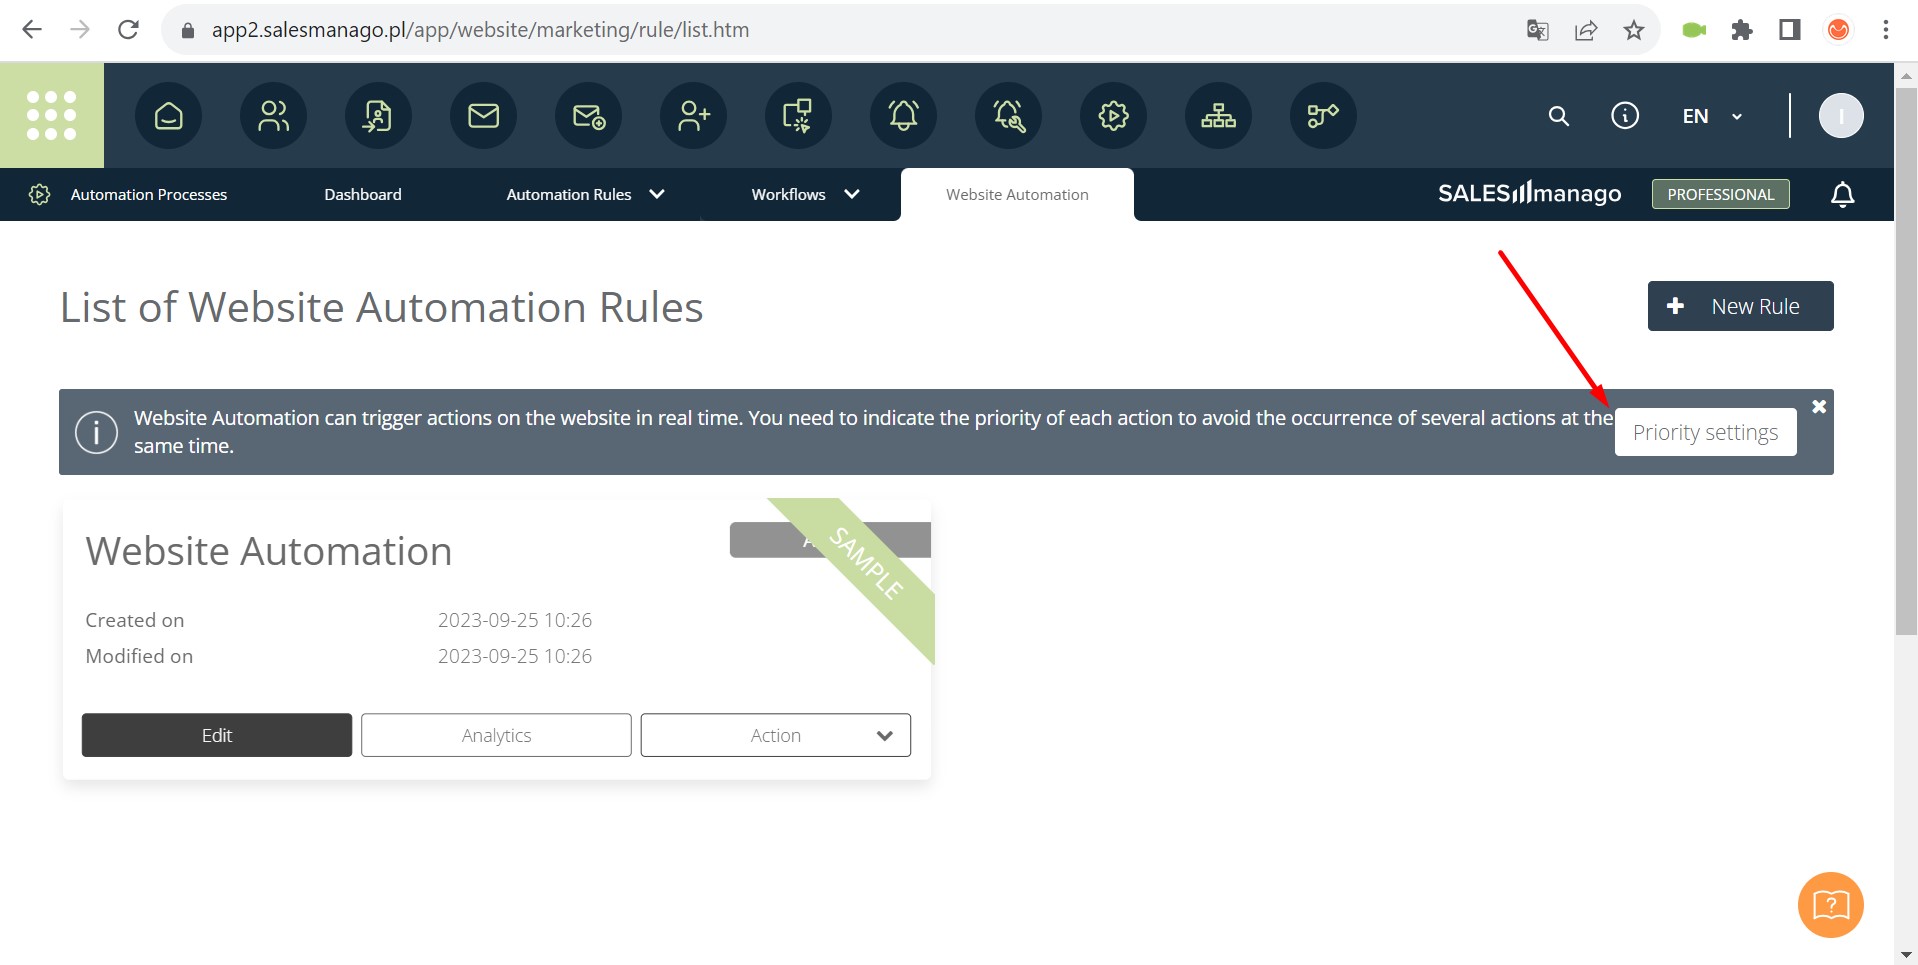
Notification lacks padding between notification text and button
Severity:
Minor
Precondition:
Log in to your account.
Steps to Reproduce:
- Click “Automation Processes / Workflows” in the top menu.
- Click “Website Automation” in the top sub-menu.
Environment:
Windows 10 Pro
Chrome v.117.0.5938.92, Firefox v.117.0.1
Actual Result:
The notification lacks padding between the notification text and the button.
Expected Result:
The notification should include space between the notification text and the “Priority settings” button.
When user clicks collapse button in feedback pop-up, it closes
Severity:
Trivial
Precondition:
Log in to your account.
Steps to Reproduce:
- Click “Lead Generation / Dashboard” in the top menu.
- Wait for the feedback pop-up window to appear.
- Click the down arrow to collapse it.
Environment:
Windows 10 Pro
Chrome v.117.0.5938.92, Firefox v.117.0.1, Microsoft Edge v. 117.0.2045.41
Actual Result:
When the user clicks the collapse button in the feedback pop-up, it closes.
Expected Result:
When the user clicks the collapse button on the feedback pop-up window, it should collapse.
Empty item in drop-down list is transparent
Severity:
Trivial
Precondition:
Log in to your account.
Steps to Reproduce:
- Click “Automation Processes / Automation Rules” in the top menu.
- Click “New Rule.”
- Click “Add Events.”
- Click “Add Actions.”
- Click the “+” in the Action block.
- Choose “Send SMS alert” and drag it over the “+”.
- Click the “Send SMS alert” settings button.
- Click “Save changes.”
- Click to open the drop-down list for the “SMS Gateway” block.
Environment:
Windows 10 Pro
Chrome v.117.0.5938.92, Microsoft Edge v. 117.0.2045.41
Actual Result:
An empty item in the drop-down list is transparent.
Expected Result:
An empty drop-down list should not have transparency.
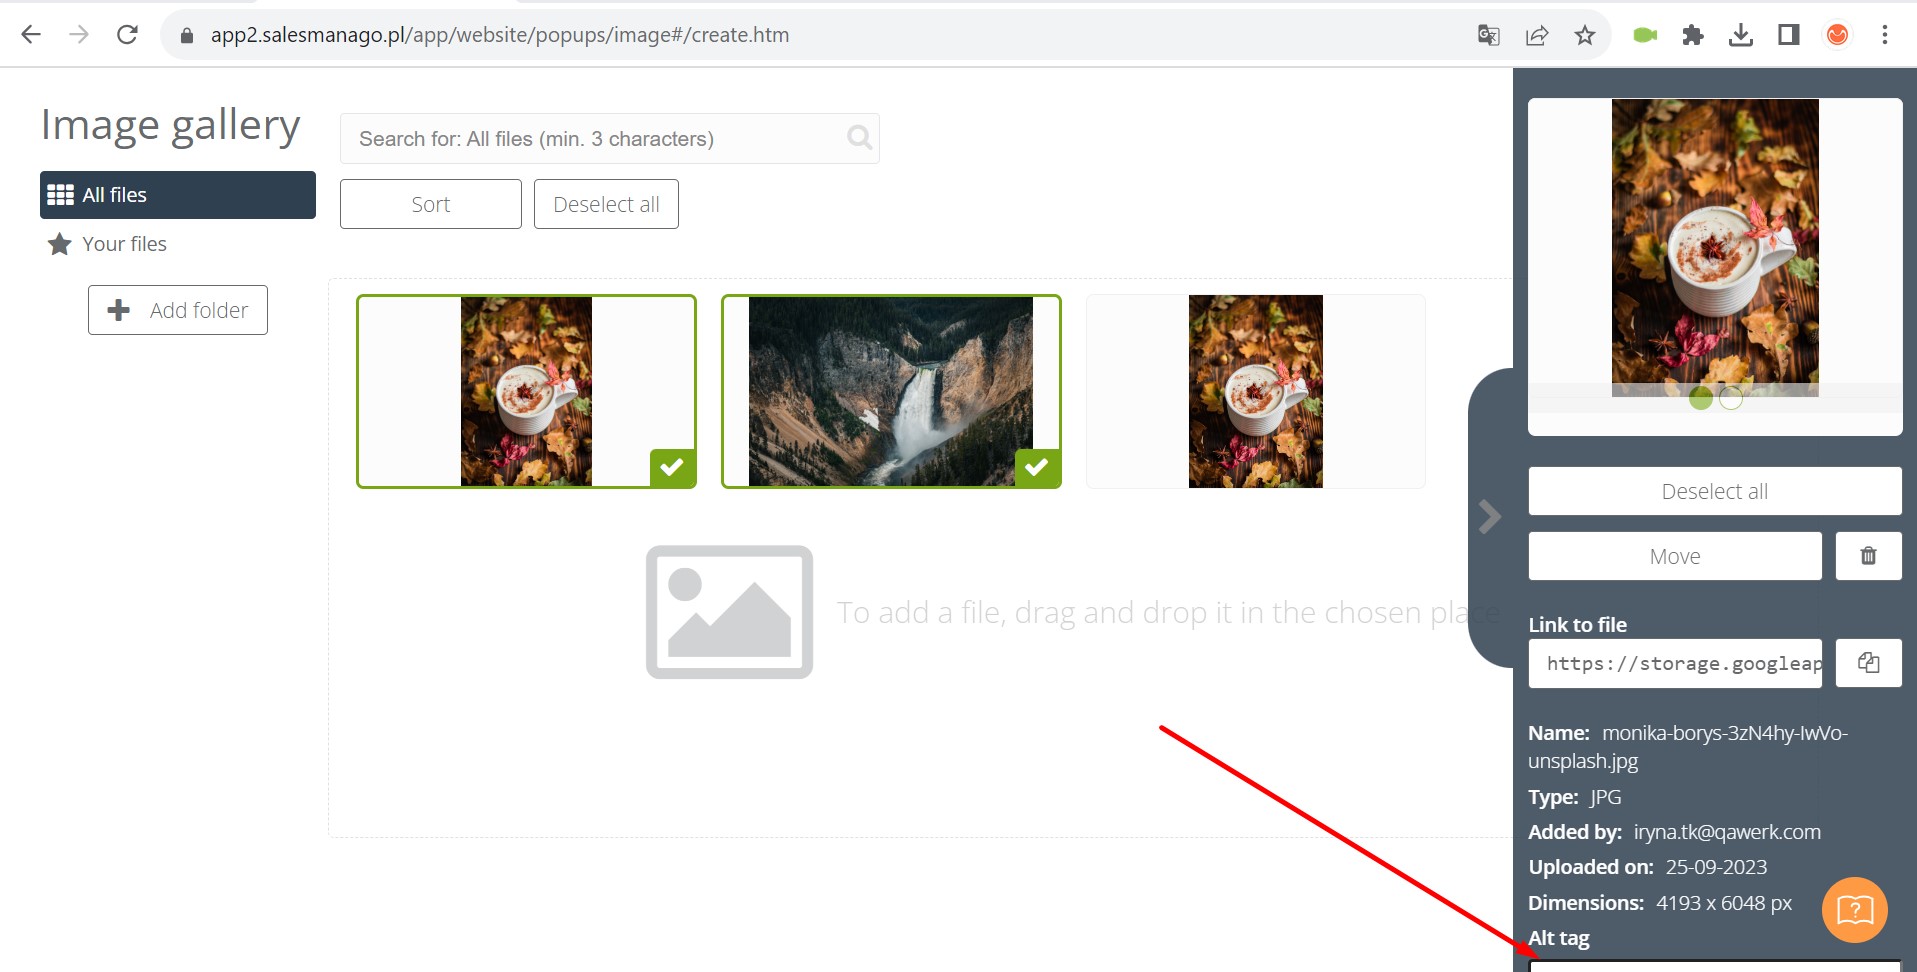
Missing side scrolling for details of uploaded pictures
Severity:
Trivial
Precondition:
- Log in to your account.
- Download any picture under 2 MB to your computer.
Steps to Reproduce:
- Click “Lead Generation / Forms” in the top menu.
- Click “Create New.”
- Choose “Image.”
- Select “Desktop and smartphone.”
- Click “Next.”
- Click “Select from gallery.”
- Click “Add file” to upload the picture.
- Click on the uploaded picture.
- Attempt to scroll through the details.
Environment:
Windows 10 Pro
Chrome v.117.0.5938.92, Firefox v.117.0.1, Microsoft Edge v. 117.0.2045.41
Actual Result:
Side scrolling for details of uploaded pictures is missing.
Expected Result:
A side scroller should be visible for the details of the attached pictures.
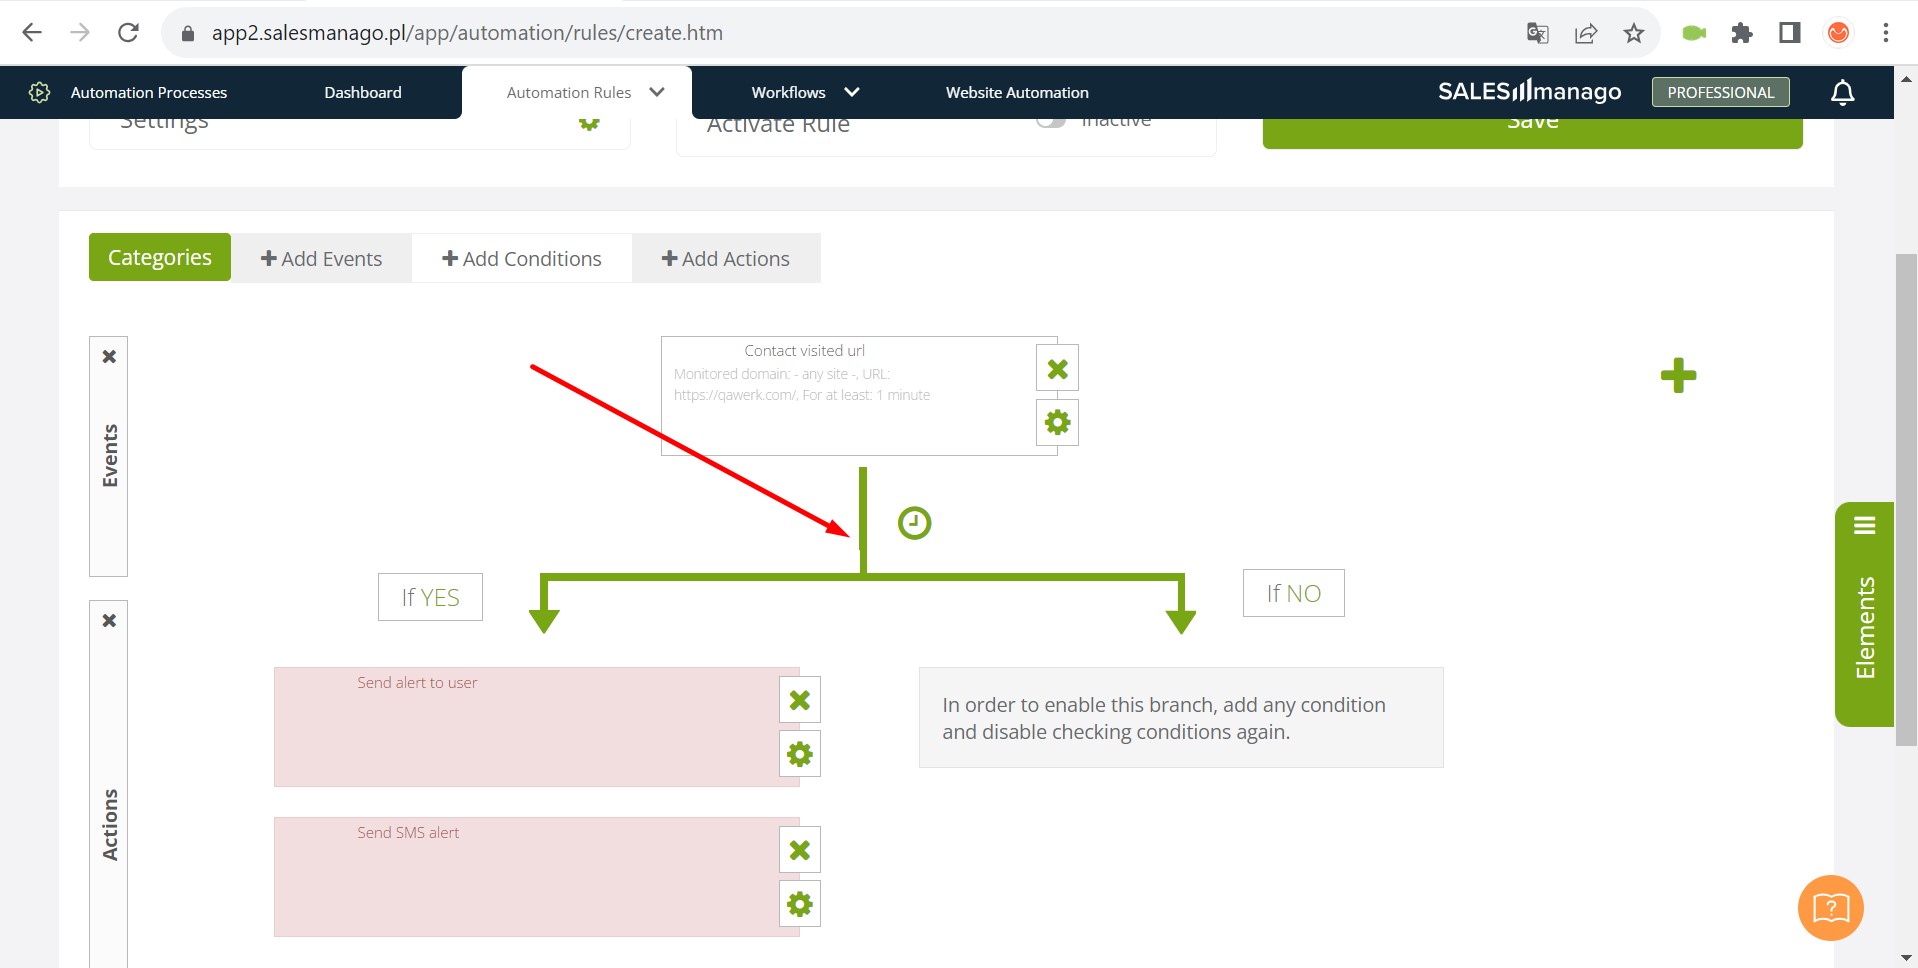
When creating Rule, automation stick for added event doesn’t move smoothly
Severity:
Trivial
Precondition:
Log in to your account.
Steps to Reproduce:
- Click “Automation Processes / Automation Rules” in the top menu.
- Click “New Rule.”
- Click “Add Events.”
Environment:
Windows 10 Pro
Chrome v.117.0.5938.92, Microsoft Edge v. 117.0.2045.41
Actual Result:
When creating a Rule, the automation stick for the added event does not move smoothly.
Expected Result:
The stick should be level.
When moving block, its image remains in main template
Severity:
Trivial
Precondition:
Log in to your account.
Steps to Reproduce:
- Click “Email Marketing / Dashboard” in the top menu.
- Click “New email.”
- Choose any theme from the “Email Design Studio templates” block.
- Click “Use this template.”
- Click “Widgets.”
- Add the “Button” widget to the template three times.
- Click on the block with the button.
- Press and hold the icon to move the block within the template.
- Move the block.
- Release the mouse.
Environment:
Windows 10 Pro
Chrome v.117.0.5938.92, Firefox v.117.0.1, Microsoft Edge v. 117.0.2045.41
Actual Result:
When moving a block, its image remains in the main template.
Expected Result:
The main image of the block should become semi-transparent and move with the mouse when it’s dragged around the template.
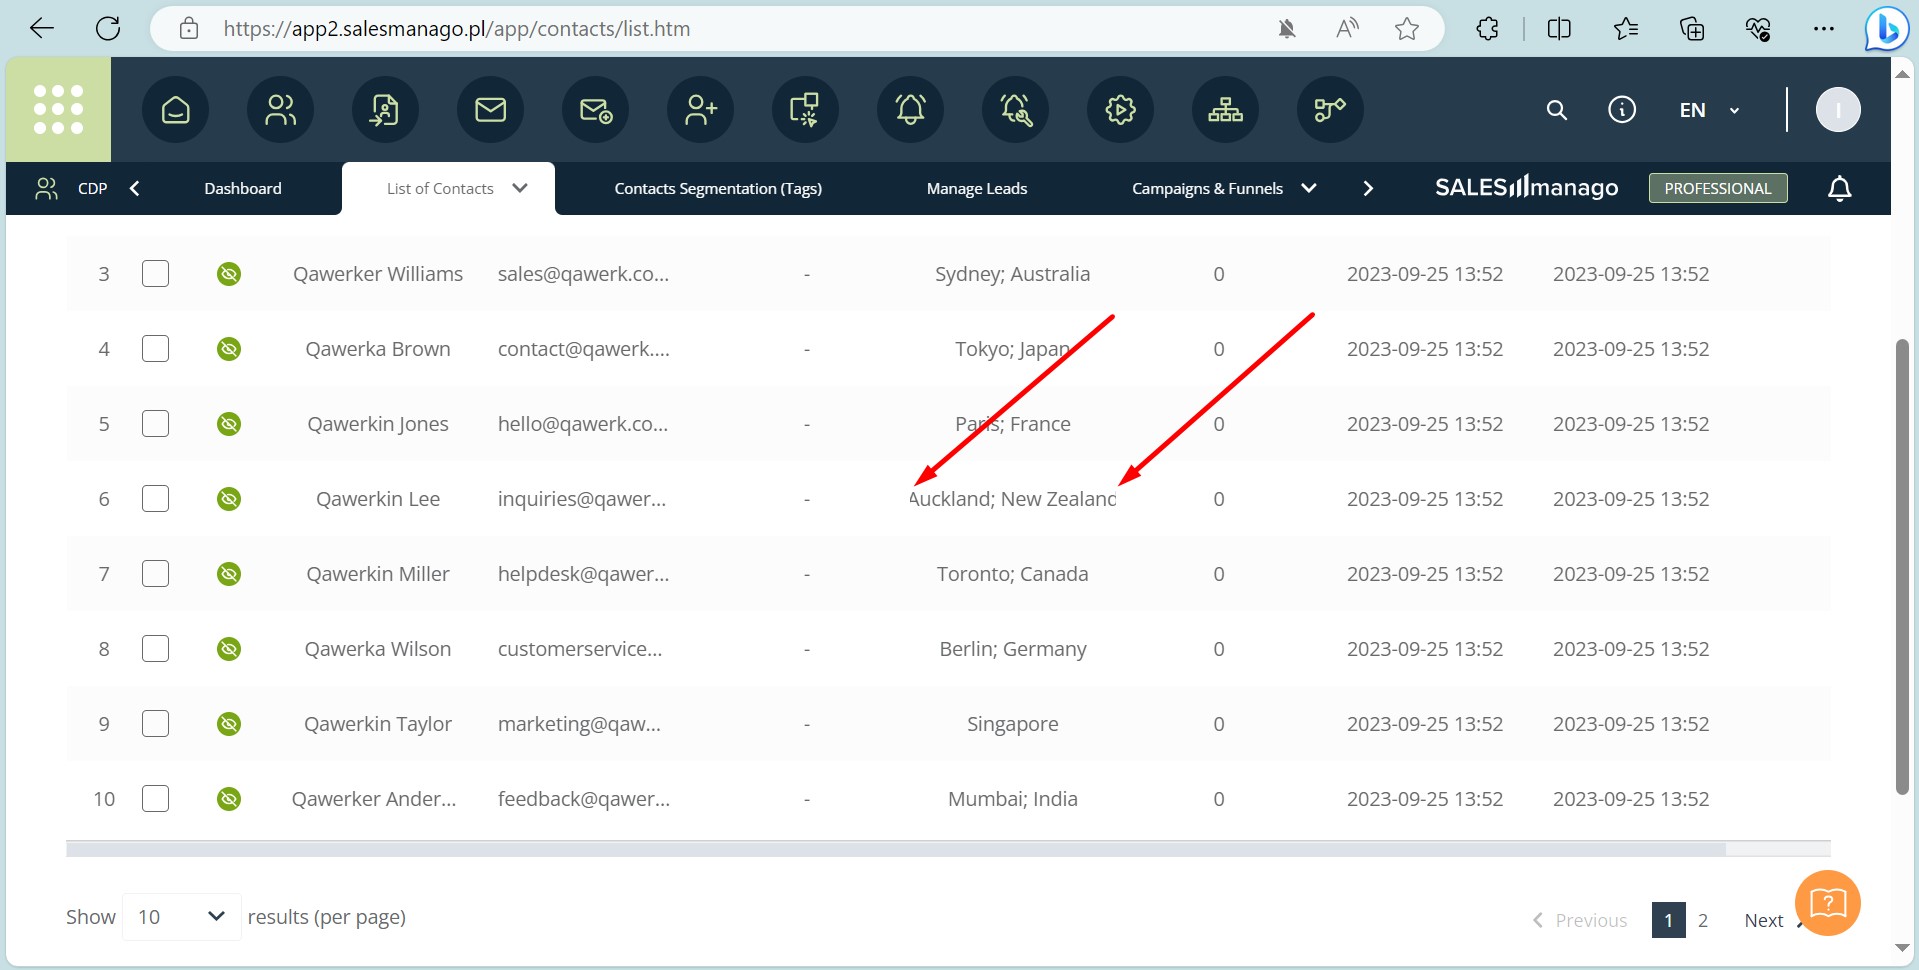
Contact information is cut off on both sides
Severity:
Trivial
Precondition:
- Log in to your account.
- Download the sample export data file to your computer.
Steps to Reproduce:
- Click “CDP / Contacts Import” in the top menu.
- Click “New import.”
- Select the previously downloaded file by clicking “Select file.”
- Click “Next.”
- For speakers:
- Select “Name” from the drop-down list under “Basic Contact Information” -> “Name.”
- Select “Company” under “Basic Contact Information” -> “Company.”
- For “Job Title,” choose “Standard Detail” from the pop-up, enter “Job Title,” and click the “Add” button.
- Select “Email” under “Basic Contact Information” -> “Email.”
- For “Industry,” choose “Standard Detail” from the pop-up, enter “Industry,” and click the “Add” button.
- Choose “Location” under “Basic Contact Information” -> “Country.”
- Click “Next.”
- Click “Next.”
- Click “Save.”
- Click the cross (or X).
- Click “CDP / Contacts Import” in the top menu.
- Click “List of Contacts” in the top sub-menu.
Environment:
Windows 10 Pro
Chrome v.117.0.5938.92, Firefox v.117.0.1, Microsoft Edge v. 117.0.2045.41
Actual Result:
Contact information is cut off on both sides.
Expected Result:
The data should be displayed from the beginning, and if there’s not enough space at the end, three dots should be displayed to indicate truncation.
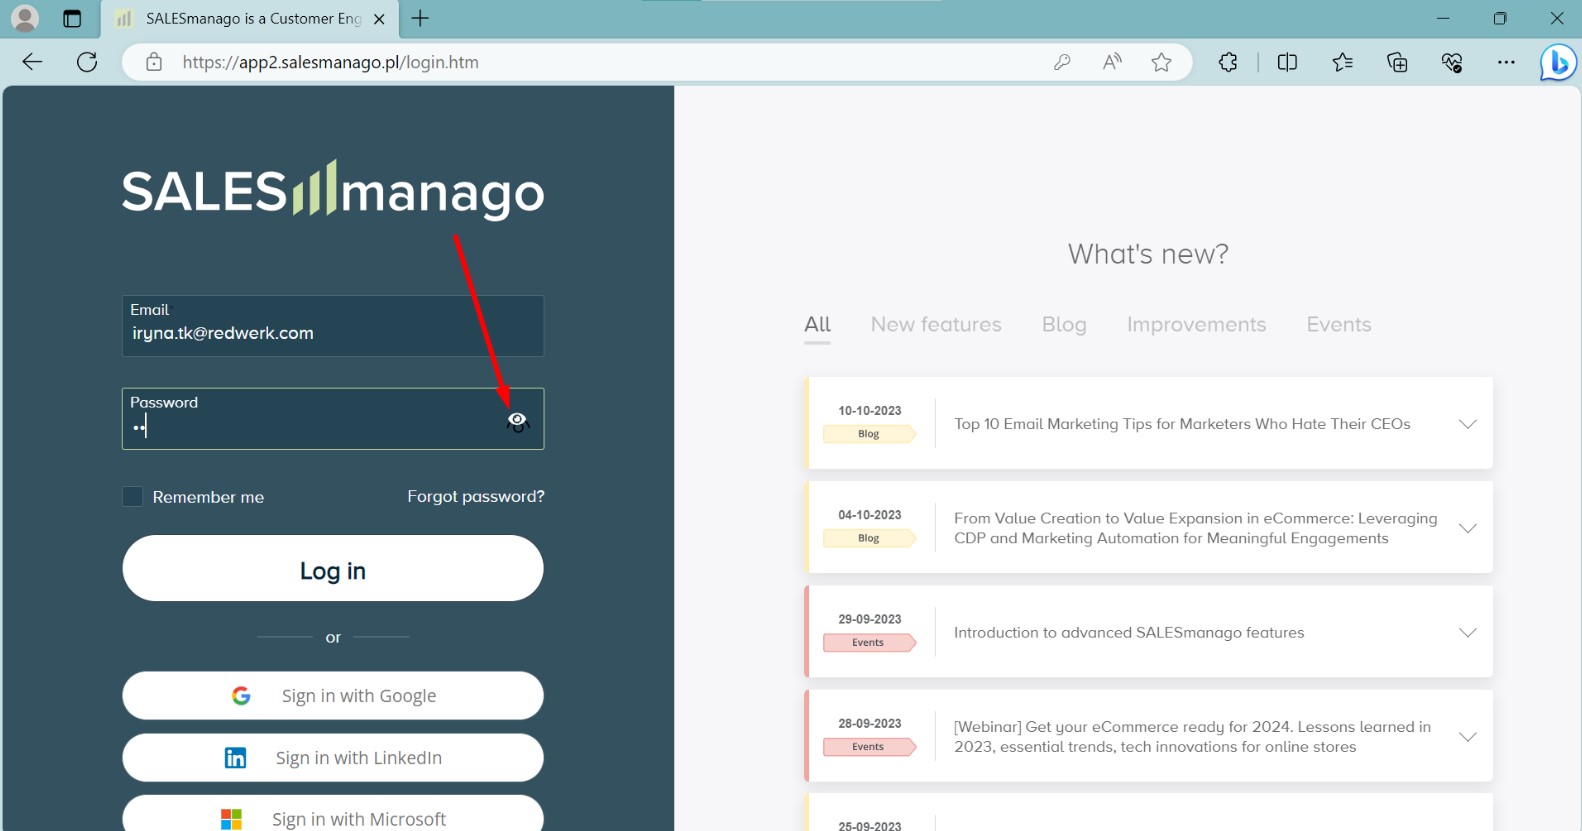
"Show Password" button appears twice, overlapping both browser and platform buttons
Severity:
Trivial
Steps to Reproduce:
- Go to the main page of the site (https://www.salesmanago.com/).
- Click “LOG IN.”
- Click the password field.
- Start typing characters.
Environment:
Windows 10 Pro
Microsoft Edge v. 117.0.2045.41
Actual Result:
The “Show Password” button is displayed twice, overlapping both the default browser button and the customized platform button.
Expected Result:
The “Show Password” button should be displayed only once.
To ensure the quality and reliability of SALESmanago, I recommend using a combination of functional and non-functional testing tools, including automated testing frameworks for functional requirements and performance testing tools to assess responsiveness and stability, while focusing on usability testing to ensure a seamless user experience. This is especially important when handling tasks such as exporting contacts, working with .csv files, and using widgets.