Bugs found in Pipeline CRM SaaS

Pipeline CRM is a powerful digital platform that aims to streamline the sales process. Pipeline CRM offers easy setup, integrations, and customization.
With a range of impressive features, Pipeline CRM facilitates seamless interactions with prospective clients, follows through commitments, and ensures optimal sales routine organization. The platform provides an integration process that synchronizes all relevant data, allowing for better efficiency and collaboration within your team.
We at QAwerk performed manual testing of Pipeline CRM and identified a set of bugs that could affect both the performance and the user experience on the platform. We hope our findings will help the development team improve the platform’s quality and continue delivering value to their customers.
Task does not appear in weekly events list after date is moved in Agenda
Critical
Login to the account.
- Click on the “Dashboards” button in the top menu.
- In the “Agenda” block, click on the “Past Due” tab.
- Click on the “Create new task” button.
- Fill in the “Name” field.
- In the “Due date” field, choose a date a few days before the current one.
- Click the “Save” button.
- Сlick on the “Past Due” tab.
- Click on the created task.
- Click on the button “Postponed 7 days”.
- Click on the “This week” tab.
OS: Windows 10 Pro
Browsers: Chrome v.129.0.6668.101, Firefox v.131.0, Microsoft Edge v.130.0.2849.46
A task does not show in the ‘This week’ events list when its date in the Agenda is moved to a week.
When a task’s date in the Agenda is shifted to a week, the task should properly appear in the events list for the corresponding week.
Discrepancy between actual number of notifications and number displayed by icon
Major
Create a Gmail account.
- Click on the “Sign Up” button.
- Click on the “Sign Up with Google” button.
- Choose a Gmail account.
- Go to the Gmail mailbox of the created account.
- Open the confirmation email.
- Click on the “Verify Account” button.
- Fill in the following fields:
- “Your Company Name”.
- “Your Phone Number”.
- “Select TYour Goal”.
- “What is your Team size?”
- Click on the “Get Started” button.
- Click on the cross.
- Click on the cross.
- Click on the “Notification” button.
OS: Windows 10 Pro
Browsers: Chrome v.129.0.6668.101, Firefox v.131.0, Microsoft Edge v.130.0.2849.46
The number displayed by the notifications icon does not tally with the actual number of notifications.
The number of notifications displayed by the icon should match the actual number of notifications.
One step from guide is missing
Major
- Register a new account.
- Login to the registered account.
- Click on the chat icon in the lower right corner.
- Click on the left button.
- Click on “Getting started with Pipeline!” button.
- Click on the “How to Navigate List Views” button.
- Click on the “LET’S GO” button.
- Click on the “Next” button.
- Click on the “Add New Company” button.
- Click on the “Next” button.
- Click on the down arrow.
- Click on the “Next” button.
- Click on the “Next” button.
- Wait.
OS: Windows 10 Pro
Browsers: Chrome v.129.0.6668.101, Firefox v.131.0, Microsoft Edge v.130.0.2849.46
A guide step is missing from the sequence which obstructs the completion of the guide at 100%.
The guide should feature all the steps in the correct order without any omission.
No error message is displayed when required field is left unfilled while saving data
Major
Login to the account.
- Click on the profile button.
- Click on the “My Profile” button.
- Click on the “Email” button.
- Scroll down to the “Your office address” block.
- Fill in the fields:
- “Street Address”.
- City.
- “Zip/Postal Code”.
- Click on the “Save” button.
OS: Windows 10 Pro
Browsers: Chrome v.129.0.6668.101, Firefox v.131.0, Microsoft Edge v.130.0.2849.46
The form is saved without any error message indicating that a required field was left unfilled.
An error message should be displayed indicating that all required fields must be filled before saving the form.
Empty tab opens when migration button is clicked without selecting platform
Major
Login to the account.
- Click on the “Add” button.
- Click on the “Imports” button.
- Click on the “Migrate Now” button.
OS: Windows 10 Pro
Browsers: Chrome v.129.0.6668.101, Firefox v.131.0, Microsoft Edge v.130.0.2849.46
Clicking the ‘Migrate Now’ button without a selected platform opens an empty tab.
The ‘Migrate Now’ button should be inactive when no migration platform is selected.
Report is saved without legend
Major
Login to the account.
- Click on the “Reports” button in the top menu.
- Click on the “Reports” button.
- Click on the “Create New Report” button.
- Click on the “Reports” button.
- Click on the “Chart Type” pie icon.
- Click on the “Report Options” button.
- Click the “Download PNG” button.
- Open the downloaded image.
OS: Windows 10 Pro
Browsers: Chrome v.129.0.6668.101, Firefox v.131.0, Microsoft Edge v.130.0.2849.46
The downloaded report doesn’t contain a legend.
The downloaded report should contain a legend.
Guide steps do not function correctly when popup is open
Major
Login to the account.
- Click on the chat icon in the lower right corner.
- Click on the left button.
- Click on “Let’s Get Set up for Success!” button.
- Click on the “Creating Custom Fields” button.
- Click on the “LET’S GO” button.
- Click on the “Profile” button.
- Click on the “Account settings” button.
- Click on the “Custom field” button.
- Click on the “Next” button.
- Click on the “Deal” button.
- Click on the “Next” button.
- Click on the “Add Custom Field” button.
- Click on the “Next” button.
- Click on the “Picklist field” button.
- Click on the “Done!” button.
- Click on the “Deal Stages” button.
- Click on the “LET’S GO” button.
- Click on the “Profile” button.
OS: Windows 10 Pro
Browsers: Chrome v.129.0.6668.101, Firefox v.131.0, Microsoft Edge v.130.0.2849.46
If the popup is open, the steps of the guide do not work.
The guide steps should function correctly even when the popup is open.
There is no automatic navigation to top of page when going through guide
Minor
Login to the account.
- Click on the “Dashboards” button in the top menu.
- Scroll down the page.
- Click on the chat icon in the lower right corner.
- Click on the left button.
- Click on “Getting started with Pipeline!” button.
- Click on the “Import your Data from Another CRM” button.
- Click on the “LET’S GO” button.
OS: Windows 10 Pro
Browsers: Chrome v.129.0.6668.101, Firefox v.131.0, Microsoft Edge v.130.0.2849.46
There is no automatic navigation to the top of the page when going through the guide.
The page should automatically navigate to the top when proceeding through the guide steps.
Blank page is added to generated PDF file
Minor
Login to the account.
- Click on the “Dashboards” button in the top menu.
- Click on any deal.
- Click on the “Actions” button.
- Click on the “PDF” button.
- Scroll down the file.
OS: Windows 10 Pro
Browsers: Chrome v.129.0.6668.101, Firefox v.131.0, Microsoft Edge v.130.0.2849.46
A blank page is added to the generated PDF file.
The generated PDF file should not contain any blank pages.
Information icon overlapping with scroll bar
Minor
Create a Gmail account.
- Click on the “Sign Up” button.
- Click on the “Sign Up with Google” button.
- Choose a Gmail account.
- Click on the “Continue” button.
- Go to the Gmail mailbox of the created account.
- Open the confirmation email.
- Click on the “Verify Account” button.
- Fill in the following fields:
- “Your Company Name”.
- “Your Phone Number”.
- “Select TYour Goal”.
- “What is your Team size?”
- Click on the “Get Started” button.
- Click on the cross.
- Click on the cross.
- Click on the “Email” button in the top menu.
- Click on the “Sync my email” button.
- Click on the “Google” button.
- Choose a Google account.
- Click on the “Continue” button.
- Tick ”Select all”.
- Click on the “Continue” button.
OS: Windows 10 Pro
Browsers: Chrome v.129.0.6668.101, Firefox v.131.0, Microsoft Edge v.130.0.2849.46
The information icon is overlapping with the scroll bar.
The information icon should not interfere or overlap with the scroll bar.
Event pop-up extends beyond calendar interface
Minor
Login to the account.
- Click on the “Calendar” button in the top menu.
- Click on the “Day” button.
- Click on any time slot.
- Fill in the “Name *” field.
- Click the “Save” button.
- Click on the event.
- Scroll up the page.
OS: Windows 10 Pro
Browsers: Chrome v.129.0.6668.101, Firefox v.131.0, Microsoft Edge v.130.0.2849.46
The event pop-up extends beyond the boundaries of the calendar interface when the page is scrolled.
The event pop-up should remain within the confines of the calendar, regardless of page scroll.
Event time discrepancy between creation and display on calendar
Minor
Login to the account.
- Click on the “Calendar” button in the top menu.
- Click on the “Day” button.
- Click on 1:00 – 2:00 am time slot.
- Fill in the “Name *” field.
- Click the “Save” button.
OS: Windows 10 Pro
Browsers: Chrome v.129.0.6668.101, Firefox v.131.0, Microsoft Edge v.130.0.2849.46
The displayed event time on the calendar does not match the time set during event creation.
The event time displayed on the calendar should exactly match the time specified during event creation.
Profile icon is not replaced with selected photo
Minor
Login to the account.
- Click on the profile button.
- Click on the “My Profile” button.
- Click on the “Add Profile Picture” button.
- Choose an image.
- Click the “Open” button.
- Click on the “Save” button.
OS: Windows 10 Pro
Browsers: Chrome v.129.0.6668.101, Firefox v.131.0, Microsoft Edge v.130.0.2849.46
The profile icon is not replaced with the selected photo.
The profile icon should be successfully replaced with the selected photo.
If selection of time slot starts from end of event, then time slot is merged into wrong interval
Minor
Login to the account.
- Click on the “Calendar” button in the top menu.
- Click on the “Day” button.
- Click on the 10 am field and drag up.
OS: Windows 10 Pro
Browsers: Chrome v.129.0.6668.101, Firefox v.131.0, Microsoft Edge v.130.0.2849.46
The selection of a time slot from the end of an event leads to the merging of the time slot into an incorrect interval.
The time of the event must correspond to the selected time frame during creation.
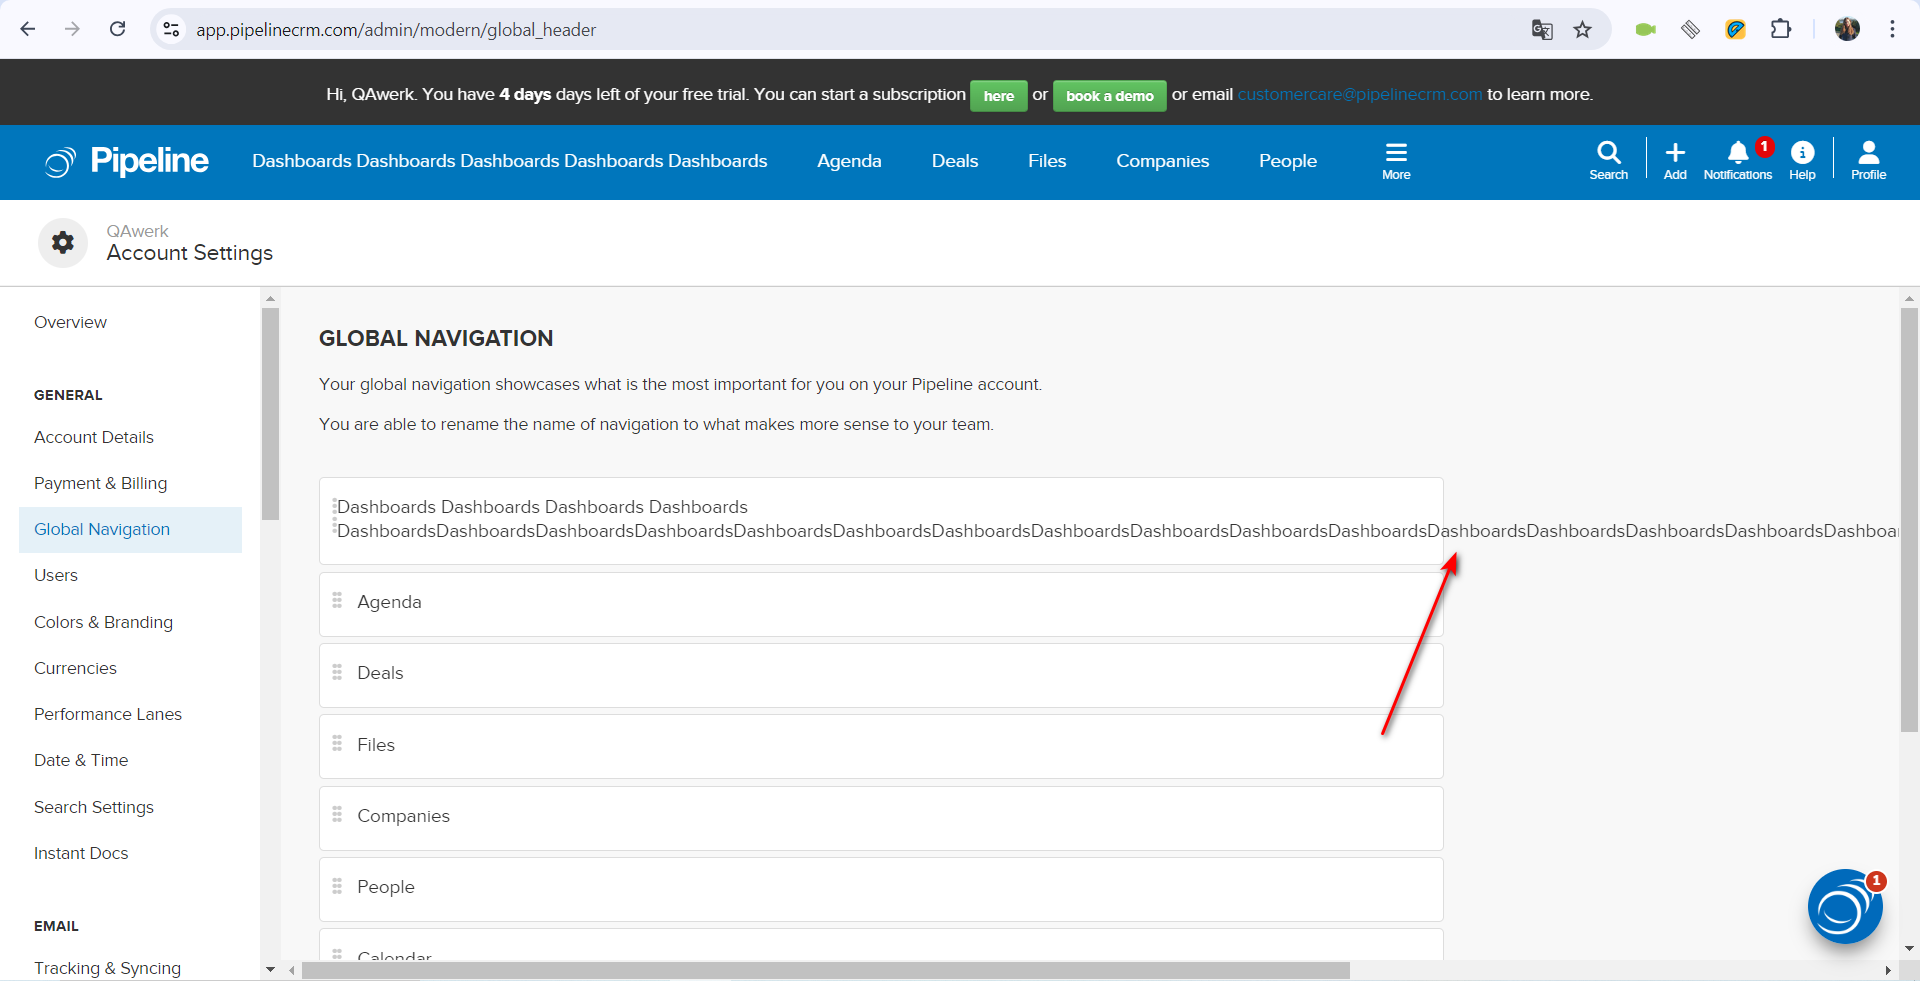
Text exceeds field boundaries
Trivial
Login to the account.
- In the top menu, click on the “More” button.
- Click on the “Customize Header” button.
- Hover over “Dashboards”.
- Click on the edit button.
- Enter.
- Enter 150 characters without spaces.
OS: Windows 10 Pro
Browsers: Chrome v.129.0.6668.101, Firefox v.131.0, Microsoft Edge v.130.0.2849.46
The text extends beyond the field.
The text must not go outside the field.
Enter is placed under selected drop-down list item
Trivial
Login to the account.
- In the top menu, click on the “Agenda” button.
- Click on the “Add New Task” button.
- Click on the “Priority” dropdown list.
- Select “Medium”.
OS: Windows 10 Pro
Browsers: Chrome v.129.0.6668.101, Firefox v.131.0, Microsoft Edge v.130.0.2849.46
Enter is placed under the selected drop-down list item.
Enter should not blink after selecting a value from the drop-down list.
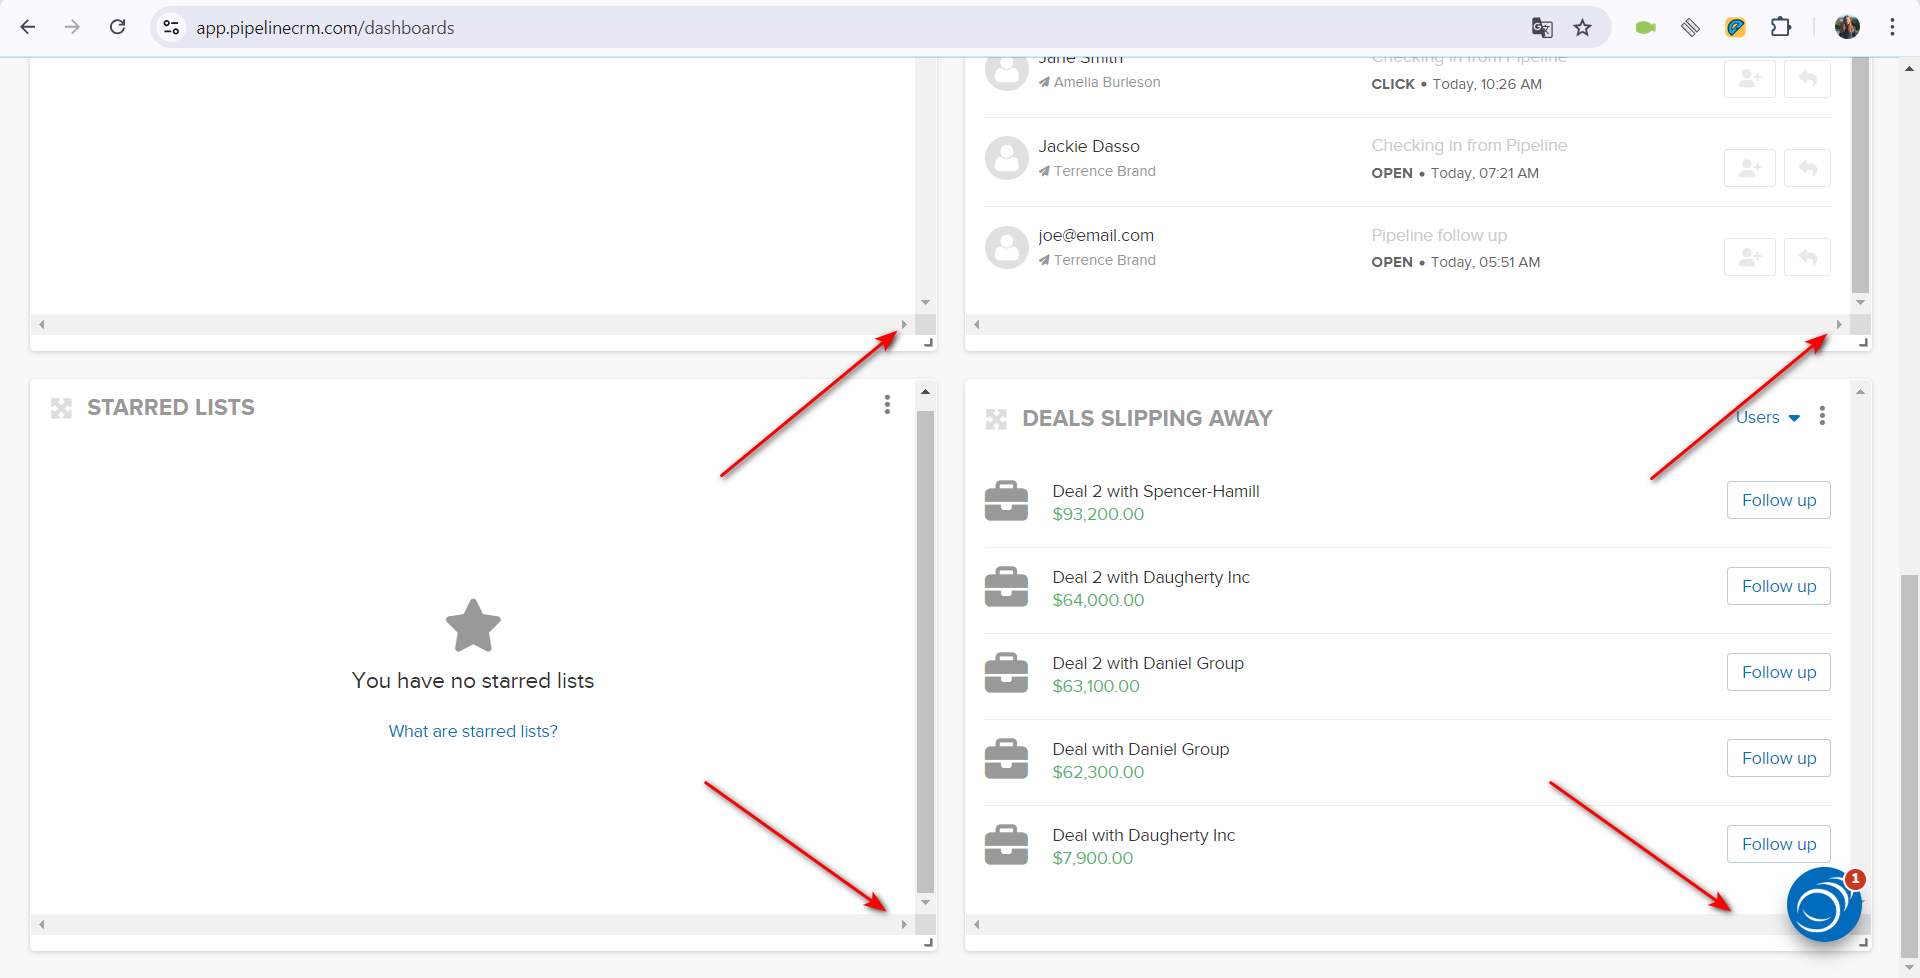
Unnecessary side scrolls appearing in dashboard widgets
Trivial
Login to the account.
- In the top menu, click on the “Dashboards” button.
- Scroll down the page.
OS: Windows 10 Pro
Browsers: Chrome v.129.0.6668.101, Firefox v.131.0, Microsoft Edge v.130.0.2849.46
There are extra side scrolls in dashboard widgets.
Dashboard widgets should be free from unnecessary side scrolls.
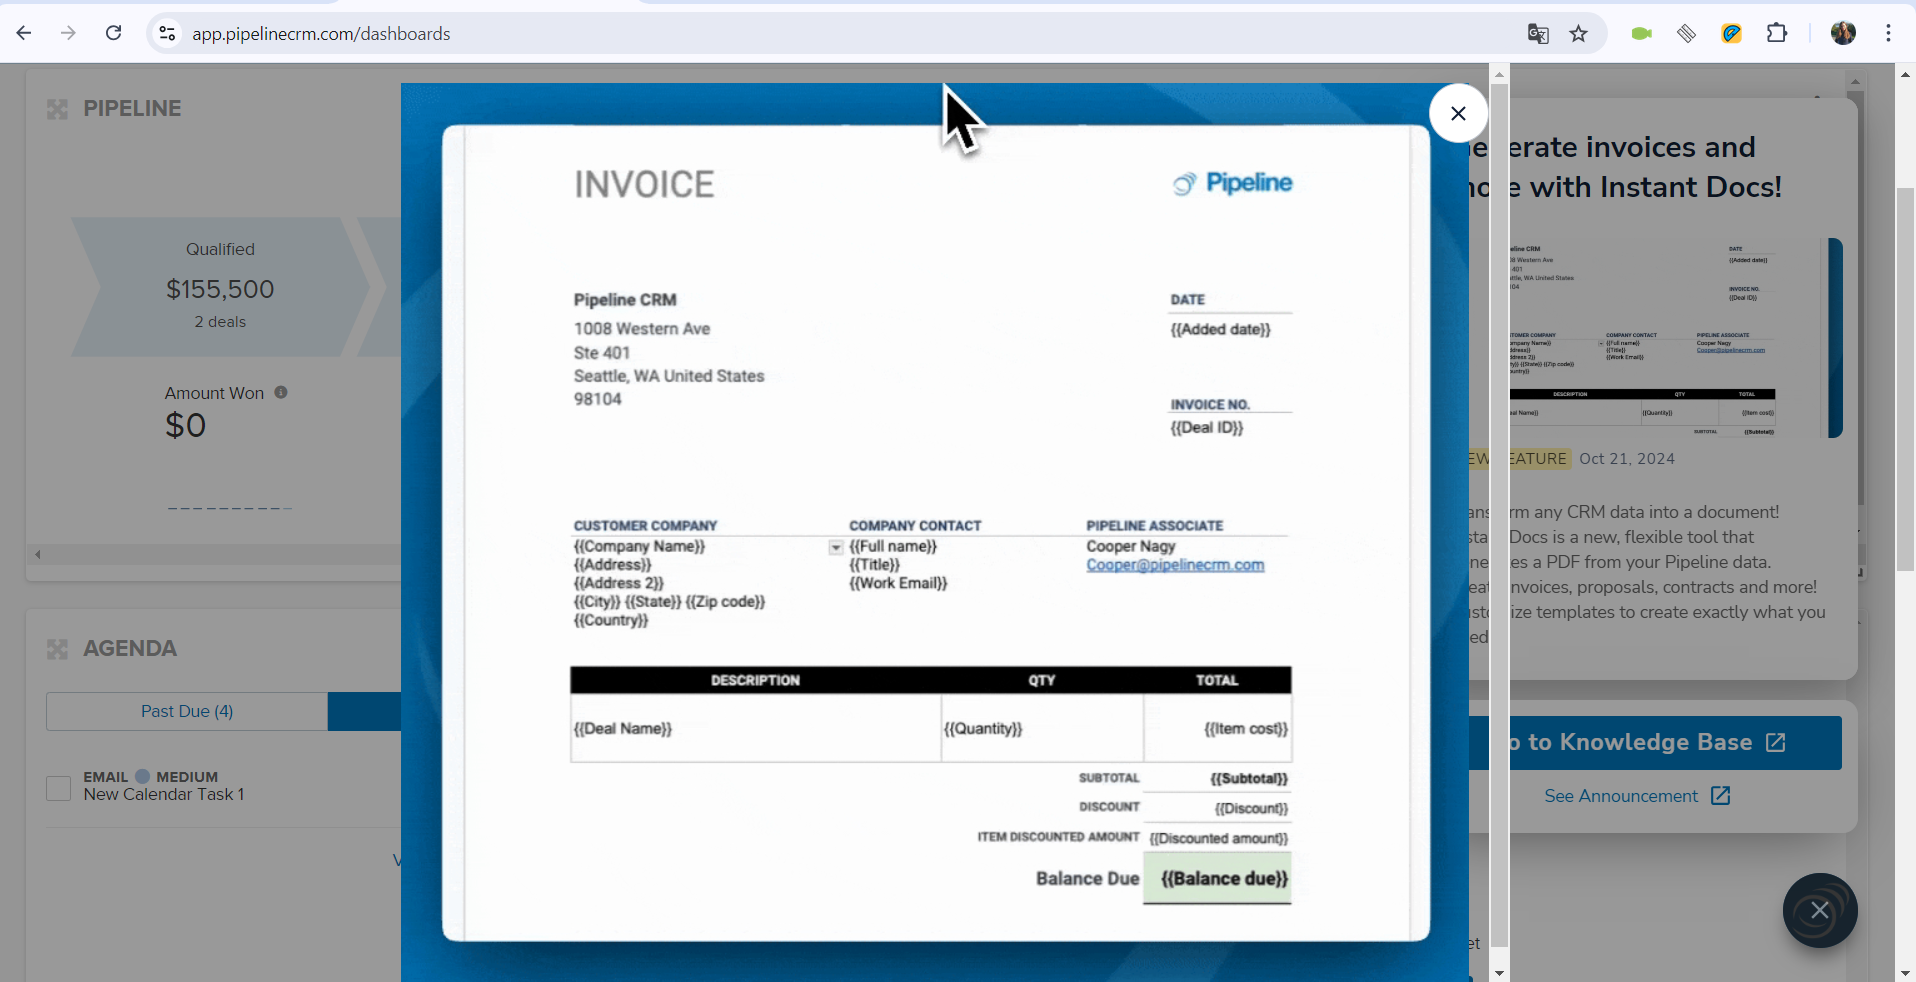
Poor image quality of generated invoice template
Trivial
Login to the account.
- Click on the chat icon in the lower right corner.
- Click on the second button from the left.
- Click on “Generate invoices and more with Instant Docs!”.
- Click on the image to enlarge.
OS: Windows 10 Pro
Browsers: Chrome v.129.0.6668.101, Firefox v.131.0, Microsoft Edge v.130.0.2849.46
Poor image quality of the generated invoice template.
All images must be of good quality.
Display of calendar events changes several times when going to calendar page
Trivial
Login to the account.
- Click on the “Calendar” button in the top menu.
- Click on the “Day” button.
- Click on the 1:00 – 2:00 am time slot.
- Fill in the “Name *” field.
- Click the “Save” button.
- Click on the “Email” button in the top menu.
- Click on the “Calendar” button in the top menu.
OS: Windows 10 Pro
Browsers: Chrome v.129.0.6668.101, Firefox v.131.0, Microsoft Edge v.130.0.2849.46
The display of calendar events changes several times when going to the calendar page.
When switching to the calendar page, the display layout should not change.
I found 19 bugs impacting different functionalities, such as calendar events, notifications, reports, and form handling. To enhance the product’s quality and ensure an effortless user experience, I recommend performing in-depth cross-browser testing and stress-testing core features like task management and reporting.

