Bugs found in Funnel SaaS
Funnel is a marketing data hub designed to streamline marketing teams’ performance analysis. It simplifies data management, allowing you to connect information from over 500 platforms.
Funnel provides a central repository for organized, up-to-date, and secure data. With automated data preparation and flexible sharing options, it ensures your marketing data seamlessly reaches reporting tools, dashboards, and analysis platforms. Funnel offers three solutions: customizable dashboards and reports, Google Analytics integration for comprehensive performance assessment, and API connectivity for seamless data transfer to various warehouses and visualization tools.
In this bug crawl, our goal was to scrutinize the Funnel SaaS platform and uncover any existing bugs. Let’s dive in!
If error occurs during creation of dataset, it doesn’t disappear after correction
Severity:
Major
Precondition:
- Log in to your account.
- Upload any Google Spreadsheet. You can use the file located at https://jira.redwerk.com/secure/attachment/115734/QAwerk%20contacts.xlsx.
Steps to Reproduce:
- In the side menu under the “Connect” block, click “Data Sources.”
- Click “+ Connect Data Source.”
- Choose “Google Sheets.”
- Log in to your account with the added table.
- Go to this account.
- Insert the Google spreadsheet file link in the input field.
- Click “Load sheets.”
- Click “Next.”
- Set type to “Headers” for row 4.
- Set “Data starts” for row 2.
- Verify the appearance of an error for “Data Sources” in the side menu.
- Set type to “Headers” for the first row.
- Click “Connect Data Source” again.
- In the side menu under the “Connect” block, click “Data Sources.”
Environment:
Windows 10 Pro
Chrome v.119.0.6045.160, Firefox v.119.0, Microsoft Edge v.119.0.2151.72
Actual Result:
If an error occurs during the creation of the dataset, it does not disappear after correction.
Expected Result:
If no error exists, there shouldn’t be any error shown in the side menu.
It’s possible to delete single user from workspace
Severity:
Major
Precondition:
- Log in to your account.
- Make sure that you are the only user of the project.
Steps to Reproduce:
- In the “Manage Workspace” block of the side menu, select “Users.”
- Choose the “Remove” button.
- Click on “Remove user.”
Environment:
Windows 10 Pro
Chrome v.119.0.6045.160, Firefox v.119.0, Microsoft Edge v.119.0.2151.72
Actual Result:
It is possible to delete a single user from the workspace.
Expected Result:
When deleting a single user from the workspace, a warning should appear, indicating: “Access to the workspace will be lost forever” and “Workspace will be deleted”; there should be no ability to remove the last user from the workspace.
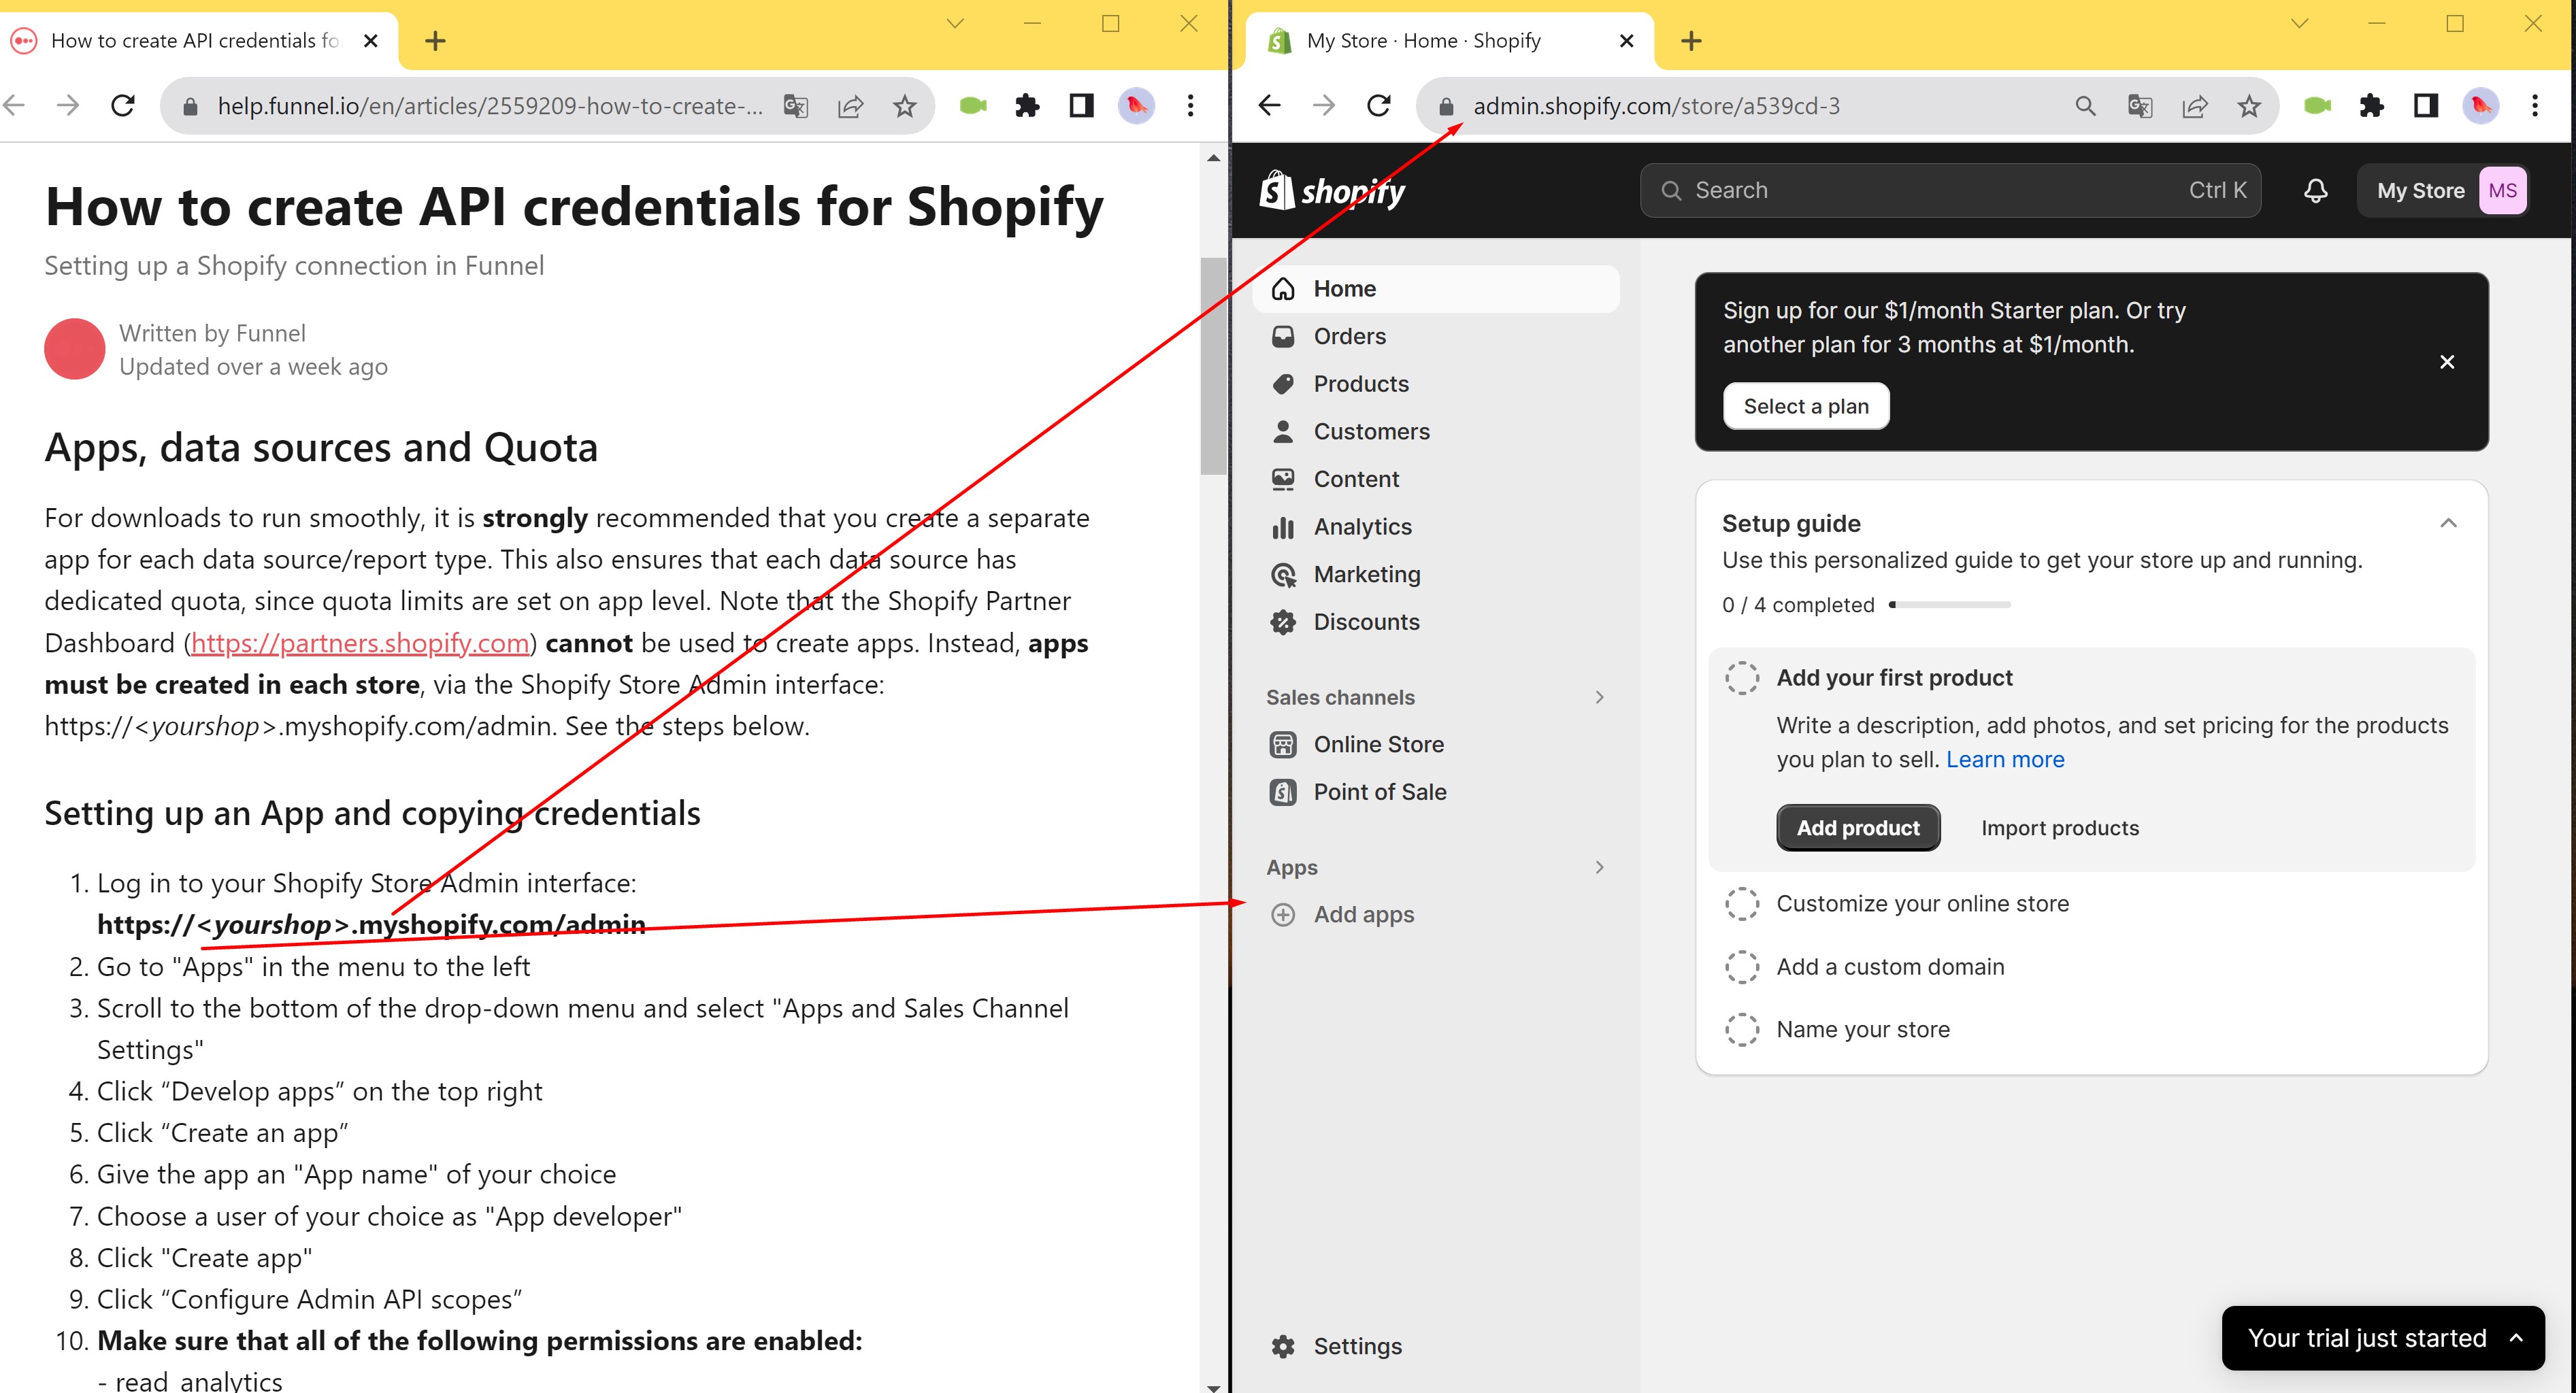
Instructions provided on information page don’t align with actual Shopify interface
Severity:
Minor
Precondition:
- Set up a store in Shopify and log in.
- Log in to your Funnel account.
Steps to Reproduce:
- In the “Connect” block of the side menu, select “Data Sources.”
- Click on the “+ Connect Data Source” button.
- Choose “Shopify.”
- Click the “Add Credentials” button.
- Select “Create a Shopify App with read access permissions” from the options.
- Navigate to your store page in Shopify.
- Compare the structure of the actual shop link with the structure mentioned in the instructions.
- Compare button names for accuracy.
Environment:
Windows 10 Pro
Chrome v.119.0.6045.160, Firefox v.119.0, Microsoft Edge v.119.0.2151.72
Actual Result:
The instructions provided on the information page do not match the actual Shopify interface.
Expected Result:
The instructions should be updated to align with the recent Shopify updates.
After deleting faulty Data Source, error persists
Severity:
Minor
Precondition:
- Log in to your account.
- Upload any Google Spreadsheet; you can use the file available at (https://jira.redwerk.com/secure/attachment/115734/QAwerk%20contacts.xlsx).
Steps to Reproduce:
- In the side menu under the “Connect” block, select “Data Sources.”
- Click the “+ Connect Data Source” button.
- Choose “Google Sheets.”
- Log in to the account where you added the table.
- Go to this account.
- Insert the link to the Google spreadsheet file in the input field.
- Click “Load sheets.”
- Click “Next.”
- Set the type to “Headers” for row 4.
- Set “Data starts” for row 2.
- Click “Connect Data Source.”
- In the side menu under the “Connect” block, select “Data Sources.”
- Next to the Data Source with an error, click the delete button.
- Click “Delete.”
Environment:
Windows 10 Pro
Chrome v.119.0.6045.160, Firefox v.119.0, Microsoft Edge v.119.0.2151.72
Actual Result:
After deleting the Data Source that had an error, the error persists and does not disappear.
Expected Result:
After deleting the Data Source with an error, the error should disappear.
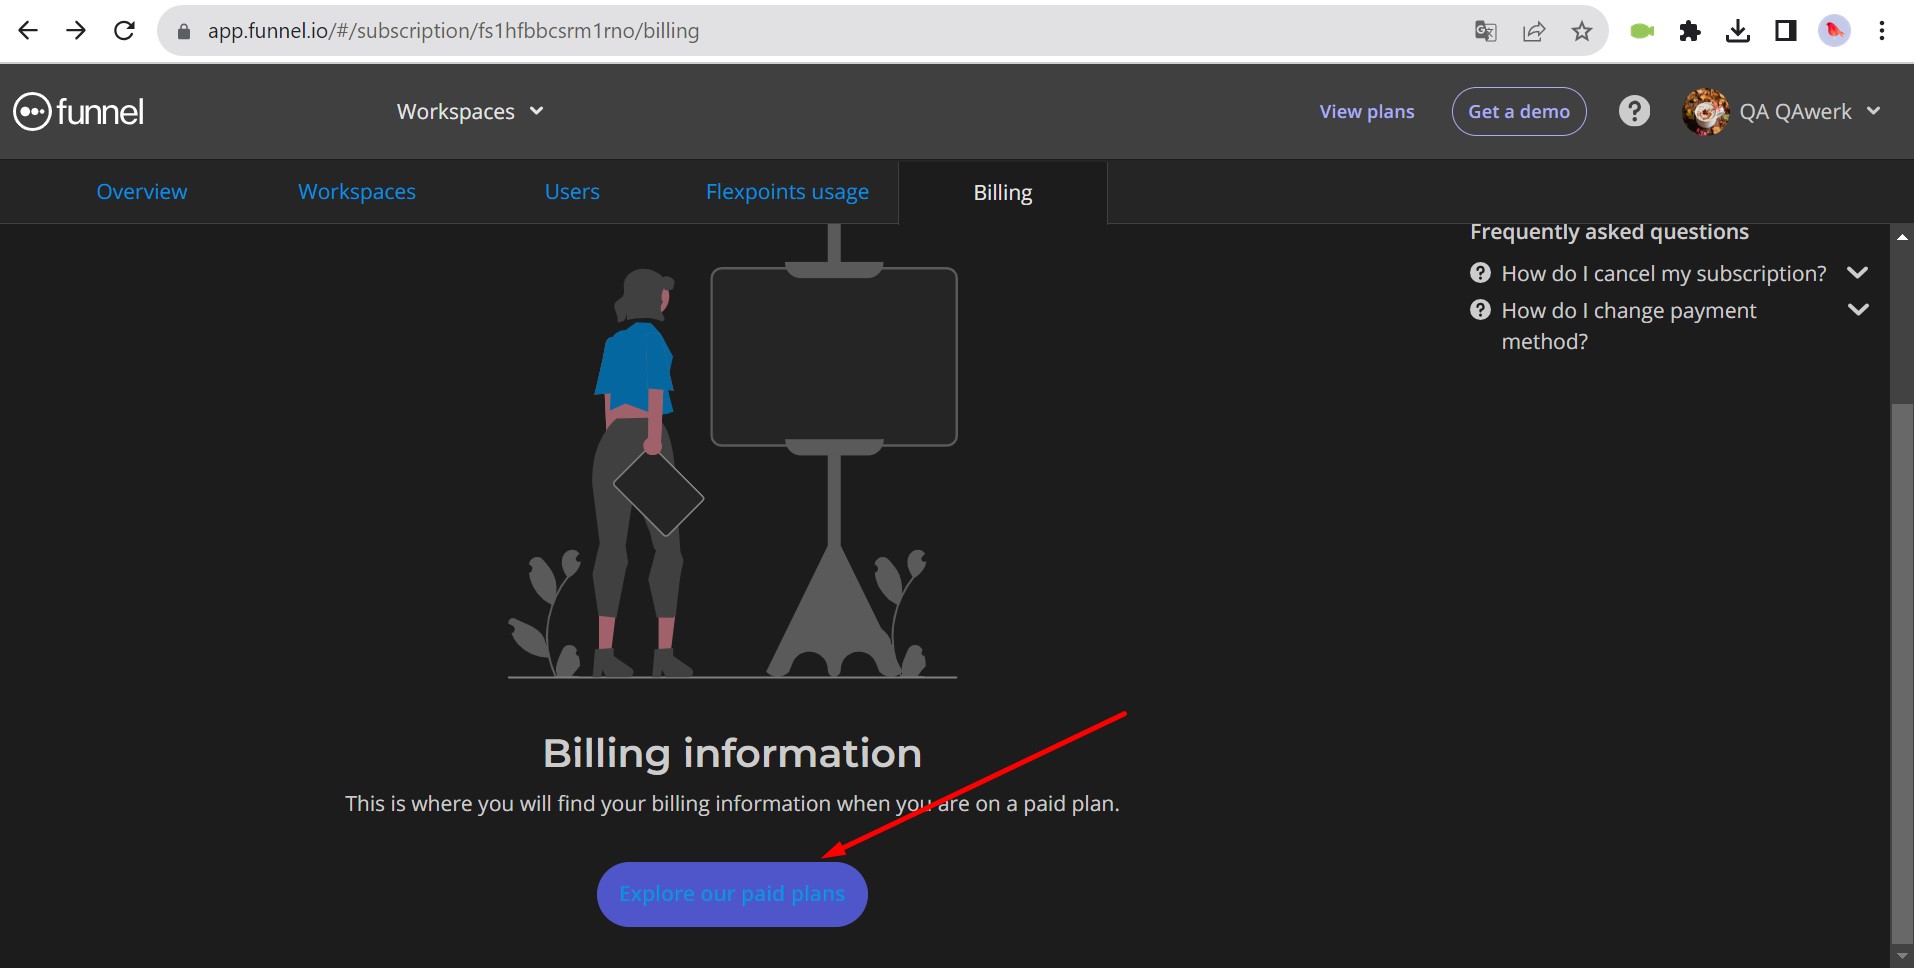
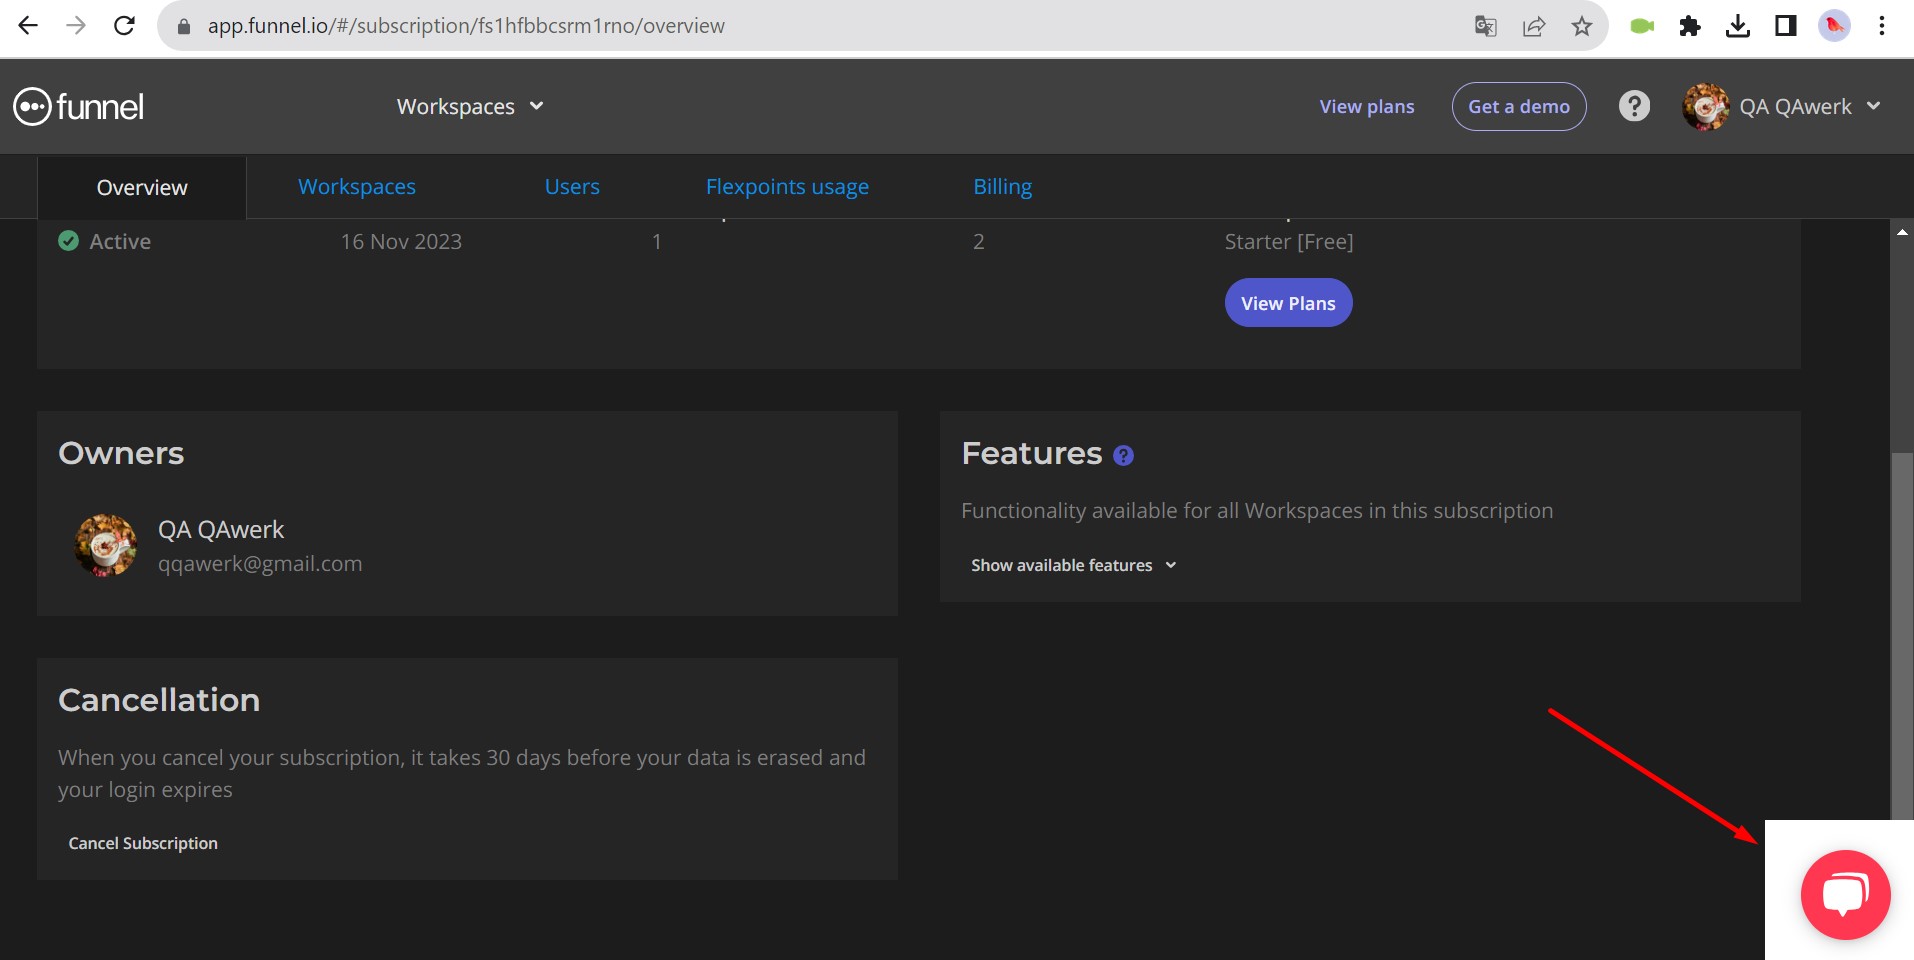
In dark mode, "Explore our paid plans" button appears inactive
Severity:
Minor
Precondition:
Log in to your account.
Steps to Reproduce:
- Click on the profile icon in the upper right corner.
- Click on the “Dark mode” button.
- Click on the profile icon in the upper right corner again.
- Click on the “Subscription overview” button.
- Click on the “Billing” button.
Environment:
Windows 10 Pro
Chrome v.119.0.6045.160, Firefox v.119.0, Microsoft Edge v.119.0.2151.72
Actual Result:
In dark mode, the “Explore our paid plans” button appears inactive.
Expected Result:
The button name should be displayed in white font.
New users added to workspace don’t have user status
Severity:
Minor
Precondition:
- Set up an email box.
- Log in to your Funnel account.
Steps to Reproduce:
- In the side menu under the “Manage Workspace” block, click on the “Users” button.
- Click on the “Subscription Administration” button.
- Enter the user’s email.
- Select the Workspace checkbox.
- Click the “Add” button.
- Sign out of your current account.
- Go to the email added to the profile.
- Find the invitation letter.
- Follow the link and create an account.
- Log out of the account.
- Log in to the account from which the invitation was sent.
- In the side menu under the “Manage Workspace” block, click on the “Users” button.
- Click on the “Subscription Administration” button.
Environment:
Windows 10 Pro
Chrome v.119.0.6045.160, Firefox v.119.0, Microsoft Edge v.119.0.2151.72
Actual Result:
Newly added users in the workspace lack a user status; once a request is sent to the workspace, there’s no account status; even after confirming the account, the status remains missing.
Expected Result:
After sending a request to the workspace, the account should have the status “Awaiting activation”; after confirming the account, the status should be “Active”

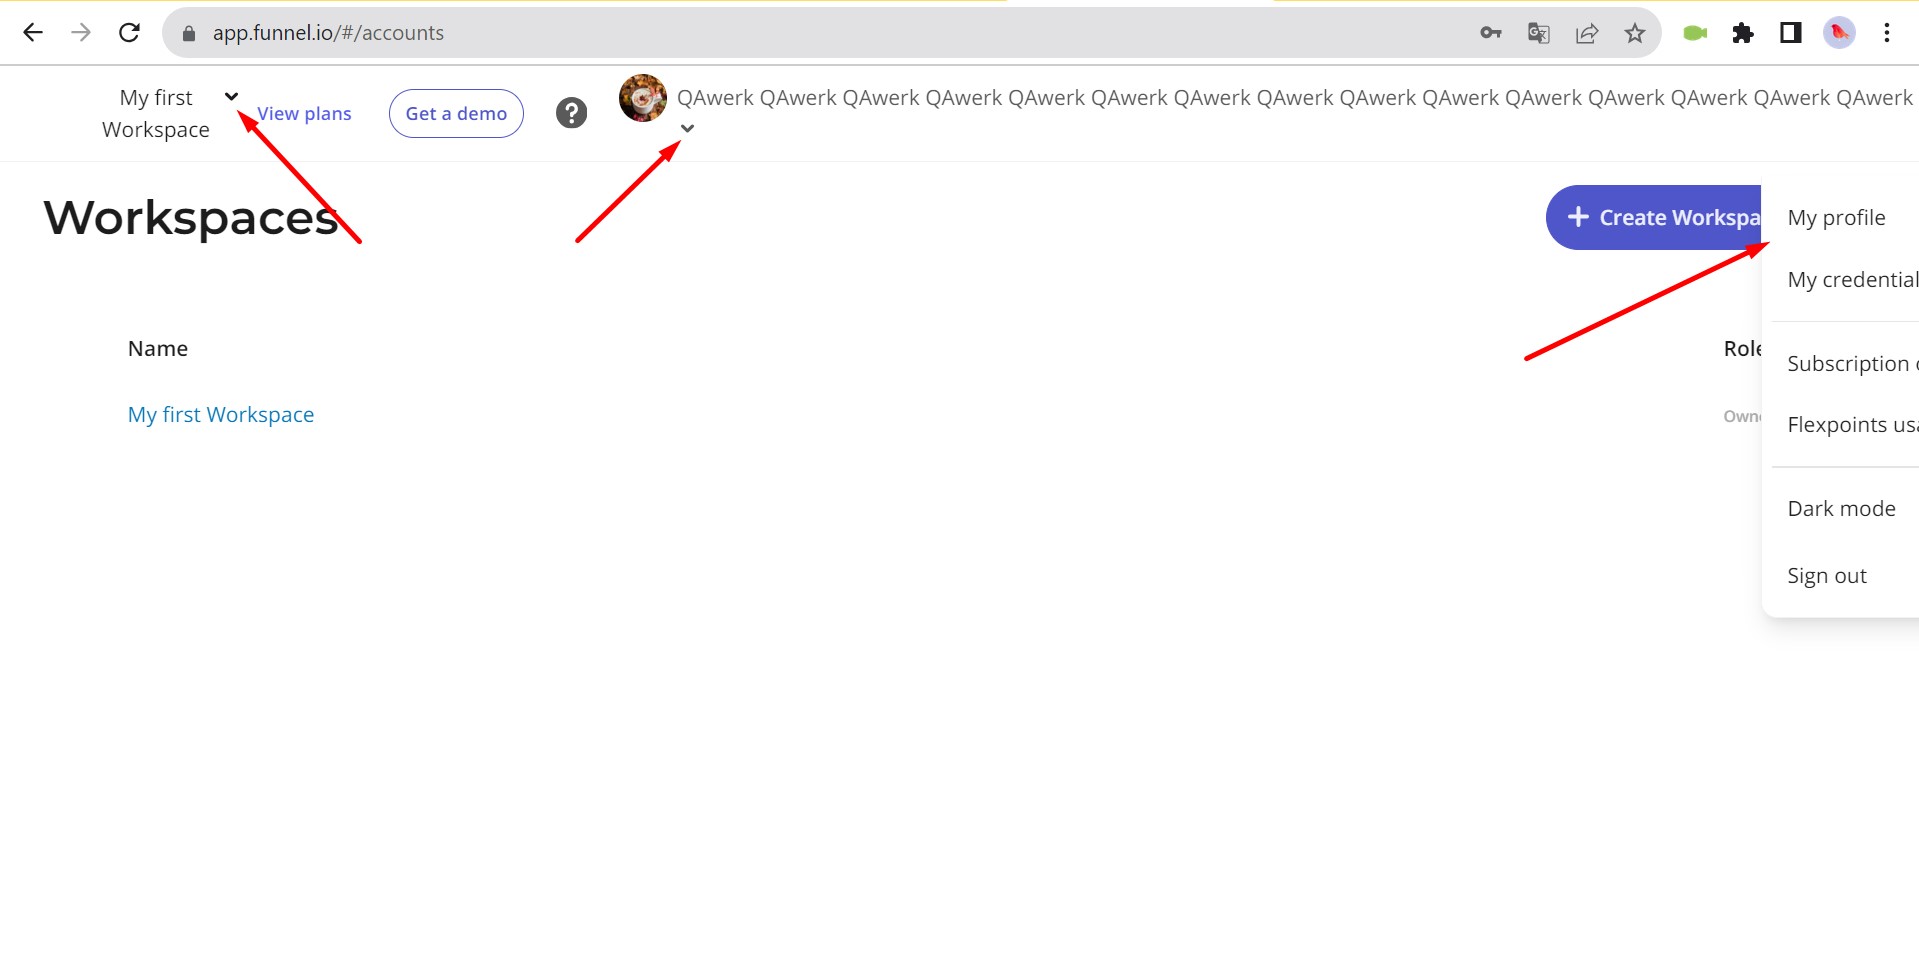
Lengthy username disrupts layout
Severity:
Trivial
Precondition:
Log in to your account.
Steps to Reproduce:
- Click on the profile icon in the upper right corner.
- Select the “My profile” button.
- Enter 50 characters in the “First name” field.
- Enter 50 characters in the “Last name” field.
- Click on the “Update profile” button.
Environment:
Windows 10 Pro
Chrome v.119.0.6045.160, Firefox v.119.0, Microsoft Edge v.119.0.2151.72
Actual Result:
A lengthy username disrupts the layout.
Expected Result:
The number of displayed characters should be limited.
Additional side-scrolling feature is displayed on initial pop-up screen following registration
Severity:
Trivial
Precondition:
Create a Google account.
Steps to Reproduce:
- Visit https://funnel.io/.
- Click “Start for free.”
- Select “Sign up with Google.”
- Access your created account.
- Wait for the account creation process to complete.
Environment:
Windows 10 Pro
Chrome v.119.0.6045.160, Firefox v.119.0, Microsoft Edge v.119.0.2151.72
Actual Result:
An additional side-scrolling feature is displayed on the initial pop-up screen following registration.
Expected Result:
If the popup completely fits the screen, there should be no side-scrolling.
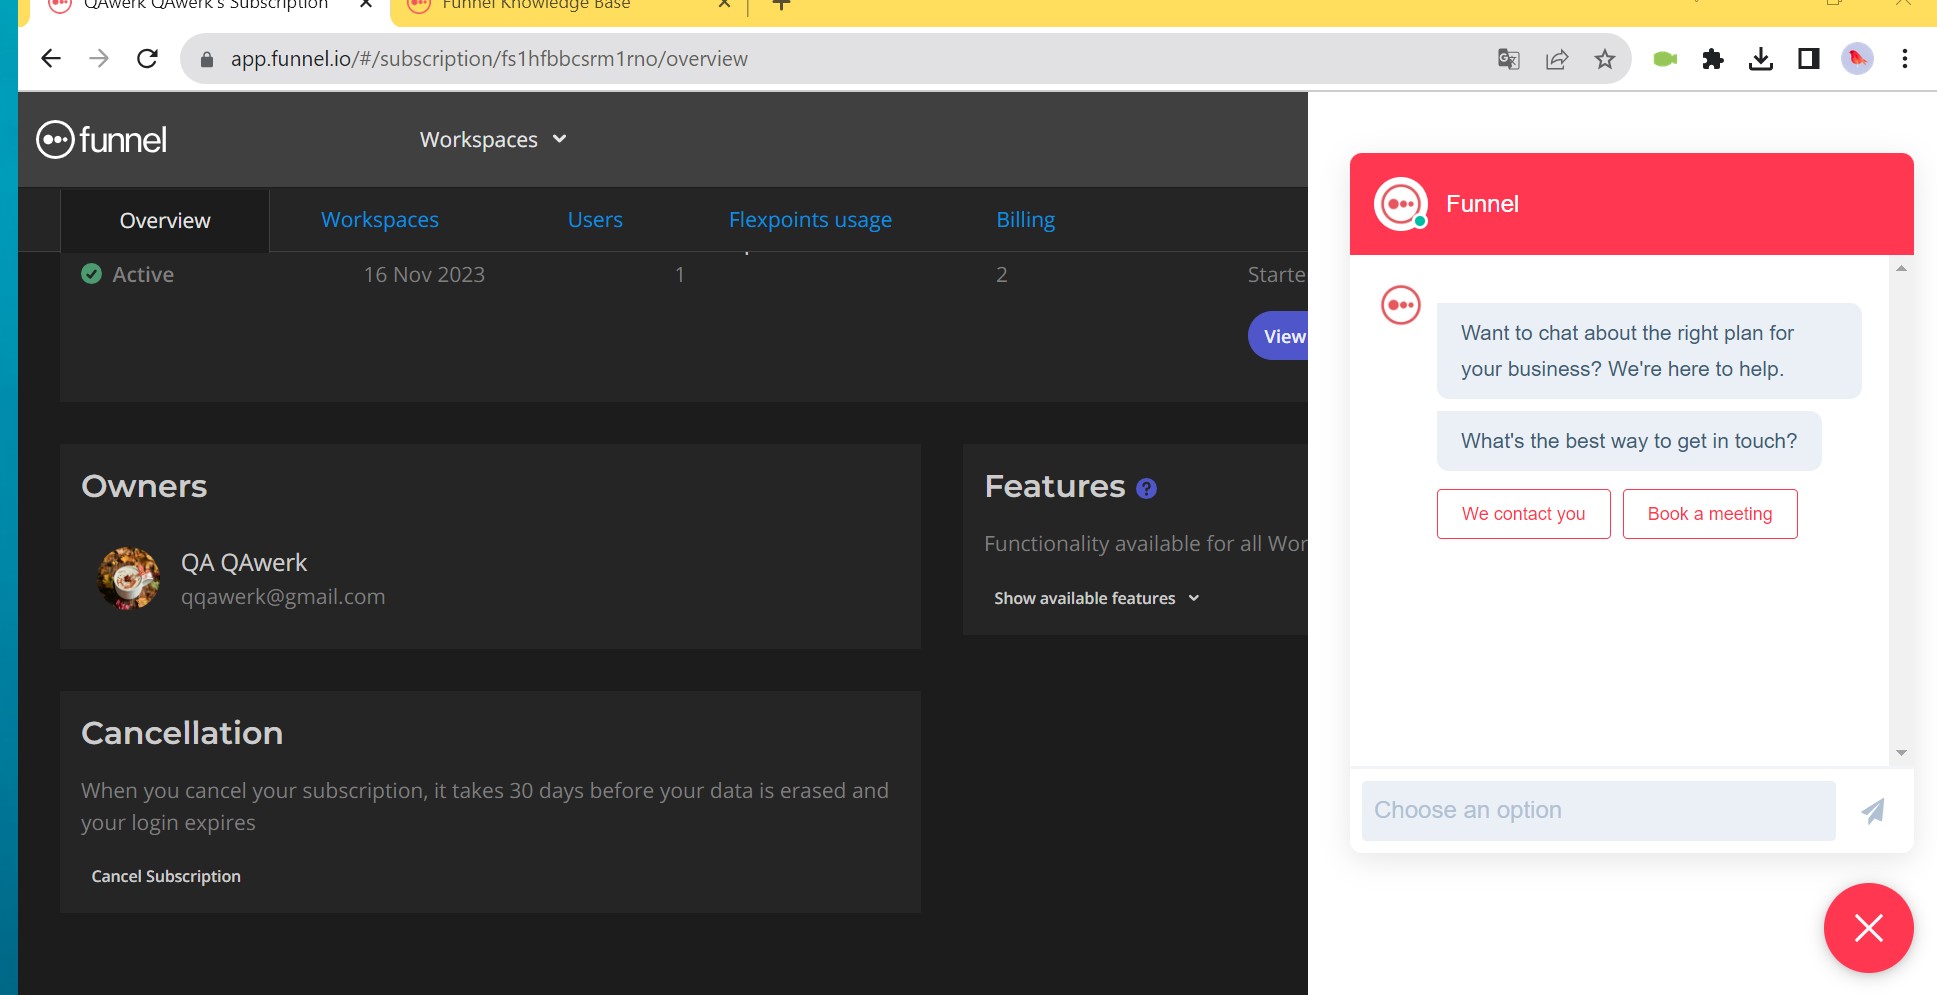
Chat doesn’t have Dark mode
Severity:
Trivial
Precondition:
Log in to your account.
Steps to Reproduce:
- Click on the profile icon in the upper right corner.
- Select the “Dark mode” button.
- Click on the “Get a demo” button.
- Click on the cross to collapse the chat.
Environment:
Windows 10 Pro
Chrome v.119.0.6045.160, Firefox v.119.0, Microsoft Edge v.119.0.2151.72
Actual Result:
Chat does not have a Dark mode.
Expected Result:
Dark mode should be available for the chat.
Information pages don’t have Dark mode
Severity:
Trivial
Precondition:
Log in to your account.
Steps to Reproduce:
- Click on the profile icon in the upper right corner.
- Select the “Dark mode” option.
- In the side menu within the “Connect” block, click on the “Data Sources” button.
- Click on the “+ Connect Data Source” button.
- Choose the “Shopify” option.
- Click on the “Add Credentials” button.
- Select “Create a Shopify App with read access permissions.”
Environment:
Windows 10 Pro
Chrome v.119.0.6045.160, Firefox v.119.0, Microsoft Edge v.119.0.2151.72
Actual Result:
Information pages don’t have Dark mode.
Expected Result:
Dark mode should be available for information pages.
For a comprehensive approach, use both functional and non-functional testing tools. Specifically, employ automated frameworks to validate core functionalities, conduct usability tests focusing on layout shifts, display issues
(including dark mode), and user status inconsistencies, and ensure compatibility across diverse environments
for seamless functionality.