Bugs found in Avaza SaaS
Avaza is an all-in-one platform that empowers over 60,000 businesses worldwide to collaborate on projects, communicate through chat, schedule resources, track time, handle expenses, and generate client invoices.
Avaza allows you to create professional invoices in seconds and generate over 50 real-time customizable reports. The software seamlessly integrates with more than 500 popular apps, including Slack, Jira, and Google Workspace. It offers free instant online support available 24/7.
Our QA team explored Avaza from a professional standpoint, and here are the results.
When entering time, entered actual time is not saved
Severity:
Major
Precondition:
The user has logged in.
Steps to Reproduce:
- Click the “Projects” button in the side menu.
- Click the “+” next to the “All Projects” button.
- Fill out the “Project Name” field.
- Click the “Create” button.
- Click the “+ Add a new Task” button.
- Enter a task name.
- Click the “Save” button.
- Access the “Timesheets” button in the side menu.
- Click the “Add Entry” button.
- In the project block, choose the created project.
- For the category block, select any category.
- In the Task block, choose the created task.
- In the “Enter a duration, or start a timer.” field, input the time as 25:00.
- Click the “Save Entry” button.
Environment:
Windows 10 Pro
Chrome v.115.0.5790.171, Firefox v.116.0.2, Microsoft Edge v.115.0.1901.203
Actual Result:
When entering the time, the entered actual time is not saved. 25 hours were entered, but 23:59 was recorded.
Expected Result:
There should be no automatic alterations upon saving entered time. As entry isn’t linked to the task’s completion day, the inputted time shouldn’t be confined to 23 hours and 59 minutes.
In single day, one user is able to book more than 24 hours
Severity:
Major
Precondition:
The user has logged in.
Steps to Reproduce:
- Click the “Projects” button in the side menu.
- Click the “+” button next to the “All Projects” option.
- Fill out the “Project Name” field.
- Click the “Create” button.
- Access the “Team Schedule” button in the side menu.
- Click on the empty field for the desired day.
- Complete the following fields:
– “Assign To” – using the current profile’s user;
– “Project” – select the created project;
– “Timesheet Category” – any value;
– “Hours per Day” – 8.00. - Click the “Save” button.
- Click on the same day once again.
- Click the “Save” button.
- Repeat the process for the same day.
- Click the “Save” button.
- Repeat the process once more for the same day.
- Click the “Save” button.
Environment:
Windows 10 Pro
Chrome v.115.0.5790.171, Firefox v.116.0.2, Microsoft Edge v.115.0.1901.203
Actual Result:
In a single day, one user is able to book more than 24 hours.
Expected Result:
A user should not have the ability to book more than 24 hours within a single day.
Change in task's deadline time is shifted by time of its start
Severity:
Major
Precondition:
The user has logged in.
Steps to Reproduce:
- Click the “Projects” button in the side menu.
- Click the “+” button next to the “All Projects” option.
- Fill out the “Project Name” field.
- Click the “Create” button.
- Access the “My Tasks” button in the side menu.
- Click on the “Gantt Task View” button.
- Click the “+ Add Task” button.
- Enter a task “Title.”
- Select the created project for the “Project” field.
- Choose any “Section.”
- Set the “Start Date” to 23-Aug-2023, 9:00 a.m.
- Set the “Due Date” to 31-Aug-2023, 6:00 p.m.
- Click the “Save” button.
- Click the right side of the entered time using the mouse button.
- Swipe right to move the deadline to September.
- Repeat this action several times.
- Double-click the entered time field.
- Check the value in the “Start Date” field.
Environment:
Windows 10 Pro
Chrome v.115.0.5790.171, Firefox v.116.0.2, Microsoft Edge v.115.0.1901.203
Actual Result:
A change in the task’s deadline time is shifted by the time of its start.
Expected Result:
When the “Due Date” is changed, the value of the “Start Date” should remain unchanged.
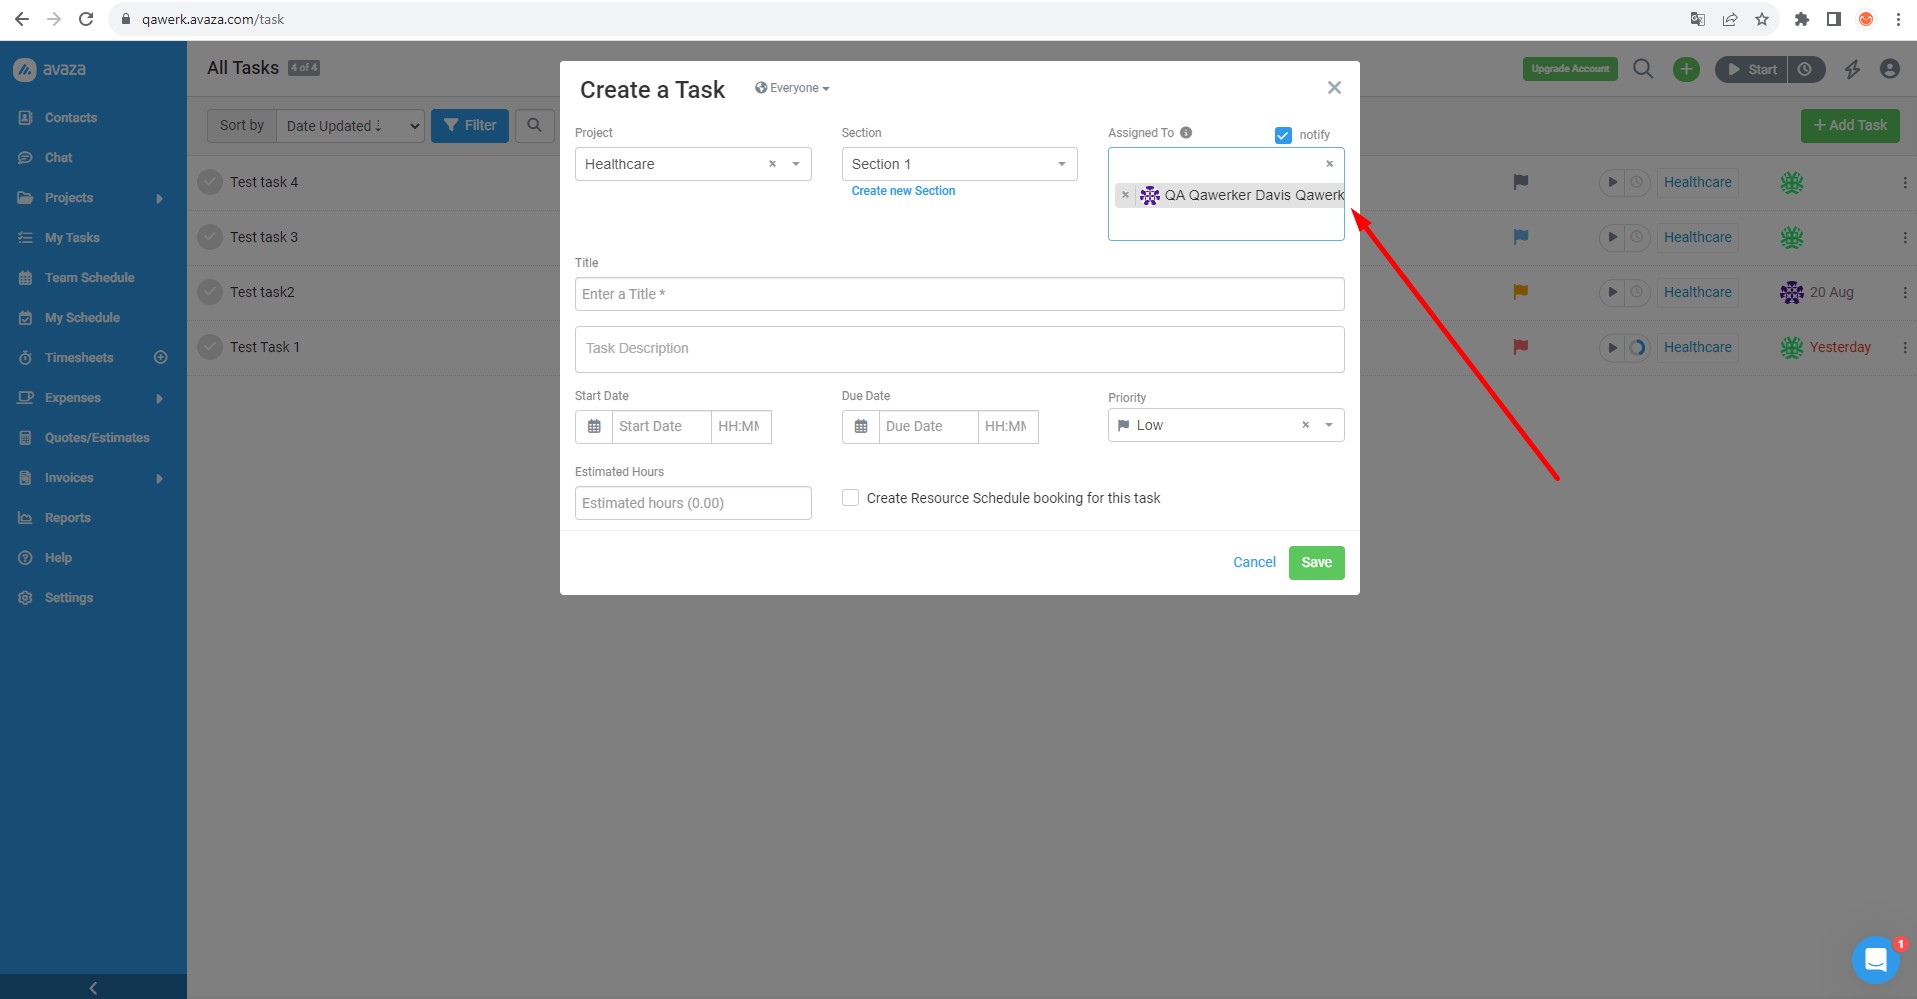
When editing task assigned to user, it's not possible to increase number of assigned users to task
Severity:
Major
Precondition:
The user has logged in.
Steps to Reproduce:
- Click the “Contacts” button in the side menu.
- Select the “Add user” button.
- Fill out the following fields: Email Address, First Name, and Last Name.
- Mark only one checkbox for “Project Collaborator.”
- Click the “Save” button.
- Navigate to the “Projects” button in the side menu.
- Click the “+” button next to the “All Projects” option.
- Complete the “Project Name” field.
- In the “Project Members” section, choose both the current user and the newly created user.
- Click the “Create” button.
- Return to the “Projects” button in the side menu.
- Access the “All Tasks” button.
- Select the “+ Add Task” button.
- Pick the created project in the “Project” field.
- Choose any section for the “Section” field.
- Enter a task “Title.”
- Assign the task to the current user in the “Assigned To” block.
- Click the “Save” button.
- Click on the created task.
- Click on the “Assigned To” field and then select the second user assigned to the project.
- Click the “Save” button.
Environment:
Windows 10 Pro
Chrome v.115.0.5790.171, Firefox v.116.0.2, Microsoft Edge v.115.0.1901.203
Actual Result:
When editing a task assigned to a single user, it is not possible to increase the number of assigned users to the task.
Expected Result:
It should be possible to assign a single task to multiple users, even during the editing process.
Transferring booked time to another day in calendar labels unscheduled days as “Full”
Severity:
Minor
Precondition:
The user has logged in.
Steps to Reproduce:
- Click on the “Projects” button in the side menu.
- Click the + next to the All Projects button.
- Fill in the “Project Name” field.
- Click on the “Create” button.
- Click on the “Team Schedule” button in the side menu.
- Click on the blank field for any day.
- Fill in the fields:
– “Assign To” – by the user of the current profile;
– “Project” – created project;
– “Timesheet Category” – any value;
– “Hours per Day” – 8.00. - Click on the “Save” button.
- Pin the booked time and drag it to any other working day.
Environment:
Windows 10 Pro
Chrome v.115.0.5790.171, Firefox v.116.0.2, Microsoft Edge v.115.0.1901.203
Actual Result:
When transferring booked time in the calendar to another day, any day without prior scheduling is labeled as “Full”
Expected Result:
If no events are scheduled for the day, the schedule should not indicate it as “Full”
When restoring tab from history, chat is shown on separate page
Severity:
Minor
Precondition:
- Open another tab in the browser to ensure that closing the chat tab won’t close the entire browser.
- Log in.
Steps to Reproduce:
- Click the “Chat” button in the side menu.
- Close the “Chat” tab.
- Use the keyboard shortcut “Ctrl + Shift + T” or restore the tab through the browser menu’s History.
Environment:
Windows 10 Pro
Chrome v.115.0.5790.171, Firefox v.116.0.2, Microsoft Edge v.115.0.1901.203
Actual Result:
When restoring the tab from the history, the chat is shown on a separate page.
Expected Result:
The page after recovery should not differ from the page before it was closed.
Clicking on any document element reloads document
Severity:
Minor
Precondition:
The user has logged in.
Steps to Reproduce:
- Click the “Projects” button in the side menu.
- Click the “+” icon next to the “All Projects” button.
- Fill out the “Project Name” field.
- Click the “Create” button.
- Access the “Reports” button in the side menu.
- Choose “Project Summary Report.”
- Click the “Customer” drop-down list and pick “Internal Projects.”
- Click the “Project” drop-down list and select the created project.
- Press the “Preview” button.
- Click on any element within the document.
Environment:
Windows 10 Pro
Chrome v.115.0.5790.171, Firefox v.116.0.2, Microsoft Edge v.115.0.1901.203
Actual Result:
Clicking on any document element reloads the document.
Expected Result:
The document should only reload when clicking on blocks that trigger changes in the document.
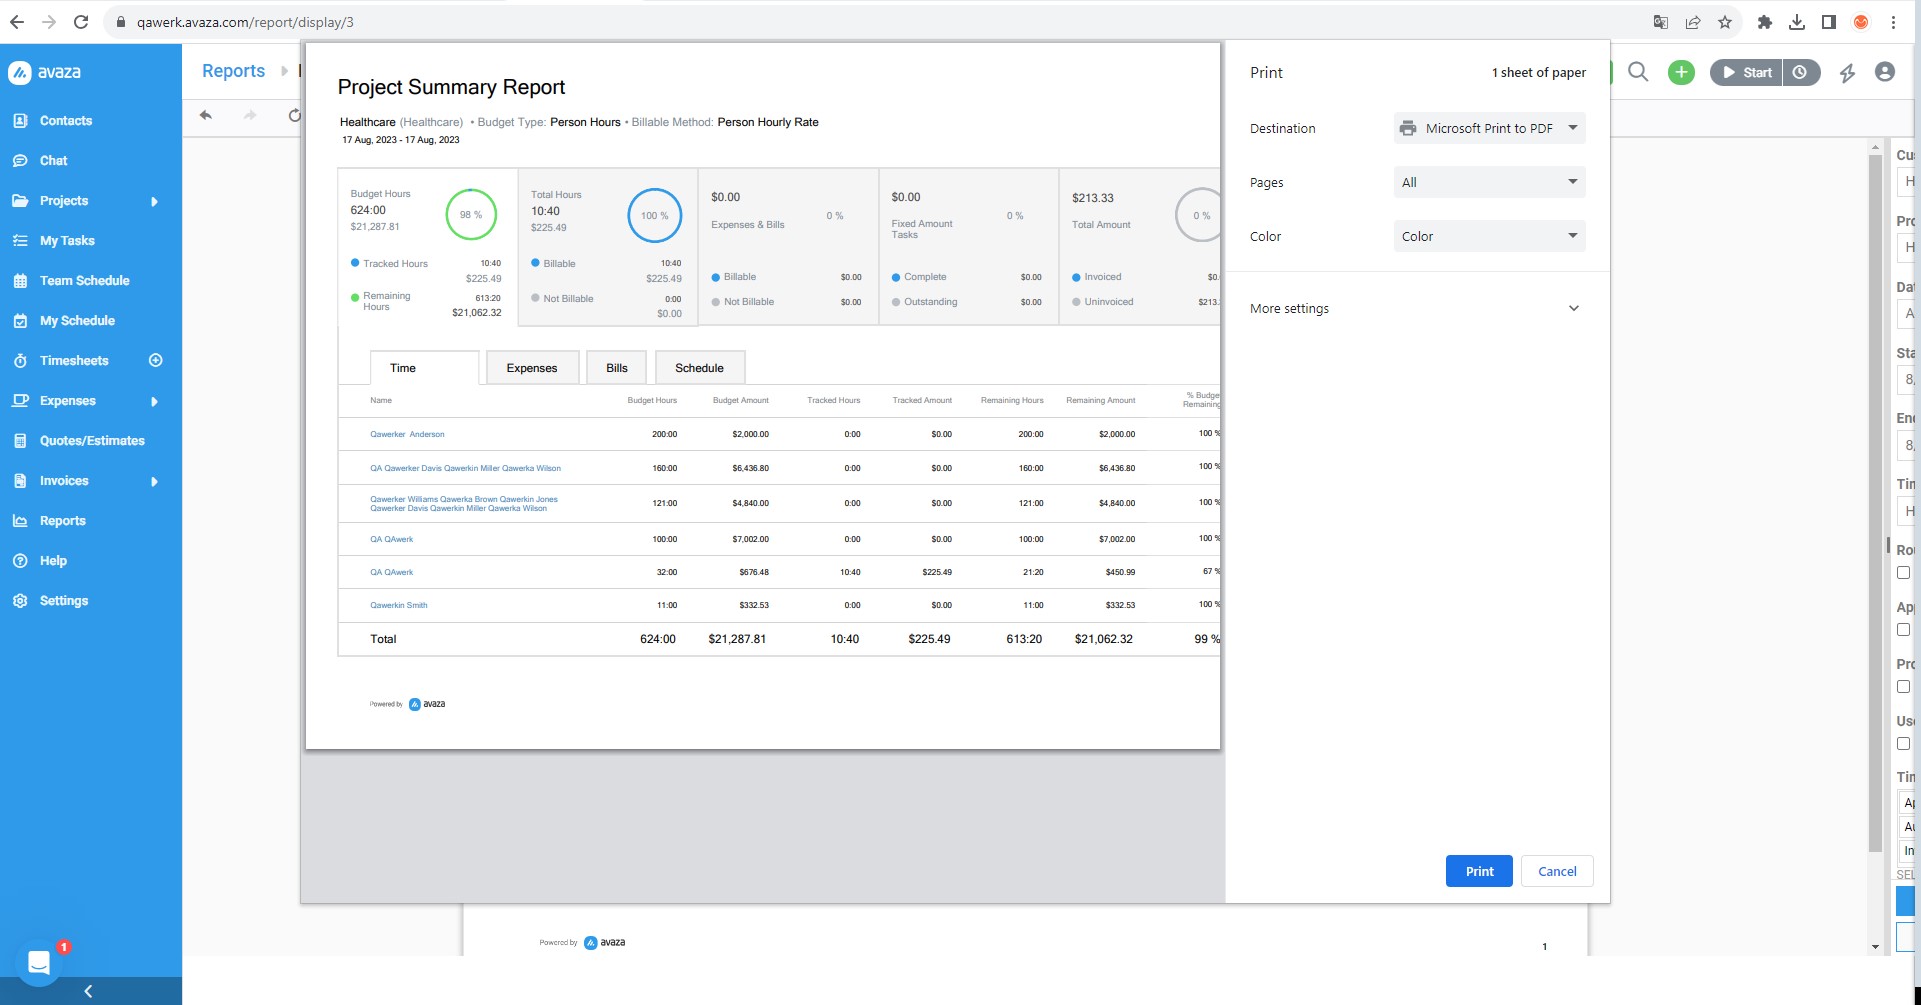
Entire document doesn't fit on page when print button is clicked
Severity:
Minor
Precondition:
The user has logged in.
Steps to Reproduce:
- Click the “Projects” button in the side menu.
- Click the “+” icon next to the “All Projects” button.
- Fill out the “Project Name” field.
- Click the “Create” button.
- Access the “Reports” button in the side menu.
- Choose “Project Summary Report.”
- Click the “Customer” drop-down list and select “Internal Projects.”
- Click the “Project” drop-down list and choose the created project.
- Press the “Preview” button.
- Click the “Print” button.
Environment:
Windows 10 Pro
Chrome v.115.0.5790.171
Actual Result:
The entire document doesn’t fit on the page when the print button is clicked.
Expected Result:
The entire document should fit on a printable page.
When previewing users, not all assigned roles are displayed
Severity:
Minor
Precondition:
The user has logged in.
Steps to Reproduce:
- Click the “Contacts” button in the side menu.
- Select the “Add user” button.
- Fill in the following fields: Email Address, First Name, and Last Name.
- Check the following checkboxes: “Project Collaborator”, “Chat User”, and “Portfolio Manager”.
- Click the “Save” button.
Environment:
Windows 10 Pro
Chrome v.115.0.5790.171
Actual Result:
When previewing users, not all assigned roles are displayed.
Expected Result:
All assigned roles should be shown.
When assigning user with long name to task, complete name is not shown
Severity:
Trivial
Precondition:
The user has logged in.
Steps to Reproduce:
- Click the “Contacts” button in the side menu.
- Select the “Add user” button.
- Fill out the following fields: Email Address, First Name (more than 20 characters), and Last Name (more than 20 characters).
- Mark only the “Project Collaborator” checkbox.
- Click the “Save” button.
- Navigate to the “Projects” button in the side menu.
- Click the “+” button next to the “All Projects” option.
- Complete the “Project Name” field.
- In the “Project Members” section, choose both the current user and the newly created user.
- Click the “Create” button.
- Return to the “Projects” button in the side menu.
- Access the “All Tasks” button.
- Select the “+ Add Task” button.
- Pick the created project in the “Project” field.
- Choose any section for the “Section” field.
- Enter a task “Title.”
- Assign the task to the created user in the “Assigned To” block.
Environment:
Windows 10 Pro
Chrome v.115.0.5790.171, Firefox v.116.0.2, Microsoft Edge v.115.0.1901.203
Actual Result:
When assigning a user with a long name to a task, the complete name is not shown.
Expected Result:
The username should be displayed on multiple lines.
When booking time, previous data is retained when creating new booking
Severity:
Trivial
Precondition:
The user has logged in.
Steps to Reproduce:
- Click the “Projects” button in the side menu.
- Click the “+” icon next to the “All Projects” button.
- Fill out the “Project Name” field.
- Click the “Create” button.
- Access the “Team Schedule” button in the side menu.
- Click on the empty field for a specific day.
- Complete the following fields:
– “Assign To” – using the current user profile;
– “Project” – select the created project;
– “Timesheet Category” – any value;
– “Hours per Day” – 8.00. - Click the “Save” button.
- Click on the empty field for another day.
Environment:
Windows 10 Pro
Chrome v.115.0.5790.171, Firefox v.116.0.2, Microsoft Edge v.115.0.1901.203
Actual Result:
When booking time, previous data is retained when creating a new booking.
Expected Result:
After saving the booking, the main booking fields should be cleared.
When making estimate, “Description” block might overlap other elements due to deformation
Severity:
Trivial
Precondition:
The user has logged in.
Steps to Reproduce:
- Click the “Quotes/Estimates” button in the side menu.
- Select the “+ Create” button.
- Click the “Add new customer” button.
- Fill out the “Customer Name” field.
- Click the “Create” button.
- In the “Item Details” block, pinch the lower-right corner and drag it to the right.
Environment:
Windows 10 Pro
Chrome v.115.0.5790.171, Firefox v.116.0.2, Microsoft Edge v.115.0.1901.203
Actual Result:
When making an estimate, the “Description” block might overlap other elements due to deformation.
Expected Result:
The disassembled block should stay undistorted.
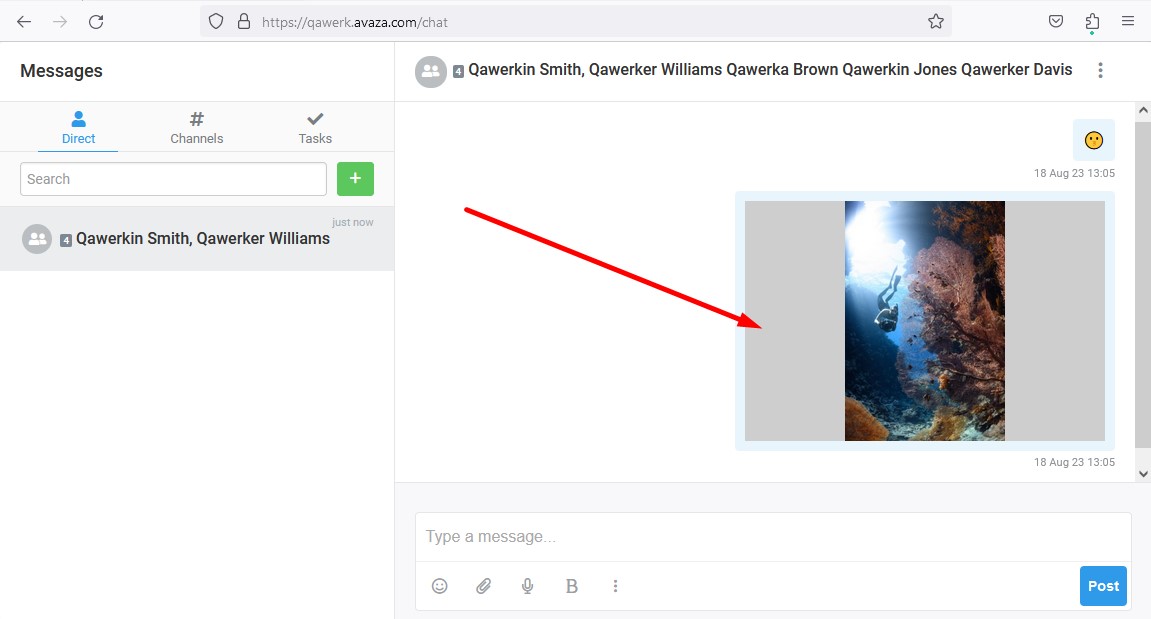
When sending vertical image in chat, gray fields are shown
Severity:
Trivial
Precondition:
- Download a vertical image to your computer.
- Log in.
Steps to Reproduce:
- Click the “Contacts” button in the side menu.
- Click the “Add user” button.
- Fill out the following fields: Email Address, First Name (more than 20 characters), and Last Name (more than 20 characters).
- Mark only the “Chat User” checkbox.
- Click the “Save” button.
- Navigate to the “Chat” button in the side menu.
- Click the “+” button.
- Select the added user.
- Click on the arrow.
- Click the “Upload” button in the chat’s bottom menu.
- Choose a vertical picture from your computer.
- Click the “Open” button.
- Click the “Upload” button.
Environment:
Windows 10 Pro
Chrome v.115.0.5790.171, Firefox v.116.0.2, Microsoft Edge v.115.0.1901.203
Actual Result:
When sending a vertical image in the chat, gray fields are shown.
Expected Result:
Images should not display any additional gray boxes.
To ensure the software's reliability and functionality, I recommend conducting comprehensive testing against both functional and non-functional requirements. Utilizing tools like automated testing frameworks and manual exploratory testing can help identify and prevent issues.